Tutorial
How to Install ImageMagick
To install ImageMagick on Linux Operating system one can run the following command:
$sudo apt-get install imagemagick php-imagemagick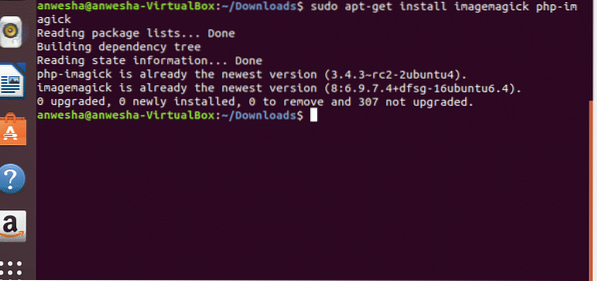
The sudo command, also known as the superuser do or switch user do, allows a user with proper permissions to execute a command as the administrator of the system. apt-get is the command line tool for handling packages. When apt-get is followed by install then it is used to install packages. There can be many packages mentioned following the install tool. A specific version of package can be specified to get installed by writing the package name with an equals (=) sign and the version of the package that is required. For installing ImageMagick software two packages i.e. imagemagick and php-imagick are chosen to get installed.
How to Display an Image
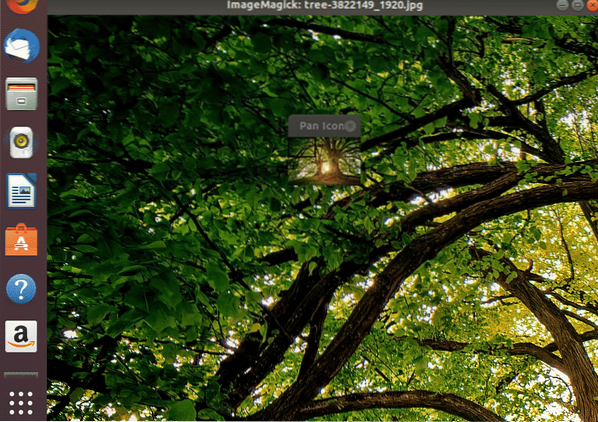
The basic function or tool in ImageMagick is display. The syntax is as follows:
$display image_name.extensionAlways one has to navigate to the directory through the terminal when displaying the image. It can be done by:
$cd pathname$cd /home/USER/Downloads/
Sets to the folder where the image to be displayed is located
$displayShows all the images present in the folder that can be displayed
$display tree-3822149_1920.jpgDisplays the image named tree-3822149_1920.jpg

How to Backup an Image
Always one must make a copy of the image before doing any changes on it. Always the basic conversions like blur, crop, filter etc. must be performed on the copy of the original image. This is a safe programming practice that must be followed by everyone. In case if there has been any anomaly when performing the conversions, original image is still intact.
The copy of the original image can be formed with the following certain steps.
$mv filename.extension filename.extension.old$cp filename.extension.old filename.extension.
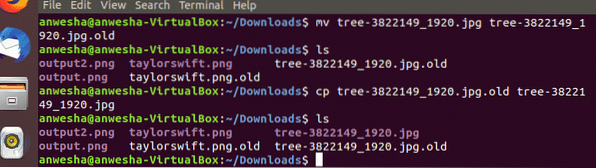
mv stands for move. This command is used to move one or more files or directories from one place to another file system. It can also be used to rename the file from one name to another.
$mv old_file_name new_file_nameIn the above example the file name tree has been renamed in Line 1 of the command
cp stands for copy. This command is used to copy files or group of files or directory. It creates an exact image of a file on the disk with different file name.
$cp filename1 filename2In the above example a copy of the same file with different file name is created in Line 3.
How to Use Sharpen Command
For any basic conversions in ImageMagick the convert command, which specifies the type of conversion and other arguments along with, can be used. Convert command contains many functions, and list of these functions can be located in the official site of ImageMagick.
Most of the images retrieved from archaeological findings are not clear due to the harshness of time and nature, most of the time the information caught on by the CCTV camera is not clear for surveillance purpose and many of the times one has a blurry pic which needs some sharpening before posting on the social media. Sharpen command is used in the following format.
The syntax for the sharpen command is as follows:
$sharpen radius x sigmaRadius is an integer value and always must be two times of sigma. For faster computation it must be minimum 1. “The most important factor is the sigma. As it is the real control of the sharpening operation.” [1] The 2-D Gaussian is given by: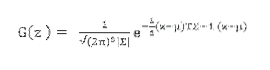
Where z is a column vector containing the x and y coordinate in the image. One can keep on changing the variance keeping the number of pixels the same and get different images. So, sigma is a very important factor for determining the outlook of the image.
To perform the sharpen operation on an image first blur the image using blur operation which takes the same arguments as sharpen command.
$convert -blur 0x4 imagename.extension output.extension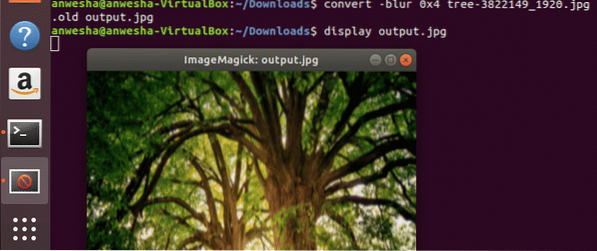
Then sharpening the image can be done in the following way:
$convert -sharpen 0x4 imagename.extension output.extension
Then finally use the display command to show the image on the screen.
$display output.jpg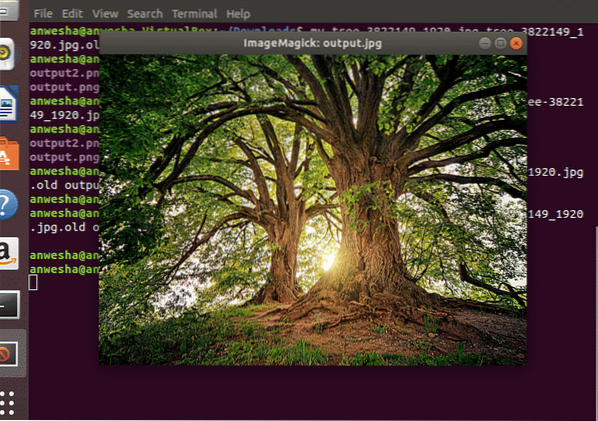
Conclusion
The ImageMagick software has many functions to perform. From resizing to blurring to painting there are many functionalities offered. The sharpen command is helpful in reducing the blur effect of an image to help people to recognize its content. This is quite useful in many use cases such as identifying criminals, recovering photos taken with an old camera.
References
1) ImageMagick v6 Examples - Blurring and Sharpening Images


