The scientific or numerical visualization tasks can be done in python easily using various Python libraries, such as Plotly, Matplotlib, Seaborn, ggplot, PyQt, etc. PyQtGraph is a useful module of the PyQt library to create a graph. This module can create graphs very fast. 2D and 3D graphics can be created by using this module. How to use the PyQtGraph module to draw different types of graphs has shown in this tutorial.
Prerequisites
You have to install the PyQtGraph module in your system before creating the graph. Run the following command to install PyQtGraph by using pip3.
$ sudo pip3 install pyqtgraphDraw Line Graph
A line chart or line graph is a chart that displays information by using a series of data plots. PlotWidget widget is used to create all plots of PyQtGraph. This widget contains a canvas on which any plot can be added or removed.
Example-1: Draw a simple line graph
The following script shows the way to draw a line graph using random numbers. range() function is used to generate 10 sequential numbers that are used for x-axis values. The random module of python is used to generate 10 random integer numbers used for y-axis values. plot() method is used to draw each plot of the line graph based on the values of the x-axis and y-axis. When the code is executed in interactive mode, then sys.flags.interactive flag will be True. If this flag's value is not True, then it indicates that the Qt event loop does not require to run because the REPL (Run, Evaluate, Print, Loop) already has an event loop.
# Import random module# Import random module
import random as rd
# Import PyQtGraph Module
import pyqtgraph as pg
# Import QtGui from the PyQtGraph Module
from pyqtgraph.Qt import QtGui
# Generate x-axis values
x = range(0, 10)
# Generate y-axis values
y = [ ]
for i in range(0, 10):
n = rd.randint(0, 20)
y.append(n)
# Initialize the plot
plt = pg.plot()
# Set the label for x axis
plt.setLabel('bottom', 'Sequentially Generated Values')
# Set the label for y-axis
plt.setLabel('left', 'Randomly Generated Values')
# Set horizontal range
plt.setXRange(0, 10)
# Set vertical range
plt.setYRange(0, 20)
# Set the title of the graph
plt.setTitle("Simple Line Graph")
# Set the plot values
line = plt.plot(x, y)
# Main method
if __name__ == '__main__':
# Import sys module
import sys
# Start Qt event loop unless running in interactive mode
if sys.flags.interactive != 1:
QtGui.QApplication.instance().exec()
Output:
The following similar line graph will be appeared after executing the above script. The graph will vary in each execution for the random values.

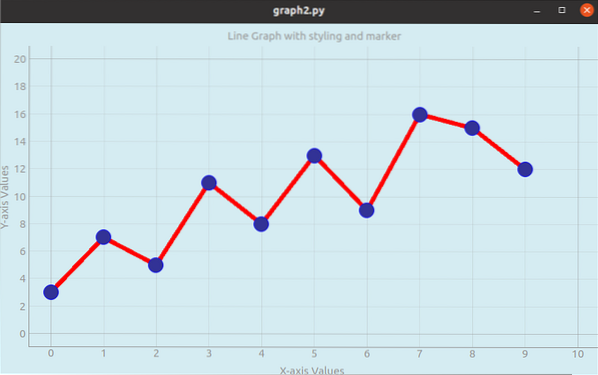
Example-2: Draw a Line graph with styling and marker
The following script shows how to draw a stylist line graph based on the values of a python list. mkPen() function is used to set the color and width of the line. 'o' is used as the marker in the graph, and the color and width of the marker are set by using symbolPen and symbolSize properties.
# Import PyQtGraph Module# Import PyQtGraph Module
import pyqtgraph as pg
# Import QtGui from the PyQtGraph Module
from pyqtgraph.Qt import QtGui
# Generate x-axis values
x = range(0, 10)
# Generate y-axis values
y = [3, 7, 5, 11, 8, 13, 9, 16, 15, 12]
# Initialize the plot
plt = pg.plot()
# Set the label for x axis
plt.setLabel('bottom', 'X-axis Values')
# Set the label for y-axis
plt.setLabel('left', 'Y-axis Values')
# Set horizontal range
plt.setXRange(0, 10)
# Set vertical range
plt.setYRange(0, 20)
# Set the title of the graph
plt.setTitle("Line Graph with styling and marker")
# Set the background color
plt.setBackground('d5ecf2')
# Set the plot values with pen color and width
line = plt.plot(x, y, pen=pg.mkPen('r', width=6), symbol='o', symbolPen='b', symbolSize=20)
# Add legend
plt.addLegend()
# Show grids
plt.showGrid(x=True, y=True)
# Main method
if __name__ == '__main__':
# Import sys module
import sys
# Start Qt event loop unless running in interactive mode
if sys.flags.interactive != 1:
QtGui.QApplication.instance().exec_()
# Main method
if __name__ == '__main__':
# Import sys module
import sys
# Start Qt event loop unless running in interactive mode
if sys.flags.interactive != 1:
QtGui.QApplication.instance().exec_()
Output:
The following line graph will be appeared after executing the above script.
Draw Bar Graph
A set of data can be visualized by using a bar graph. A simple bar creates by comparing the list of data with a related range of data. BarGraphItem class is used to create the bar graph by using PyQtGraph.
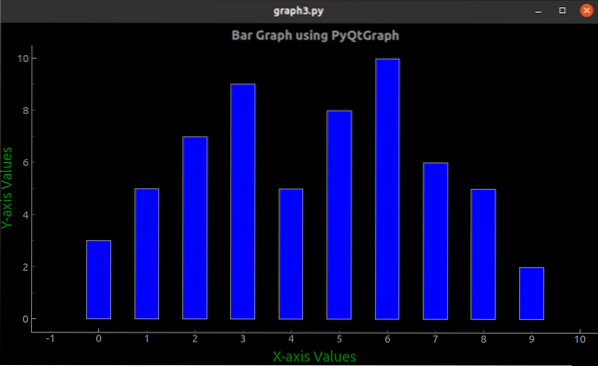
Example-3: Draw a bar graph
The following script shows how to draw a bar graph based on the values of a NumPy array. BarGraphItem is used to draw a bar graph with blue color and a width value of 0.5.
# Import PyQtGraph module# Import PyQtGraph module
import pyqtgraph as pg
# Import QtGui from the PyQtGraph Module
from pyqtgraph.Qt import QtGui
# Import NumPy Library
import numpy as np
# Generate x-axis
x = np.arange(0, 10)
# Generate y-axis
y = np.array([3, 5, 7, 9, 5, 8, 10, 6, 5, 2])
# Set bar chart values and brush color and width
bg = pg.BarGraphItem(x=x, height=y, width=0.5, brush='b')
# Define the plot variable
plt = pg.plot()
# Set the label for x axis
plt.setLabel('bottom', '
X-axis Values
')# Set the label for y-axis
plt.setLabel('left', '
Y-axis Values
')# Set the bar title
plt.setTitle('
Bar Graph using PyQtGraph
')# Add the bar chart items
plt.addItem(bg)
# Main method
if __name__ == '__main__':
# Import sys module
import sys
# Start Qt event loop unless running in interactive mode
if sys.flags.interactive != 1:
QtGui.QApplication.instance().exec_()
Output:
The following bar graph will be appeared after executing the above script.
Conclusion
Creating three different types of graphs with random values, list items, and NumPy array have shown in this tutorial by using three simple examples. The readers will be able to use the PyQtGraph module for implementing line and bar graphs after reading this tutorial.


