The best way to crop is to create an object and shrink the picture to the object.
When it comes to Inkscape, cropping is not the exact concept as expected from other drawing software. The reason is that Inkscape uses vector graphics. In general, this should not make a difference but because everything is an object you cannot in general “crop” a picture. Instead, you need to select the objects that you want to remove from the picture. Here is a description of how you can achieve a similar result. You also have many other options available to you. The method that is most similar to how you do it in GIMP is at the bottom, though GIMP has many other features for this kind of jobs. Note that InkScape is designed to work with vector graphics which means that your regular JPEG or PNG files will be unchanged or converted to SVG. The conversion process is destructive but can sometimes lead to beautiful art.
Start by making the objects. (drawing several shapes… )
The first thing you want to do is create objects to manipulate in your document. There are two ways you can do this, the most obvious is to use the drawing tools to draw a funny animal. To look nice without being just boxes and circles, play with the Bezier tool. This tool draws a line that bends according to how you set the endpoints along the lines. Built-in to InkScape, there are many tutorials to follow. Look them up if you feel you need to practice the basics.
Cropping as a concept is not quite correct
As stated earlier, cropping is not what you are going to do, instead you are going to choose the objects you want to keep and make a new file with them. If you have them placed at the right position on your sketch, you will be able to make a new picture out of those parts.
Next pick the objects using the big arrow.
Once you have a picture, it contains many objects. The simplest way to select the pieces you need, is to use the rectangular select tool. This will not always be possible though, if that is the case you need to hold down Ctrl while clicking on an object at a time.
Optionally group the objects.
Now that you have all the objects selected, you copy the objects, open a new document and paste the selection. When you are done, save the new picture. You can also choose to export to PNG format.
If you want to cut a non-vector graphics picture, then you can use 'clip'

This tool uses a shape that you have created and cuts the other object according to that shape. Many times, when you want to do this, you have a jpeg or png picture. In this case you have a few other options. The simplest is to use a rectangle and place it over the image you want to cut. The shape, in this case a rectangle, can be placed anywhere over the picture you are trying to cut out. This includes using snap features so that you grab the corner of your picture or find the centre if that suits your needs better.
You also have the ability to cut out the exact shape that you need. The other simple shapes available are circles, ellipses and stars. The stars can be tweaked in so many ways that they look completely different from stars but still are circular and have a regular pattern around the shape. The biggest difference between this function and cropping is that cropping is usually rectangular and nothing else, with clipping and the other binary functions you can cut any shape around you picture. Taking your portrait and cutting a circle around it is the most common use-case for this.
The final result will have features active depending on what your document properties are. Transparency is achieved by having the Alpha channel set to zero in your document. For a more detailed cropping, you should use the bezier pen and the edit paths by nodes tool together. The two tools are used in sequence, first you draw a rough draft around the shape you want to crop. You then use the edit path tool to fine tune the line. Since the line is a collection of Bezier curves, you need to set the nodes to smooth where needed. The curves can then and bend the curves along the edge of the shape you want to cut out. This work is simple in principle but time consuming since you need to zoom in to see the detail and zoom back out to see where to continue. If you rush it, you will end up with odd edges where sharp turns look round and vice versa. Once the path is well-defined around your figure you go back and select both the figure and the background and then choose Clip->mask. This will end up leaving anything outside the figure transparent and the rest will contain the picture.
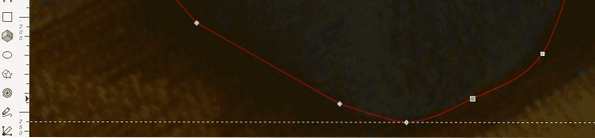
If you look at the panda in the picture you will see a red line around it, this is the initial bezier curve. When you zoom in, you will see that the line is not very exact. To continue, you need to choose the 'Edit paths by nodes' tool by clicking on the button or pressing F2. While editing the line you will notice that you have squares and diamonds along the line, these are nodes. Each node is used as anchors for changing your bezier curve. The shapes have a meaning, the squares means there is corner under it, the diamonds denote a curve. You can change the mode of a node by clicking on it while holding down Ctrl.
This method works but InkScape is not ideal for this purpose, unless you are very comfortable with bezier curves. In short, you can do this job here if you are in InkScape already but if you hope to get the best results you should consider other tools like GIMP.


