For Linux OS, there is a tool available, known as chroot, that provides an easier and quicker way of sandboxing an application. With chroot, you can install and test any application without affecting the rest of the system.
This article will explain how to use chroot in Debian 10 Buster, along with a few examples. For explanation, we will create a chroot environment for the bash and some of the commands, such as the “ls,” “ip,” and “pwd” commands.
What Is chroot?
The chroot tool is a command in Linux that changes the root directory of an application to another directory. Processes running in this new root directory cannot access the files outside of it. Hence, it isolates the operations of applications from the rest of the system.
How Does chroot Work?
Chroot works by copying the application and all its executables and dependencies inside the alternate root directory. It then runs the application from within this alternate root directory, causing the application to consider it as the original root directory. The root directory is the top-most directory in the hierarchy, and no application can reach higher than this directory, so this is how chroot isolates the application from the rest of the system.
Use Cases
- Setting up a test environment
- Running 32-bit programs on a 64-bit system
- Running older program versions on the latest OS version
- Password recovery
Syntax
The following is the basic syntax for the chroot command:
$ chrootFollow the below steps to use the chroot command in Debian to set up a chroot environment.
1. Create an Alternate Root Directory
First, create an alternate root directory to be used for the chroot environment.
$ sudo mkdir ~/new_rootThe above command will create the new_root directory under the Home directory, which will be used as the root directory in the chroot environment.
2. Add Essential Directories
Create the “bin,” “lib,” and “lib64” directories under the ~/new_root directory:
$ sudo mkdir -p ~/new_root/bin,lib,lib643. Copy Program Binaries
Everything required to run an application in the chroot environment needs to be in the alternate root directory. In this article, we will create a chroot environment for the bash and some commands, including the “ls,” “ip,” and “pwd” commands. Therefore, we will copy the binaries from the /bin directory to the alternate ~/new_root/bin directory. To locate the binaries of the commands, use the which command:
$ which bash ls ip pwd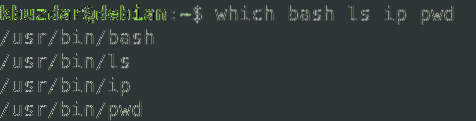
Next, copy the binaries of the commands to the ~/new_root/bin directory.
$ sudo cp -v /bin/bash,ls,ip,pwd ~/new_root/bin
4. Copy Program Dependencies
We will also need to figure out what dependencies our program needs. First, we will need to find what those dependencies are, and then we will copy them to the ~/new_root/lib directory.
Copying Dependencies for bash
First, find out the dependencies for the bash program:
$ ldd /bin/bash
Then, copy these dependencies to the ~/new_root/lib directory.
$ cp -v /lib/x86_64-linux-gnu/libtinfo.so.6,libdl.so.2,libc.so.6 ~/new_root/libFor the /lib64 files, copy them to the ~/new_root/lib64 directory.
$ cp -v /lib64/ld-linux-x86-64.so.2 ~/new_root/lib64Copy Dependencies for ls Command
First, find out the dependencies for the ls command:
$ ldd /bin/ls
Then, copy these dependencies to the ~/new_root/lib directory.
$ sudo cp -v /lib/x86_64-linux-gnu/libselinux.so.1,libc.so.6,libpcre.so.3,libdl.so.2,libpthread.so.0 /lib64/ld-linux-x86-64.so.2 ~/new_root/lib
For the /lib64 files, copy them to the ~/new_root/lib64 directory.
$ sudo cp -v /lib64/ld-linux-x86-64.so.2 ~/new_root/lib64Copy Dependencies for ip Command
First, find out the dependencies for the ip command:
$ ldd /bin/ip
Then, copy these dependencies to the ~/new_root/lib directory.
$ cp -v /lib/x86_64-linuxgnu/libselinux.so.1,libelf.so.1,libmnl.so.0,libcap.so.2,libdl.so.2,libc.so.6,
libpcre.so.3,libz.so.1,libpthread.so.0 ~/new_root/lib
For the /lib64 files, copy them to the ~/new_root/lib64 directory.
$ sudo cp -v /lib64/ld-linux-x86-64.so.2 ~/new_root/lib64Copy Dependencies for pwd Command
First, find out the dependencies for the pwd command:
$ ldd /bin/pwd
Then, copy these dependencies to the ~/new_root/lib directory.
$ sudo cp -v /lib/x86_64-linux-gnu/libc.so.6 ~/new_root/libFor the /lib64 files, copy them to the ~/new_root/lib64 directory.
$ sudo cp -v /lib64/ld-linux-x86-64.so.2 ~/new_root/lib64To view all the directories in the alternate root directory, use the following command:
$ ls -R
5. Switch to Alternate Root Directory
Now, we are finally prepared to switch to our new chroot environment. To change the root directory, run the following command in the shell with root privileges:
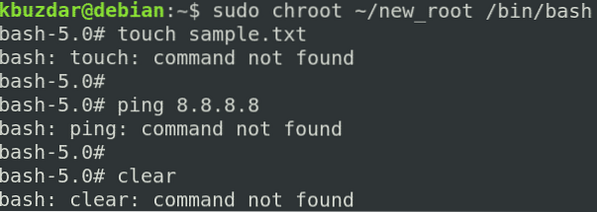
$ sudo chroot ~/new_root /bin/bashWhere ~/new_root is our alternate root directory and /bin/bash is the application that we have used to set up the chroot environment.
After running the above command, you will see that the bash prompt has changed to bash-x.y which in our case is bash-5.0 (where 5.0 is the bash version number).
Note: you may encounter the following error after running chroot command, as I did:

If this error occurs, check that you have added all the libraries and executables related to the required program to the new root directory.
After entering the chroot environment, you will only be able to access the file within it. Try running the commands you have set up for your chroot environment, including some built-in commands. You can find the built-in commands by running the help command in the shell.

You can see we have tried the “ls,” “pw,” and “ip” commands, and all of them succeeded. If we run any command other than these three commands and the built-in commands, the command will fail, as we have not set it up for the chroot environment. As you can see in the following screenshot, we have tried running the “touch,” “ping,” and “clear” commands, and all of them failed.
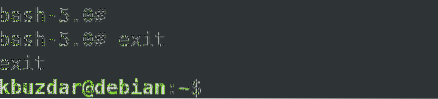
6. Exit chroot
To exit the chroot environment, use the exit command.
Conclusion
In this article, you have learned what chroot is and how it works in Linux. This article showed you step-by-step how to use chroot in Debian 10 Buster to create a chroot environment for bash and other commands. Now, you should be comfortable using the chroot command to change the root directory of a process and its sub-processes and isolating them from the rest of the system.

