However, most WordPress users are only familiar with its graphical workflow; very few people have explored its terminal side.
This tutorial will introduce you to WP-CLI, a command-line tool for managing WordPress sites.
Let us dive into the world of WP-CLI:
How to Install WP-CLI
Installing WP-CLI is relatively easy. The tool is in the form of a PHP archive which you can download and execute.
Start by downloading the archive using wget or cURL as:
wget https://raw.github.com/wp-cli/builds/gh-pages/phar/wp-cli.pharFor cURL users, use the command:
curl -O https://raw.githubusercontent.com/wp-cli/builds/gh-pages/phar/wp-cli.pharOnce downloaded, make the file executable and move the archive to a PATH in your system such as /usr/local/bin as:
chmod +x wp-cli.phar sudo mv wp-cli.phar /usr/local/bin/wpTo confirm that you have successfully installed it and it's working, use the command:
wp --infoThis should give you an output similar to the one shown below, indicating that you've installed the tool successfully.
NOTE: Ensure you have PHP installed; otherwise, you will get an env error.
OS: Linux 4.4.0-19041-??? Mon Sep 01 13:43:00 PST 2021 x86_64 Shell: /bin/bash PHP binary: /usr/bin/php7.3 PHP version: 7.3.19-1~deb10u1 php.ini used: /etc/php/7.3/cli/php.ini WP-CLI root dir: phar://wp-cli.phar/vendor/wp-cli/wp-cliWP-CLI vendor dir: phar://wp-cli.phar/vendor
WP_CLI phar path: /home/root
WP-CLI packages dir:
WP-CLI global config:
WP-CLI project config:
WP-CLI version: 2.4.0
How to Use WP-CLI
WP-CLI is a terminal or command line alternative to the wp-admin dashboard. Hence, there is a WP-CLI command for all the tasks you can perform with the WordPress admin web interface.
Let us learn how to use them, but before that:
How to enable WP-CLI Bash Completion
The WP-CLI tool allows you to enable the Bash Completion Feature to view and autocomplete commands using the TAB key. Let us enable it to make our tasks easier.
We begin by downloading the Bash Completion Script with the command:
wget https://github.com/wp-cli/wp-cli/raw/master/utils/wp-completion.bashTo load the Bash Completion Script on every terminal session, let us edit our bash profile config file. Enter the following entry in the .bashrc file.
source $HOME/wp-completion.bashNext, reload the bash profile to load all the changes:
source .bashrcOnce completed, you should have Bash Completion enabled. If you are using another shell, perhaps ZSH, check the official documentation for information on how to enable completion.
To test if it is working, enter the command wp + TAB. That should give you all available commands as:
cache core eval-file languageoption rewrite shell term cap
cron export maintenance-mode package
role sidebar theme cli db
help media plugin scaffold
site transient comment embed i18n
menu post search-replace super-admin
user config eval import network
post-type server taxonomy widget
Installing WordPress with WP-CLI
Before we get to the WordPress admin, we have to install WordPress first. Let's discuss how to install it using WP-CLI.
NOTE: Ensure you have a web server and MySQL database installed.
First, log in to MySQL shell and create a database
sudo mysql -u root -pEnter Password:
Next, we need to create a database:
CREATE DATABASE wp;Next, we need to create a user and grant all privileges as:
CREATE USER "wpadmin" IDENTIFIED BY "password";GRANT ALL PRIVILEGES ON wp.* TO wpadmin;
FLUSH PRIVILEGES;
The next step is to download the WordPress installation file. For this, we are going to use the /var/www/html directory.
Change to /var/www/html
cd /var/www/html/To ensure we have r/w permission to that directory, chown the www-data user created by apache as:
sudo chown -R www-data .sudo chown www-data:www-data .
Next, download WordPress using WP-CLI. You will need to invoke the wp command as www-data as the user has to write permission to the /var/www/html directory. Avoid using root.
sudo -u www-data wp core downloadThis will download WordPress and extract it into the current directory. Ignore the error shown below:
Downloading WordPress 5.6.1 (en_US)…Warning: Failed to create directory '/var/www/.wp-cli/cache/': mkdir(): Permission denied.
md5 hash verified: e9377242a433acbb2df963966f98c31d Success: WordPress downloaded.
Confirm you have WordPress installed by listing the contents of the /var/www/html directory:
$:/var/www/html$ ls -l total 240-rw-r--r-- 1 www-data www-data 405 Feb 5 22:22 index.php
-rw-r--r-- 1 www-data www-data 19915 Feb 5 22:22 license.txt
-rw-r--r-- 1 www-data www-data 7278 Feb 5 22:22 readme.html
-rw-r--r-- 1 www-data www-data 7101 Feb 5 22:22 wp-activate.php drwxr-xr-x 1 www-data www-data 4096 Feb 5 22:23 wp-admin
-rw-r--r-- 1 www-data www-data 351 Feb 5 22:23 wp-blog-header.php
-rw-r--r-- 1 www-data www-data 2328 Feb 5 22:23 wp-comments-post.php
-rw-r--r-- 1 www-data www-data 2913 Feb 5 22:23 wp-config-sample.php drwxr-xr-x 1 www-data www-data 4096 Feb 5 22:23 wp-content
-rw-r--r-- 1 www-data www-data 3939 Feb 5 22:23 wp-cron.php drwxr-xr-x 1 www-data www-data 4096 Feb 5 22:24 wp-includes
Next, we need to generate the WordPress configuration file and add the relevant information. Use the command below and replace the values appropriately.
$:/var/www/html$ sudo -u www-data wp core config --dbname="wp" --dbuser="wpadmin" --dbpass="password" --dbhost="localhost" Success: Generated 'wp-config.php' file.Once we have all the relevant configuration setup, we can finally run the installer setting up the WordPress user as:
sudo -u www-data wp core install --url="http://127.0.0.1" --admin_user="admin" --admin_password="password" --admin_email="[email protected]" --title="WP-CLI Tutorial"Success: WordPress installed successfully.
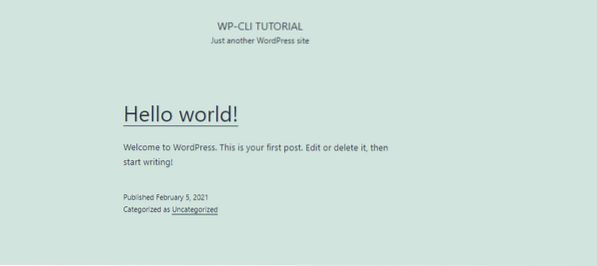
With that, you have WordPress installed on the system. You can test the site by navigating to http://localhost, which should display the default WordPress:
How to Manage a WordPress Site with CLI
Now you have an entire WordPress site installed and managed using WP-CLI. How about we try to perform basic tasks such as installing a plugin.
Install a Plugin with WP-CLI
While still in the WordPress site installation directory (/var/www/html), let us search for a plugin to install. Let us use the Elementor Page Builder as an example:
wp plugin search elementorRunning this command should give you all the possible plugins in tabular form-as shown below:

Cool right? Now let us see how we can install the plugin once we find the appropriate name.
To install it, use the plugin slug as:
sudo -u www-data wp plugin install elementor Installing Elementor Website Builder (3.1.1)Warning: Failed to create directory '/var/www/.wp-cli/cache/': mkdir(): Permission denied.
Downloading installation package from https://downloads.wordpress.org/plugin/elementor.3.1.1.zip…
Unpacking the package…
Installing the plugin…
Plugin installed successfully.
Success: Installed 1 of 1 plugins.
Once we have successfully installed the plugin we need, we can simply activate it using a similar command as:
sudo -u www-data wp plugin activate elementor Plugin 'elementor' activated.Success: Activated 1 of 1 plugins.
Uninstall a Plugin with WP-CLI
If you can install a plugin with WP-CLI, you can uninstall it.
sudo -u www-data wp plugin deactivate elementor Plugin 'elementor' deactivated.Success: Deactivated 1 of 1 plugins.
Once deactivated, you can uninstall it easily as:
sudo -u www-data wp plugin uninstall elementor Uninstalled and deleted 'elementor' plugin.Success: Uninstalled 1 of 1 plugins.
Installing WordPress Themes with WP-CLI
Themes are a common WordPress feature. Let's discuss how to manage them from the command line.
To search for a theme, use the command:
wp theme search astra Success: Showing 2 of 2 themes.+--------+--------+--------+
| name | slug | rating |
+--------+--------+--------+
| Astra | astra | 100 |
| Astral | astral | 100 |
+--------+--------+--------+
Once you have the theme you wish to install, use the command as shown below:
sudo -u www-data wp theme install astra Installing Astra (3.0.2)Warning: Failed to create directory '/var/www/.wp-cli/cache/': mkdir(): Permission denied.
Downloading installation package from https://downloads.wordpress.org/theme/astra.3.0.2.zip…
Unpacking the package…
Installing the theme…
Theme installed successfully.
Success: Installed 1 of 1 themes.
Once you install the theme, you can activate it with the command:
sudo -u www-data wp theme activate astra Success: Switched to 'Astra' theme.To install it from a zip file, use the command shown below:
sudo -u www-data wp theme install oceanwp.2.0.2.zip Unpacking the package…Installing the theme…
Theme installed successfully.
Success: Installed 1 of 1 themes.
Uninstalling a WordPress theme with WP-CLI
To remove a theme with CLI, first, activate another theme and then uninstall the one you want to uninstall using the command:
sudo -u www-data wp theme activate oceanwp && sudo -u www-data wp theme uninstall astra Success: Switched to 'OceanWP' theme.Deleted 'astra' theme.
Success: Deleted 1 of 1 themes.
View Themes and Plugins
To list all the themes and plugins in the WordPress instance, use the commands shown below:
wp theme listwp plugin list
This command should list available themes and plugins, respectively, as shown below:
+-----------------+----------+--------+---------+| name | status | update | version |
+-----------------+----------+--------+---------+
| oceanwp | active | none | 2.0.2 |
| twentynineteen | inactive | none | 1.9 |
| twentytwenty | inactive | none | 1.6 |
| twentytwentyone | inactive | none | 1.1 |
+-----------------+----------+--------+---------+
+---------+----------+--------+---------+
| name | status | update | version |
+---------+----------+--------+---------+
| akismet | inactive | none | 4.1.8 |
| hello | inactive | none | 1.7.2 |
+---------+----------+--------+---------+
Updating Themes and Plugins with WP-CLI
You can also update plugins and themes using the CLI. For example, to update all themes, use the command;
sudo -u www-data wp theme update --allSuccess: Theme already updated.
NOTE: You can specify the specific theme name to update a single theme.
Updating WordPress from CLI
When the WordPress team releases a new version, you can update from the command line with a few single commands:
The first step is to update the site's files first as:
sudo -u www-data wp core updateNext, we need to update the database as:
sudo -u www-data wp core update-dbSuccess: WordPress database already at latest db version 49752.
Creating a WordPress post with CLI
To create a post using WP-CLI, use the command below:
sudo -u www-data wp post create --post_type=page --post_title="WP-CLI Tutorial" --post_date="2021-02-04"Success: Created post 5.
Deleting a Post
To delete a post, specify its numerical identifier as:
sudo -u www-data wp post delete 5Success: Trashed post 5.
Conclusion
This guide has shown you how you use the powerful WP-CLI to manage a WordPress site from the command line. If you want to learn more about how to work with WordPress CLI, consider the documentation resource provided below:
https://make.wordpress.org/cli/handbook/


