One of the upsides to using a Linux system is that we can boot using Live media, which makes it possible to test a specific distribution without altering the primary structure. Using bootable media such as USB drives, we can burn an iso image and boot from it or even use it to install the OS.
Although there are various ways to create bootable media-UnetBootIn, dd (Unix), Rufus, Disk Utility, etcetera, -having a simple and cross-platform tool can be massively advantageous.
This tutorial will discuss the Etcher tool, a cross-platform tool you can use to create bootable media for Linux systems:
What is BalenaEtcher
Etcher, commonly called BalenaEtcher, is a powerful open-source tool used to flash OS images to SD cards and USB Flash drives. Etcher is cross-platform and easy-to-use, meaning you can use it to flash an image from Linux, Windows, or Mac.
Built with the latest and stable technologies (Electron JS), Etcher is extremely fast and efficient. It also provides a safe fallback to flash images to removable drives without the risk of accidentally flashing images to hard-disks. Etcher also supports USB boot-Flashing protocol, allowing you to flash images directly to devices like the Raspberry Pi.
How to Install Etcher GUI on Ubuntu
Installing Etcher is straightforward because the tool provides pre-built installers for all the major Operating Systems.
Navigate to the Etcher Download Page and select the installer you want based on your operating system:
https://www.balena.io/etcher/
Add the etcher Debian repository and verify the GPG key using the commands:
echo "deb https://deb.etcher.io stable etcher" | sudo tee /etc/apt/sources.list.d/balena-etcher.listsudo apt-key adv --keyserver hkps://keyserver.ubuntu.com:443 --recv-keys 379CE192D401AB61
Next, update the repositories using the command:
sudo apt-get updateFinally, install BalenaEtcher with the command:
sudo apt-get install balena-etcher-electronHow to Install Etcher CLI on Ubuntu
If you are running a server environment or accessing your system via SSH, you will mostly not require to use a GUI interface. In such cases, you can install etcher-CLI, which you can use in the command line.
Enter the commands:
curl -sL https://deb.nodesource.com/setup_15.x | sudo -E bash -sudo apt-get install -y nodejs
Once you have Nodejs installed, use the Node Package manager to install etcher-CLI as shown:
sudo npm install -g etcher-cliYou can also download etcher-CLI installers from the GitHub release page provided below:
https://github.com/balena-io/balena-cli/releases/tag/v12.36.1
How to Use Etcher to Create Bootable Live Media
Whether you're installing Ubuntu 20.10, Manjaro, Raspbian, Fedora, and many other distributions, Etcher can help you create bootable media quickly.
Let discuss how to create bootable media using this tool:
Flashing from File
The first step is to download the OS image you want to use on your computer. For our test case, we will use Manjaro Linux.
In the next step, launch the Etcher tool you installed and insert your SD card or USB into your computer.
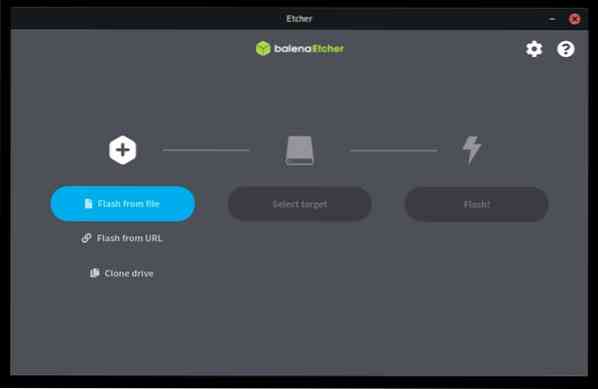
In the main etcher interface, select Flash from the file then selects the image you downloaded.

In the next section, select the drive where you wish to flash the image. If you have multiple drives connected, ensure to choose the appropriate one to avoid accidentally flashing the wrong drive.
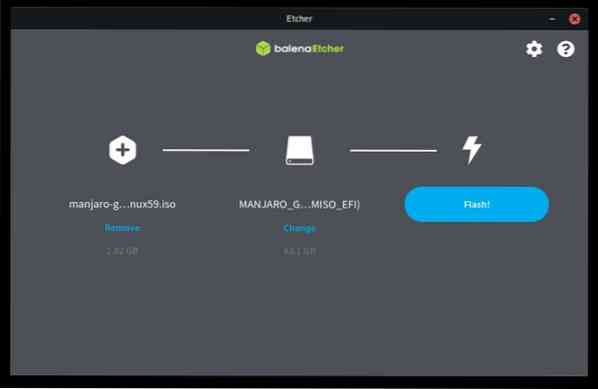
Once selected, click on Flash to start the flash process. The total amount of time required to flash the image to the drive will depend on your drive write speed and the image size. Wait until the flash process completes. The Etcher will verify the image is written correctly and eject the drive upon completion.
Flash from URL
Etcher also allows you to flash images from an URL if you have high-speed internet and do not want to download the image to your PC, either due to insufficient space or other reasons.
To do so, select the Flash from URL option, and enter the URL of the image you wish to use.
Next, select the drive you wish to use and click Flash.

Cloning a Drive
If you have a drive containing an image and would like to copy its content to another disk, you can use the clone option in Etcher to accomplish this task.
Connect the drives you wish to use on your computer. Next, select clone from the Etcher dashboard and choose the main drive you want to clone from. Next, select the target as the empty drive you wish to use and click clone to complete the process.
Flashing Using Etcher CLI
If you are using etcher-CLI, all you need to do is invoke Etcher, followed by the full path of the image you wish to use. Doing this will launch an interactive session that'll allow you to flash the image.
Conclusion
Etcher is a simple and powerful tool that allows you to perform complex operations in a few clicks. Because it's such a useful tool, it has replaced most flashing devices.
Thank you for reading, and have fun experimenting with Etcher. You can also learn more from the official Etcher documentation:
https://github.com/balena-io/etcher/blob/master/docs/USER-DOCUMENTATION.md


