![How to Host a Complete Website on a Raspberry Pi [Guide]](https://phen375questions.com/storage/img/images/how-to-host-a-complete-website-on-a-raspberry-pi-[guide]_14.jpg)
Raspberry Pi is a low-cost single-board computer that requires very low energy to run and can provide a long-time service. Besides many other features of the Pi, it can be used as a web server too. Hence, it's really easy to host a website on Raspberry Pi. If you calculate a regular hosting service provider's costings, you will see how expensive they can be for their service. On the other hand, you can host your site on the Pi for almost free of cost. Also, the features of the Pi are upgrading quite randomly in recent years. So, you can be relaxed to know that the hosting service will only get better with time!
Benefits of Hosting a Website on the Pi
There are a good number of benefits when you host your site on the pi rather than in the regular servers:
- Usual website hosting is expensive.
- Raspberry Pi can easily run on low energy.
- The Pi is portable
- Running a computer server all day will require a lot of energy.
Besides, hosting is a matter of a few minutes when you use a Pi. Moreover, any version of the Pi can help you with the task. As long as you have good internet, you won't have to worry about your website.
Host Website on Raspberry Pi
In this article, I will walk you through all the necessary steps to host a website on the pi. You are recommended to follow this article step by step to host your website and get it online successfully. Be sure to read the whole thing once to get a clear idea of what you need to do before starting the project.
Things You Will Need
It would help if you collected all the following things to host a website on Raspberry Pi successfully:
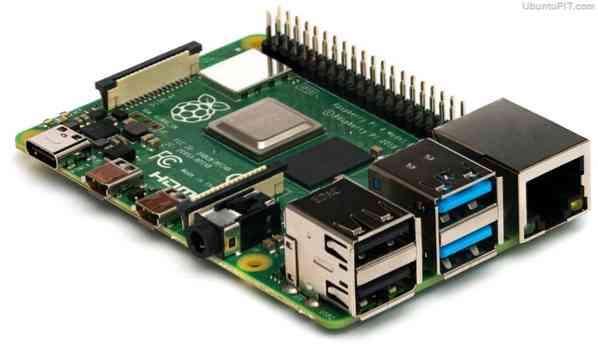
1. Raspberry Pi: Well, no need to say why you need this one before starting the project! Try to get the latest version of the Pi for better performance.
2. A Router or Modem: A router or modem is necessary to get internet service on your Pi. While you can get only one box from ISP from your internet service provider, using a separate router will help you better with multiple devices.
3. Ethernet Cable: This one is the best option if you want your Pi to have a permanent internet connection without any interruptions. You can also use a wireless USB adapter for the task.
Step 1: Setting Up an Operating System on the Pi
Connect the microSD card to your computer and format it. After that, install a backup application so that your card's data is always saved.
Now, you will have to download NOOBS (New Out Of Box Software) on your computer, which is a great distro for Pi beginners. After you are done, load the downloaded software.
After that, insert the SD card into your Pi and connect it with a power supply as well as keyboard, monitor, and mouse. In this part, your Raspberry Pi will start to boot up and direct you to the NOOBS screen. If it doesn't, your power supply or HDMI cables can be loose. So, make sure they are connected properly.
You will get a list of operating systems to choose from. I recommend using Raspbian if you are a complete beginner. Adafruit can also be a good option. OS installation will take a while; make sure it's not interrupted.
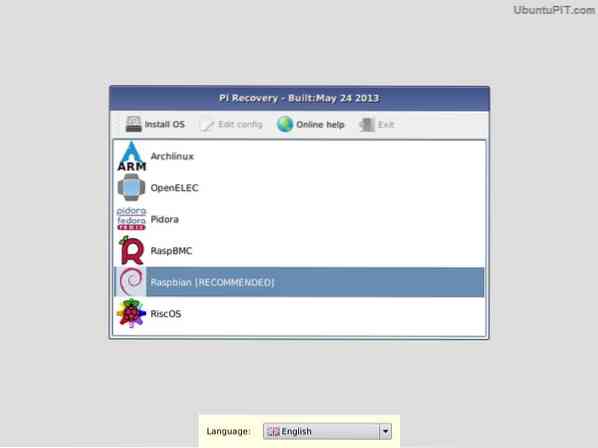
Once the screen says, 'Image applied successfully”, you can click on “return” and the Pi will start to reboot. After it's done, you will see your OS's graphical user interface.
And you are done!
Step 2: Accessing Raspberry Pi Web Server with SSH
In this step, you will need to access the Raspberry Pi web server using SSH. The Secure Shell (SSH) network protocol allows you to make a connection between your Raspberry Pi and computer so that you can transfer data easily. This also allows you to control the Pi with your computer's command line.
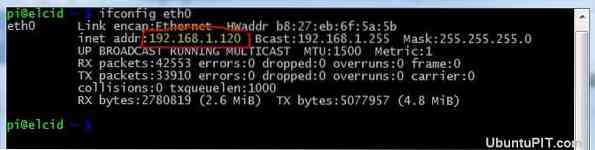
Now, if you have installed the Raspbian OS from the latest NOOBS system, you probably have the SSH pre-installed in your Pi. You will need your Pi's IP address to use the SSH. Use the following command:
sudo ifconfig
You will see the IP address on top of the screen. If you are using an ethernet cable for the internet, the address will start with “eth0” and if you are using Wi-Fi, the address will show as “wlan0”. In both cases, there will be written “inet addr” and an after that. You can use this address to get access to your Pi from your computer.
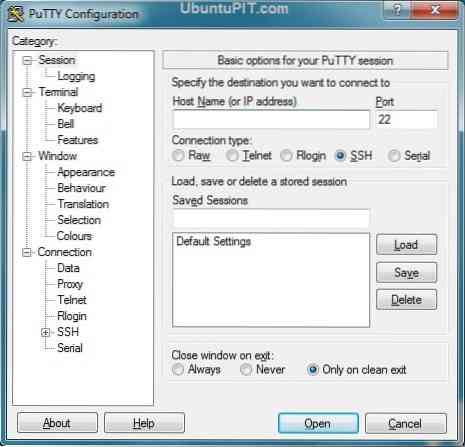
If you are using a Linux or Windows PC, you will have to download and install PuTTY, an SSH client for Windows. You need to enter the IP address in the field and keep the port at 22. If you select to enter, the PuTTY will open a terminal that will ask for your username and password. Enter those, and you are ready to use Pi from your computer.
If you are a Mac user, SSH is already built-in the system. To launch the terminal, you need to type the following command:
ssh pi@IP ADDRESS
For example, if your IP address is “192.167.2.2”, you will write:
ssh [email protected]
Then they will ask for a password, which is by default “raspberry”. You can change the password to something more reliable.
Step 3: Updating Your Pi
After you have accessed your Pi from your computer using SSH, you will have to make sure everything's updated before installing Apache on the server. To do that, write the following code:
sudo apt-get update sudo apt-get upgrade
All the packages and directories will be updated, and your Pi won't disturb when you are trying to install applications like Apache.
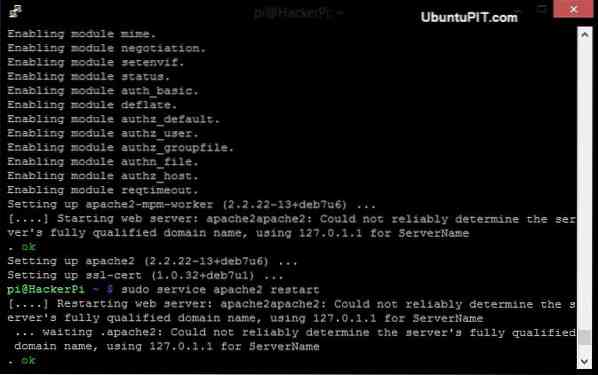
Step 4: Installing Apache
When you are trying to turn your whole Raspberry Pi into something that can host websites, Apache is the software you need. Apache is an open-source and completely free HTTP web server software that helps you host a Raspberry Pi website.
After you have downloaded the Apache, it only requires a single command line to install it, and that is:
sudo apt-get install apache2 php5 libapache2-mod-php5
This command-line does more than just installing the Apache. It also installs the other packages included with it like PHP and the PHP library for Apache. PHP is needed to build a web framework for your website to connect your site to the database.
After the installation is completed, you will have to restart the program to activate the software using the following command line:
sudo service apache2 restart
Then make sure the Apache is running properly:
sudo service apache2 status
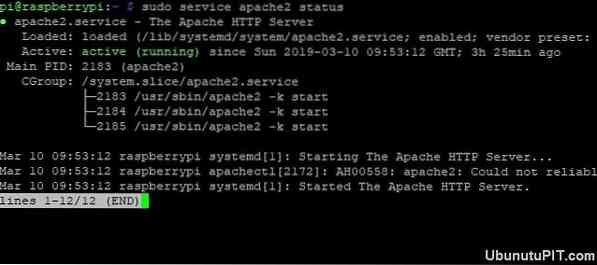
If the window includes a green text written “active(running)”, everything is well. If the server goes down for any reason, use the following code to start it:
sudo service apache2 start
After this part, you will be able to browse the Pi from your computer's browser. Since you are using SSH, you can access the Pi using the IP address in your browser. For example:
http:// 192.167.2.2
You will get a confirmation box then saying that the Apache is successfully installed.
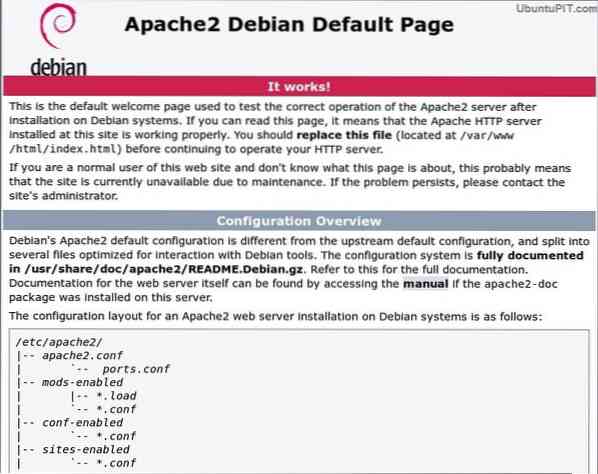
Step 5: Making a Simple HTML Website
Whenever your Raspberry Pi is done with the Apache installation, it will automatically generate a simple HTML website. If you type your IP address on your browser, you will see an already made website with the title of “It Works!” This is a completely basic index.html page that comes preinstalled with the Apache software.

If you want to make changes to it, write the following lines:
cd /var/www/ sudo nano index.html
You can use the IP Address to see your changes.
Step 6: Configuring FTP
You most probably would like to change the index file when you have a website already made. In this case, you will have to create a www directory and install an FTP software using the following lines:
sudo chown -R pi /var/www sudo apt install vsftpd
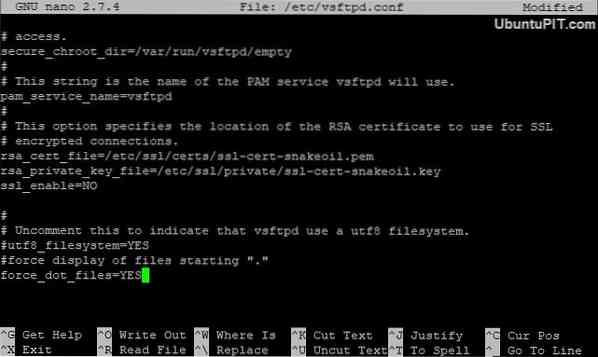
After the vsftpd (“Very Secure FTP Daemon”) is installed properly, you will have to change some configuration settings. Use this code to open the nano config file:
sudo nano /etc/vsftpd.conf
Firstly, change the anonymous_enable from “YES” to “NO”. Then remove the # symbol from the following lines to uncomment:
#local_enable=YES #write_enable=YES
And then add this line at the end:
force_dot_files=YES
this command is used to force the server files' display that starts with a “.” Like .htaccess.
Now, select Ctrl+X to save the changes and exit the terminal. You will get a confirmation box. Press Y+Enter to confirm. At last, restart the FTP using:
sudo service vsftpd restart
This will allow you to connect to your Raspberry Pi and upload the files to the /var/www/html.
Step 7: Getting A Domain Name
While you can visit and edit your website, it's not visible to everyone. To make it accessible for everyone, you need to get it online. This is one of the most important parts when trying to host a website on Raspberry Pi.
Now, anyone can usually access your website from anywhere with an external IP address. But that's not very professional, and people prefer to have a domain name with words. Luckily, you can find many services online like DNSdynamic that will allow you to translate your IP address into a preferable domain name for free.
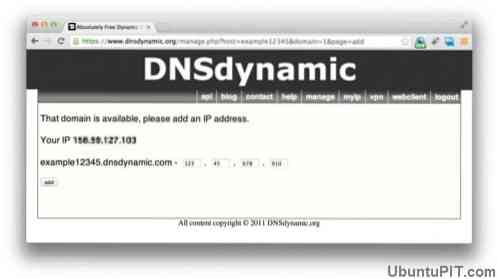
In this case, you will have to register to DNSdymanic, and they will do the rest for you. Soon enough, you will have a human-readable domain name ready for your site.
In case you don't have a static IP address and your ISP changes your address every day, you can use the no-ip server to get a domain name. A no-ip will automatically update your domain name according to the last IP address you had.
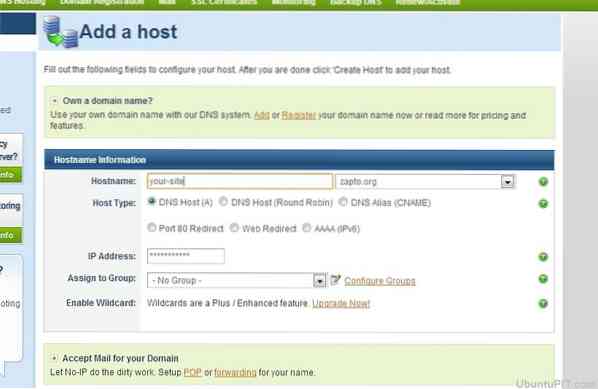
In this case, you will have to make a free account on Set and register a hostname, which will look like “rspi.no-ip.org”. After you are done with that, use these commands to install the server on your Pi.
cd /usr/local/src/ sudo wget http://www.no-ip.com/client/linux/noip-duc-linux.tar.gz tar xf noip-duc-linux.tar.gz sudo rm noip-duc-linux.tar.gz cd noip-2.1.9-1/ sudo make install
After that, the system will start the configuration automatically and then ask for your username and password. Now that everything's set, you need to make sure that the server will start working every time you open the Pi. Write these codes:
cd /etc/ sudo nano rc.local
Then, add the following line in the rc.local file:
sudo noip2
Press CTRL+X to close and save the file. Now, reboot the Pi using this:
sudo reboot
Step 8: Visiting the Website
If you used DNSdynamic, you would need the exact domain name to access your website. You will be able to visit your website by entering the domain name on the browser. The same thing works with a no-ip server.

With a no-ip, you can test if the service is running properly by writing the following command:
sudo noip2 -S
If you get a valid PID, you can be assured that the service is running perfectly.
Step 9: Improving Performance and Security
While hosting a website on the raspberry pi is a rather easy process, it's not the best web server for your site's production-level speed. Hence, you need to find a way to improve the overall performance of your website.
One way can be setting up your server on a USB drive rather than using an SD card. In this way, the time to regularly read and write processes will be deduced. Also, using RAM for write/read file storage can help to increase the speed.
It's better to make a static website with a few pages when trying to host it on Raspberry Pi.
Now, when it comes to security, make sure to change the default password of your Pi to something stronger and hard to guess. You can use the following command to do that:
Passwd
In this way, your website will be safe from anyone familiar with the Raspberry Pi operating system.
Extra Tips: Hosting with LAMP
If you think that an HTML website is too simple for you and needs something more dynamic, an LAMP server configuration can be a great option. A LAMP server supports both PHP and MySQL to make your website more interactive. If you wish to use this system, simply complete the Apache installation part first and install MySQL. Write the following code lines to install both MySQL and other PHP components:
sudo apt install mysql-server php-mysql -y
After this is done, restart the Apache:
sudo service apache2 restart
Then, you need to install the PHP itself:
sudo apt install php -y
After all the installation is done, you will need to restart the Apache again using the command mentioned above. So, your LAMP server is now ready, and you can make a database-driven website with PHP web applications.
Conclusion
So, this is how you host a website on Raspberry Pi. Hosting a complete website is not very difficult with a Pi. But you need to keep in mind that your Pi cannot do many things that normal hosting servers can do. If you have a very basic static website, you should only think about hosting with the Pi. Also, you need to consider the speed level and securities of your site when you are using this method.
I sincerely hope you are successful in hosting your website on the Pi with this article's help. Don't forget to mention your thoughts in the comment section!


