In this post, we will see how to cancel ChkDsk in Windows 10/8 at startup or reboot, after it has been scheduled in Windows. Disk Error Checking in Windows 10/8 is a bit different from the earlier versions of Windows. In Windows 10, Microsoft has redesigned the chkdsk utility - the tool for detecting and fixing disk corruption.
Microsoft introduced a file system called ReFS, which does not require an offline chkdsk to repair corruption - as it follows a different model for resiliency and hence does not need to run the traditional chkdsk utility. The disk is periodically checked for file system errors, bad sectors, lost clusters, etc., during Automatic Maintenance and you now no longer need to re and run it.
But there may be times when you may want to run the command-line version of ChkDsk. In this case, you may bring up CMD, enter the following command to identify bad sectors, attempt recovery of information and fix errors detected, and schedule a ChkDsk to run at boot time:
chkdsk /f /r c:
Cancel ChkDsk in Windows 10
During Windows startup, you will be given a couple of seconds, during which you can press any key to abort the scheduled Disk checking. If this does not help, cancel CHKDSK by pressing Ctrl+C and see if that works for you.
If while it is running, you need to cancel it, then, the only want to do it, is to power down the computer. But then, again on the next restart, the scheduled chkdsk utility will run.
If you want to cancel chkdsk in Windows 10/8 after you have scheduled it, here is how you can do it.
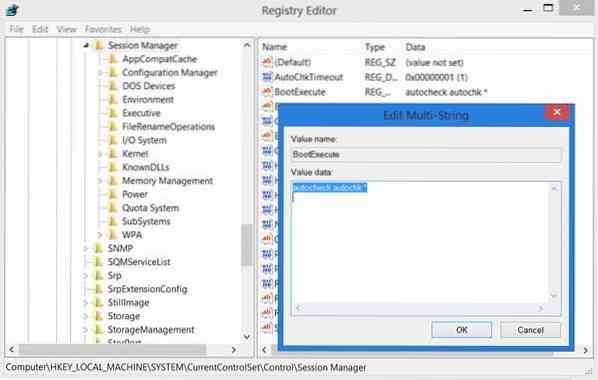
1] Using Registry Editor
Run regedit to open the Registry Editor and navigate to the following key:
HKEY_LOCAL_MACHINE\SYSTEM\CurrentControlSet\Control\Session Manager
Change the BootExecute entry from:
autocheck autochk * /r\DosDevice\C:
To:
autocheck autochk *
Close the Registry Editor and restart your Windows PC. ChkDsk will not run.
2] Using Command Prompt
To cancel a scheduled check disk, open an elevated CMD window, type the following and hit Enter:
chkntfs /x c:
Here c is the drive letter. This should cancel the scheduled chkdsk run.
3] Using Taskkill
First, obtain the PID for the Chkdsk task. Open the Task Manager and look at CHKDSK, Right-click > Details. You will find it here.
Now in an elevated command prompt execute the following:
taskkill /F PID XYZ
Here XYZ is the Process ID for the running CHKDSK.
You should know that it is not a good idea to forcibly stop a manually scheduled chkdsk process that has been executed with parameters like /f and /r.
Have a look at these posts too:
- ChkDsk or Check Disk runs at every startup
- ChkDsk or Check Disk will not run at startup.


