
Linux, like all operating systems, keeps initial/default settings and configuration parameters for its programs in the form of configuration files. These files are used to configure software applications, server processes and OS settings for your system. As Linux administrators, you can edit these files in various ways; one of them being commenting or uncommenting a line of configuration.
When you open a configuration file, you might see one or multiple lines starting with the symbol '#'; this means that this line has been commented out. When the interpreter is reading the contents of a configuration file, it ignores the lines starting with the #. Therefore any feature-enabling line that has been commented, means that the respective feature is disabled on your system.
This is how an enabled(uncommented) feature looks in a configuration file:
# This is an enabled feature FeatureEnable= true
This is how a disabled(commented) feature looks in a configuration file:
# This is a disabled feature #FeatureEnable = true
In this article, we will present an example and see how commenting and uncommenting a line or more can be used to enable or disable a feature on your Linux System. We will run this example on Ubuntu 18 to enable Automatic Login for a user through the custom.conf file located at /etc/gdm3/
Example: Enabling Automatic Login for an Ubuntu User
Let us make use of this commenting and uncommenting feature to enable automatic login for a user on Ubuntu.
- Open the Terminal through Ubuntu Dash or Ctrl+Alt+T.
- Open the custom.conf file in Nano editor through the following command:
$ sudo nano /etc/gdm3/custom.conf
Please note that you need to be a superuser to edit most of the system configurations.
When you enter your password, the following file will open:
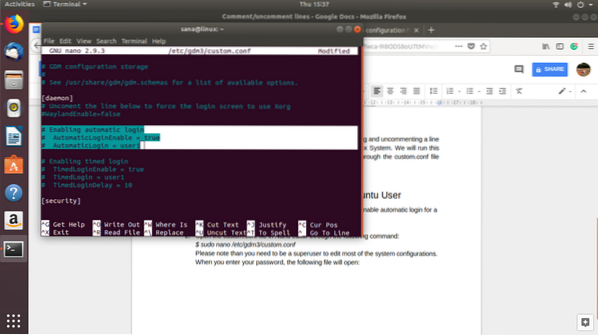
You can see that the selected lines have been commented out. It means that the automatic login feature for user1 has been disabled.
You can simply remove the # character from the last two lines we have selected and provide the username instead of the value “user1” for the user whose automatic login you want to enable. For example:
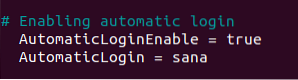
You can see the change in color of the enabled feature.
Now save the file by pressing Ctrl+X and then Y.
Now when you restart the computer, you will be logged in without being asked to provide authentication details.
We have seen how uncommenting a line of feature can enable it. You can disable a feature, in a similar manner, by adding a # character in the start of a feature-defining line.


