1. git add
The git add command lets you start tracking files and folders for your Git repository and moves them to the staging area. You'll have to use the git commit command to make them permanent on your historical snapshots.
Using the command is easy. You can choose to add files and folders individually or use Linux type asterisk (*) glob operator to add them in groups.
Let's take the example below:

Suppose, in the above case, we have already added the ReadMe.txt. But the rest of the files haven't been added.
Let's check the status:
$git statusOn branch master
Your branch is up-to-date with 'origin/master'.
Untracked files:
(use 'git add
file1.txt
file2.txt
folder1/
The files and folders are in red which means they are not being tracked. We can add them using:
$git add file1.txt file2.txt folder1/*If we check the status now:
$git statusOn branch master
Your branch is up-to-date with 'origin/master'.
Changes to be committed:
(use 'git reset HEAD
new file: file1.txt
new file: file2.txt
new file: folder1/file3.txt
new file: folder1/file4.txt
The git add command has added the files to the staging area. Files are kept in the staging area before making them permanent through the commit process.
2. git branch
On Git, branching is easy. In other version control systems, it was an expensive operation. But Git algorithms are optimized for branching. So you can use the git branch command whenever you want to create a separate line of development without worrying about performance.
Let's look at the following example.
$git statusOn branch master
Your branch is up-to-date with 'origin/master'.
Changes to be committed:
(use 'git reset HEAD
new file: file1.txt
new file: file2.txt
new file: folder1/file3.txt
new file: folder1/file4.txt
Notice we are 'On branch master'. When you create a new project, you'll end up in branch master. You can also use the git branch -a command to find out on which branch you are on:
$git branch -a* master
The above is telling you that there is only one branch called 'master' and the asterisk (*) means you are on that branch.
Let's create a new branch called 'testing':
$git branch testingNow we can check the branches again:
$git branch -a* master
testing
Even though, we are still on the 'master' branch, we can also see the new 'testing' branch that was created. The 'testing' branch is a replica of the 'master' branch.
3. git checkout
The git checkout command takes you to a branch, so you can work on the resources in there. You can think of branches as rivers and streams. With a branch, you create a new stream. With the checkout command, you move into that stream.
Let's checkout the 'testing' branch from the previous example:
$git checkout testingSwitched to branch 'testing'
Now let's check the status and the branches again:
$git statusOn branch testing
nothing to commit, working directory clean
$git branch -a
master
* testing
You can see from the git branch -a command that we have moved to the testing branch.
4. git clone
The git clone command allows you to make a copy of any Git repository. As soon as you clone a repository, the new cloned folder will start keeping track of changes locally. Because Git is distributed, a clone is a fully autonomous Git repository.
In order to show how cloning works, let's create a new repository:
$mkdir dir1$cd dir1
$mkdir myproject
$cd myproject/
$git init
Initialized empty Git repository in /dir1/myproject/.git/
$touch ReadMe.txt
$git commit -m 'Initialize my repository'
[master (root-commit) 5a0bd75] Initialize my repository
1 file changed, 0 insertions(+), 0 deletions(-)
create mode 100644 ReadMe.txt
In the above example, we have created Git repository called 'myproject' inside 'dir1' folder. Suppose, this is our main repository. Now we want to make a copy of it and work elsewhere.
Let's create a directory called 'dir2' and clone the 'myproject' repository. We are using the git clone
$cd dir2
$git clone /dir1/myproject/
Cloning into 'myproject'…
done.
$ls
myproject
The git clone command works with a URL too.
$git clone https://github.com/test/test.gitAlso, you can change the name of the clone by specifying it after the Git repository address:
$git clone https://github.com/test/test.git mytest5. git commit
The git commit command is run after the git add command. In our git add example, we had added the files for tracking, but we hadn't committed it to the Git repository. Tracking stays local until a commit is made. When you commit the changes, they become part of the permanent record.
Below we are running the git commit -m
[master 3ef57b3] Committing my files and folders
4 files changed, 0 insertions(+), 0 deletions(-)
create mode 100644 file1.txt
create mode 100644 file2.txt
create mode 100644 folder1/file3.txt
create mode 100644 folder1/file4.txt
If you don't use the -m option to put a comment, Git will open your default text editor and ask for it. Comments are considered good version control practice. So always put meaningful comments in your commit.
6. git config
The git config command lets you setup various options for your git repository. For example, you can use the git config -global
Here's how you can set the values:
$ git config --global user.name 'Zak H'$ git config --global user.email [email protected]
Here's how you can check the values:
$git config --global user.nameZak H
$git config --global user.email
[email protected]
7. git diff
The git diff command helps you see the differences between files and folders. If you are making changes in a file, it's a useful tool to quickly evaluate the changes you made.
Let's suppose we start our work with a ReadMe.txt file with two lines. Then we get rid of the second line and add a third line.
Now if we run the diff command it will show the differences between the committed version and the local changed version in the staging area. Here's how it will look:
$git diffdiff --git a/ReadMe.txt b/ReadMe.txt
index 9475ddc… 1804904 100644
--- a/ReadMe.txt
+++ b/ReadMe.txt
@@ -1,2 +1,2 @@
Line 1: My first line
-Line 2: My second line
+Line 3: My THIRD line
Line 1 is unchanged (white), Line 2 removed (red) and Line 3 added (green).
You can use the diff command to also find differences between particular commits.
8. git fetch
The git fetch command gets the latest resources from the specified origin.
Let's look at an example. Supposed you have the following condition:
dir1/myprojectdir2/myproject (cloned)
The folder 'dir2/myproject' is cloned from 'dir1/myproject'. Now if someone committed changes to 'dir1/myproject', you can get those changes like this from inside 'dir2/myproject':
$git fetch originremote: Counting objects: 2, done.
remote: Compressing objects: 100% (2/2), done.
remote: Total 2 (delta 0), reused 0 (delta 0)
Unpacking objects: 100% (2/2), done.
From /dir2/… /dir1/myproject
5a0bd75… 1713734 master -> origin/master
It's important to remember that git fetch command doesn't merge the changes. For automatic fetch and merge, use the git pull command. Then you might be wondering why use this command in the first place. There might be advanced Git options where you get all the changes from your origin server and then only apply changes selectively to certain files. The git fetch command allows you to achieve this. However, it's an advanced topic that you can find in the git fetch documentation.
9. git grep
The git grep command allows you to search your Git tree for information. Here is example of searching the word 'Line' in our git repository. The -n or --line-number option shows line numbers where Git finds a match:
$git grep -n LineReadMe.txt:1:Line 1: My first line
ReadMe.txt:2:Line 3: My THIRD line
You can run a similar search for number of times the match is there with -c or --count option:
git grep -c LineReadMe.txt:2
The reason for using git grep over Linux grep is that git grep is faster for git repositories.
10. git log
The git log command shows you the commit history.
$git logcommit 171373479fc309846ef605fbe650933767afd0fb
Author: Zak H
Date: Wed Nov 21 20:26:32 2018 -0800
New files added
commit 5a0bd759506d20b2b989873258bf60d003aa3d36
Author: Zak H
Date: Wed Nov 21 18:48:35 2018 -0800
Initialize my repository
You can also use the --oneline option to see an abbreviated version. The abbreviated version is easier to follow.
$git log --oneline1713734 New files added
5a0bd75 Initialize my repository
11. git merge
The git merge command merges branches.
Let's create a new repository with 'main' and then create a 'test' branch.
$mkdir myproject$cd myproject
$git init
Initialized empty Git repository in /git_essentials/myproject/.git/
$touch ReadMe.txt
$git add -A
$git commit -m 'Initial commit'
[master (root-commit) b31d4e1] Initial commit
1 file changed, 0 insertions(+), 0 deletions(-)
create mode 100644 ReadMe.txt
$git branch test
$git branch -a
* master
test
$git checkout test
Switched to branch 'test'
In the 'test' branch, let's make some changes:
$touch File1.txt File2.txt$Ls
File1.txt File2.txt ReadMe.txt
$git add -A
$git commit -m 'Added two new files'
[test 7e11910] Added two new files
2 files changed, 0 insertions(+), 0 deletions(-)
create mode 100644 File1.txt
create mode 100644 File2.txt
We have added two files to the test.
$git branch -amaster
* test
$ls
File1.txt File2.txt ReadMe.txt
$git checkout master
Switched to branch 'master'
$git branch -a
* master
test
$ls
ReadMe.txt
We see from the above, that File1.txt and File2.txt exists in 'test' branch, but not in 'master'.
Let's merge now.
$git merge testUpdating b31d4e1… 7e11910
Fast-forward
File1.txt | 0
File2.txt | 0
2 files changed, 0 insertions(+), 0 deletions(-)
create mode 100644 File1.txt
create mode 100644 File2.txt
$ls
File1.txt File2.txt ReadMe.txt
$git branch -a
* master
test
Now we have 'File1.txt' and 'File2.txt' in 'master' branch too.
Note: Think of merging as a pull operation. You have to be in the branch you want to merge into. In this case, you are in the 'master' branch pulling the changes from the 'test' branch.
12. git mv
The git mv is a short cut command to run git add and git rm commands. It can be used to rename files.
Here is an example:
$git mv ReadMe.txt ReadMe.md$git status
On branch master
Changes to be committed:
(use 'git reset HEAD
renamed: ReadMe.txt -> ReadMe.md
13. git pull
The git pull command is a lot like the git fetch, except the merge happens automatically.
Here is an example of running git pull origin like the git fetch one (we are running a pull request from the clone to get changes from the original Git repository):
$git pull originremote: Counting objects: 3, done.
remote: Compressing objects: 100% (2/2), done.
remote: Total 3 (delta 0), reused 0 (delta 0)
Unpacking objects: 100% (3/3), done.
From /LearnGIT/git_essentials/myproject
7e11910… e67f932 master -> origin/master
Updating 7e11910… e67f932
Fast-forward
File1.txt | 1 +
File2.txt | 1 +
File3.txt | 1 +
ReadMe.txt => ReadMe.md | 0
4 files changed, 3 insertions(+)
create mode 100644 File3.txt
rename ReadMe.txt => ReadMe.md (100%)
You can see that changes have been downloaded from the origin and merged into the clone.
14. git push
The git push command is used to push changes to remote repositories. Here is an example of running the push command:
$git push origin masterCounting objects: 2, done.
Delta compression using up to 4 threads.
Compressing objects: 100% (2/2), done.
Writing objects: 100% (2/2), 242 bytes | 0 bytes/s, done.
Total 2 (delta 1), reused 0 (delta 0)
To /LearnGIT/git_essentials/myproject
e67f932… 90dc546 master -> master
The git push origin master command is sending changes to the 'master' branch of the origin (the Git repository you cloned) from the 'master' branch of the cloned repository. Visually, the push looks like this:
cloned/master -> origin/master15. git rebase
The git rebase command helps you change the base of the branches. In a general merge, something like this happens:
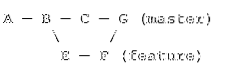
The test branch has been merged into the 'master' branch to create a new commit.
In a rebase, this is what happens:
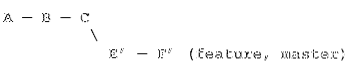
The changes from E and F changelist is recalculated and latched at the end of the master branch. Rebasing helps simplify the branches.
Let's suppose we have this situation in the 'master' branch:
$ git log --oneline7f573d8 Commit C: added c.txt
795da3c Commit B: added b.txt
0f4ed5b Commit A: added a.txt
And a feature branch:
$ git log --oneline8ed0c4e Commit F: modified b.txt
6e12b57 Commit E: modified a.txt
795da3c Commit B: added b.txt
0f4ed5b Commit A: added a.txt
If we rebase, we get git rebase master:
$ git checkout featureSwitched to branch 'feature'
$ git rebase master
First, rewinding head to replay your work on top of it…
Applying: Commit E: modified a.txtApplying: Commit F: modified b.txt
Then merge 'feature' into 'master'.
$ git checkout master
Switched to branch 'master'
$ git merge feature
Updating 7f573d8… 9efa1a3
Fast-forward
a.txt | 1 +
b.txt | 1 +
2 files changed, 2 insertions(+)
Now if you go to both the 'master' and the 'feature' branch, you'll see the same logs:
$ git log --oneline9efa1a3 Commit F: modified b.txt
8710174 Commit E: modified a.txt
7f573d8 Commit C: added c.txt
795da3c Commit B: added b.txt
0f4ed5b Commit A: added a.txt
Rebasing has squashed them together.
Note: Never use rebasing in public repositories as developers will run into major merge issues.
16. git remote
The git remote command allows you to set a remote server for your repository. In a cloning situation, the source repository automatically becomes the remote.
For example:
$pwd/LearnGIT/git_essentials/test
$git remote -v
origin /LearnGIT/git_essentials/myproject (fetch)
origin /LearnGIT/git_essentials/myproject (push)
The above is showing that the remote server for 'test' is another folder called 'myproject'. The reason is that 'test' was cloned for my project.
But the remote server doesn't need to be local. You can have something like this with a URL:
$git remote -vorigin https://github.com/zakh/myproject (fetch)
origin https://github.com/zakh/myproject (push)
You can set up a git remote repository using the command git remote add
This will connect your repo to the origin so you can fetch and push.
17. git reset
The git reset allows you to unstage added files.
Let's say you added the file 'test.txt' to your repository:
$touch test.txt$git add -A
$git status
On branch master
Your branch is up-to-date with 'origin/master'.
Changes to be committed:
(use 'git reset HEAD
new file: test.txt
However, you decide you don't want to track 'test.txt' anymore. You can use the git reset Head
If you check the status, the file is again untracked:
$git statusOn branch master
Your branch is up-to-date with 'origin/master'.
Untracked files:
(use 'git add
test.txt
The file 'test.txt' is no longer tracked.
18. git revert
The git revert command lets you reverse changes using the commit hash number.
$echo 'Test 1' >> MyFile.txt$git add -A
$git commit -m 'Added Change 1'
[master 78a8277] Added Change 1
2 files changed, 1 insertion(+)
create mode 100644 MyFile.txt
create mode 100644 test.txt
$cat MyFile.txt
Test 1
$echo 'Test 2' >> MyFile.txt
$git add -A
$git commit -m 'Added Change 2'
[master a976e9c] Added Change 2
1 file changed, 1 insertion(+)
$cat MyFile.txt
Test 1
Test 2
$git log --oneline
a976e9c Added Change 2
78a8277 Added Change 1
90dc546 Added a file
e67f932 Added new files
7e11910 Added two new files
b31d4e1 Initial commit
We created a 'MyFile.txt' and committed two changes, so the file has the lines 'Test 1' and 'Test 2'. But we decided that we don't want the second commit. So we found the commit hash (a976e9c) for it. We can use the git revert
[master 4f270e7] Revert 'Added Change 2'
1 file changed, 1 deletion(-)
$git log --oneline
4f270e7 Revert 'Added Change 2'
a976e9c Added Change 2
78a8277 Added Change 1
90dc546 Added a file
e67f932 Added new files
7e11910 Added two new files
b31d4e1 Initial commit
$cat MyFile.txt
Test 1
We see that there was a new commit hash created that reverted the 'Test 2' line commit. The file only has the 'Test 1' line now.
19. git rm
The git rm command sets up files for future deletes. It puts the files-to-be-deleted in the staging area.
$git rm test.txtrm 'test.txt'
$git status
On branch master
Your branch is ahead of 'origin/master' by 3 commits.
(use 'git push' to publish your local commits)
Changes to be committed:
(use 'git reset HEAD
deleted: test.txt
You have to commit the changes for the delete to take effect.
20. git stash
The git stash command allows you to temporarily abandon work that you are not ready to commit yet.
Suppose you are working in a repository with the following files:
John.txt Mary.txt
You want to change these files to be more project-based. So you start with:
$git mv John.txt ProjectFile1.txt
$ls
Mary.txt ProjectFile1.txt
$git status
On branch master
Changes to be committed:
(use 'git reset HEAD
renamed: John.txt -> ProjectFile1.txt
In the middle of renaming and updating 'John.txt' to 'ProjectFile1.txt', you receive a request to change something in the project. But you are not ready to submit 'ProjectFile1.txt'. So you stash it.
$git stashSaved working directory and index state WIP on master: f0b5a01 Init John and Mary
HEAD is now at f0b5a01 Init John and Mary
$lsJohn.txt Mary.txt
Your local work environment is back to where you were before making your project-based changes. After, attending to the interruption, instead of going back to 'John.txt', you decide to work on the 'Mary.txt' file now:
$git mv Mary.txt ProjectFile2.txt$git status
On branch master
Changes to be committed:
(use 'git reset HEAD
renamed: Mary.txt -> ProjectFile2.txt
$ls
John.txt ProjectFile2.txt
You get interrupted again and you stash your new work on 'Mary.txt':
$git stashSaved working directory and index state WIP on master: f0b5a01 Init John and Mary
HEAD is now at f0b5a01 Init John and Mary
$ls
John.txt Mary.txt
After the interruption work is done, you check the stash list:
$git stash liststash@0: WIP on master: f0b5a01 Init John and Mary
stash@1: WIP on master: f0b5a01 Init John and Mary
You have two work-in-progress (WIP) in the stash. Firs time you pop the stash, you get the latest 'Mary.txt' changes:
$git stash popRemoving Mary.txt
On branch master
Changes to be committed:
(use 'git reset HEAD
new file: ProjectFile2.txt
Changes not staged for commit:
(use 'git add/rm
(use 'git checkout --
deleted: Mary.txt
Dropped refs/stash@0 (9b77a6b75e4e414fb64de341668c812d3d35150c)
Second time you pop the stash, you get the 'John.txt'-related changes:
$git stash popRemoving John.txt
On branch master
Changes to be committed:
(use 'git reset HEAD
new file: ProjectFile1.txt
new file: ProjectFile2.txt
Changes not staged for commit:
(use 'git add/rm
(use 'git checkout --
deleted: John.txt
deleted: Mary.txt
Dropped refs/stash@0 (1e1968854fb5ca4d609e577822dc3280dbf928f6)
$ls
ProjectFile1.txt ProjectFile2.txt
And you have your work-in-progress 'ProjectFile1.txt' and 'ProjectFile2.txt' back.
So the git stash command helps you stash your work so you can get back to it later.
21. git status
The git status command displays the difference between current files and the HEAD commit.
Here is an example:
$git statusOn branch master
Changes to be committed:
(use 'git reset HEAD
renamed: File2.txt -> File3.txt
Changes not staged for commit:
(use 'git add
(use 'git checkout --
modified: File1.txt
It's showing that 'File2.txt' is being renamed to 'File3.txt' which is ready for commit, but the modifications in 'File1.txt' isn't in the staging area yet.
So, we add everything:
$git add -ANow when we check status:
$git statusOn branch master
Changes to be committed:
(use 'git reset HEAD
modified: File1.txt
renamed: File2.txt -> File3.txt
We see all the changes are ready for commit.
22. git tag
The git tag command helps you to create tags for your important historical points. It is generally used to set up version numbers.
The git tag command will show you the current available tags:
$git tagv1.0
v2.0
You can tag with the command format git tag
In order to see what's in the tag, you can use git show command:
$git show v1.0commit 61e9e8aa1b98b2a657303e6822b291d2374314b5
Author: Zak H
Date: Thu Nov 22 01:06:42 2018 -0800
First commit
diff --git a/1.txt b/1.txt
new file mode 100644
index 0000000… e69de29
You can also tag using a commit hash and the command format git tag
374efe9 Modified file
a621765 Add
6d6ed84 Second commit
61e9e8a First commit
$git tag v4.0 a621765
$git show v4.0
commit a6217650a2c7b2531ecb9c173ba94bd4b3ba7abd
Author: Zak H
Date: Thu Nov 22 01:15:55 2018 -0800
Add
diff --git a/1.txt b/1.txt
index e69de29… 587be6b 100644
--- a/1.txt
+++ b/1.txt
@@ -0,0 +1 @@
In Conclusion
For any command, you can use git
Further Study
- https://git-scm.com/docs


