OpenZFS: A hands on guide using DigitalOcean
You may have heard multiple times that ZFS is an enterprise grade filesystem meant to handle large quantities of data in complicated arrays. Naturally, this would make any new comer think that they shouldn't (or could not) dabble with such technology.
Nothing can be further from truth. ZFS is one of the few software out there that just works. Out of the box, without any fine-tuning, it does all the things that it advertises - From data integrity checks to RAIDZ configuration. Yes, there are fine-tuning options available, and one can delve into it if the need arises. But for beginners, the defaults work wonderfully well.
The one limitation that you may encounter is that of hardware. Putting multiple disks in various configuration means that you have many disks lying around to being with! That's where DigitalOcean (DO) comes to the rescue.
Note: If you are familiar with DO and how to set up SSH keys, you can skip straight to the ZFS part of the discussion. What the next two section shows is how to set up a VM on DigitalOcean and to attach block devices to it with
Introduction to DigitalOcean
To put it simply, DigitalOcean is a cloud service provider where you can spin up virtual machines for your apps to run on. You get an insane amount of bandwidth and all SSD storage to run your apps on. It is targeted towards the developers and not the operators, which is why the UI is much simpler and easier to understand.
Additionally, they charge on a per hour basis, which means you can work on various ZFS configuration for a few hours, delete all the VMs and storage once you are satisfied, and your bill won't exceed more than a few dollars.
We will be using two of the features on DigitalOcean for this tutorial:
- Droplets: A Droplet is their word for a virtual machine, running an operating system with a static public IP. Our choice of OS will be Ubuntu 16.04 LTS.
- Block Storage: Block storage is similar to a disk being attached to your computer. Except, here you get to decide upon the size and number of disks you desire.
Sign up for DigitalOcean if you haven't already.
To login to your Virtual Machine there are two ways, one is to use the console (for which the password gets emailed to you) or you can use the SSH key option.
Basic SSH Set up
MacOS and other UNIX users who have a terminal on their desktop can use that to SSH into their droplets (SSH client is installed by default on all most all Unices) and Windows user might want to download Git Bash.
Once you are in your terminal, enter the following commands:
$mkdir -p ~/.ssh$cd ~/.ssh
$ssh-keygen -y -f YourKeyName
This will generate two files in ~/.ssh directory, one named YourKeyName which you need to keep safe and private all the time. It is your private key. It will encrypt messages before you send them to the server, and it will decrypt the messages that the sever sends you back. As the name suggests, the private key is meant to be kept secret at all times.
Another file is created named YourKeyName.pub and this is your public key which you will provide to DigitalOcean when you create the Droplet. It handles encryption and decryption of messages on the server, just like the private key does on your local machine.
Creating your first Droplet
After signing up for DO you are ready to create your first Droplet. Follow the below steps:
1. Click on the create button on the top-right corner and select Droplet option.
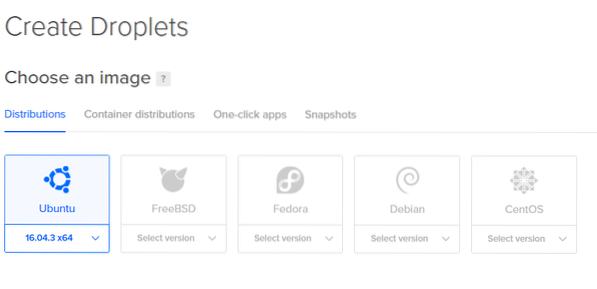
2. The next page will let you decide upon the specifications of your Droplet. We will be using Ubuntu.
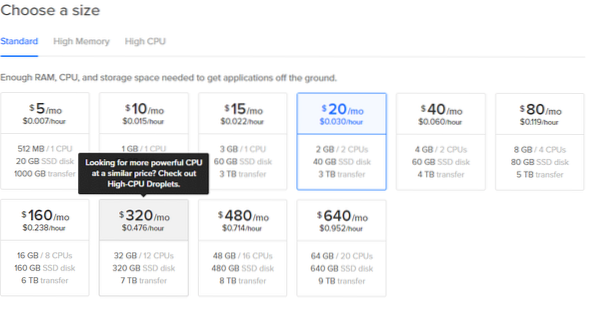
3. Choose size, even the $5/mo option works for small experiments.

4. Choose the data center nearest to you, for low latencies. You may skip the rest of the additional options.
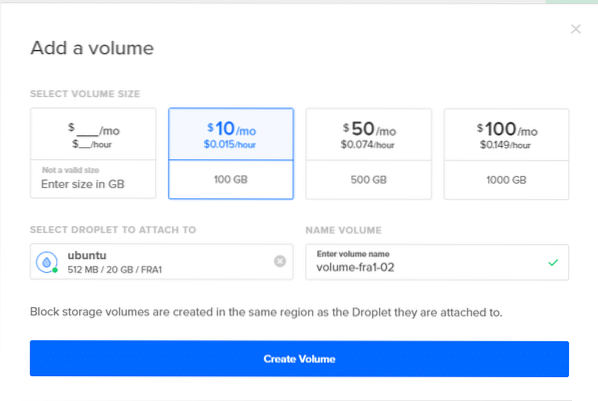
Note: Don't add any volumes now. We will add them later for clarity's sake.


5. Click on New SSH keys and copy all the contents of YourKeyName.pub into it and give it a name. Now just click on Create and your Droplet is good to go.
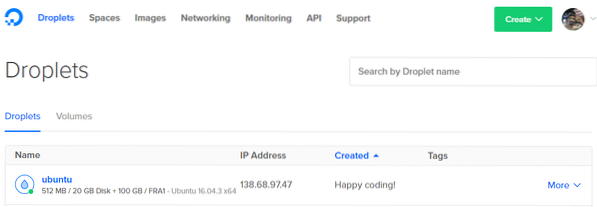
6. Get the IP address of your Droplet from the dashboard.
7. Now you can SSH, as root user, into your Droplet, from your terminal using the command:
$ssh [email protected] -i ~/.ssh/YourKeyNameDon't copy the above command since your IP address will be different. If everything worked right, you will receive a welcome message on your terminal and you will be logged into your remote server.

Adding Block Storage
To get the list of block storage devices in your VM, in the terminal use the command:
$lsblk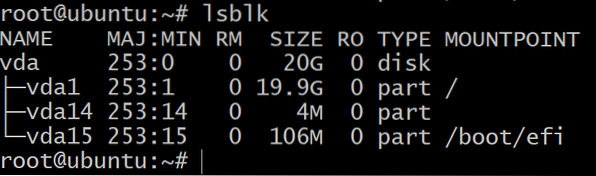
You will see only one disk partitioned into three block devices. This is the OS installation and we shall not be experimenting with them. We need more storage devices for that.
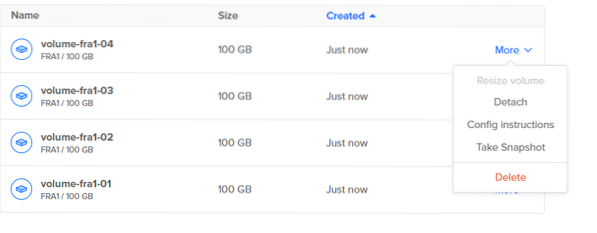
For that go to your DigitalOcean dashboard the click on Create button like you did in the first step and choose volume option. Attach it to your Droplet and give it an appropriate name. Add three such volumes by repeating this step two more times.
Now if you go back to your terminal and type in lsblk, you will see new entries to this list. In the screenshot below, there are 3 new disks which we shall be using for testing ZFS.

As a final step, before getting into ZFS, you should first label your disks under GPT scheme. ZFS works best with GPT scheme, but the block storage added to your droplets have an MBR label on them. The following command fixes the problem by adding a GPT label to your newly attached block devices.
$ sudo parted /dev/sda mklabel gptNote: It doesn't partition the block device, it just uses the 'parted' utility to give a Globally Unique ID (GUID) to the block device. GPT stands for the GUID Partition Table and it keeps track of every disk or partition with a GPT label on it.
Repeat the same for sdb and sdc.
Now we are ready to get started with using OpenZFS with enough drives to experiment different arrangements.
Zpools and VDEVs
To get started with creating your first Zpool. You have to understand what a Virtual device is and what its purpose is.
A Virtual Device (or a Vdev) can be a single disk or a grouping of disks that are exposed as a single device to the zpool. For example, the three 100GB devices created above sda, sdb and sdc all can be a vdev of their own and you can create a zpool, named tank, out of it which will have the storage capacity of the 3 disks combined that is 300GB
First install ZFS for Ubuntu 16.04:
$zpool create tank sda sdb sdc
$zpool status tank
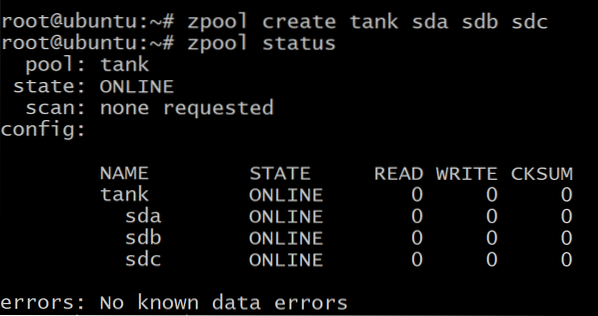
Your data is spread across the three disks, evenly, and if anyone of the disks fail, all your data is lost. As you can see above, the disks are the vdevs themselves.
But you can also create a zpool where the three disks replicate each other, known as mirroring.
First destroy the pool previously created:
$zpool destroy tankTo create a mirrored vdev we will use the keyword mirror:
$zpool create tank mirror sda sdb sdc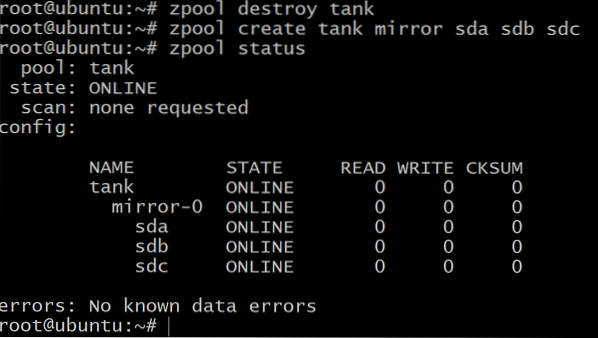
Now, the total amount of available storage is only 100 GB (use zpool list to see that) but now we can withstand up to two drives of failure in the vdev mirror-0.
When you run out of space and want to add more storage to your pool, you will have to create three more volumes in DigitalOcean and repeat the steps in Adding Block Storage do it with 3 more block devices which will show up as vdev mirror-1. You can skip this step for now, just know that it can be done.
$zpool add tank mirror sde sdf sdgLastly, there's raidz1 configuration which can be used to group three or more disks in each vdev and can survive the failure of 1 disk per vdev and give a total available storage of 200GB.
$zpool destroy tank$zpool create tank raidz1 sda sdb sdc
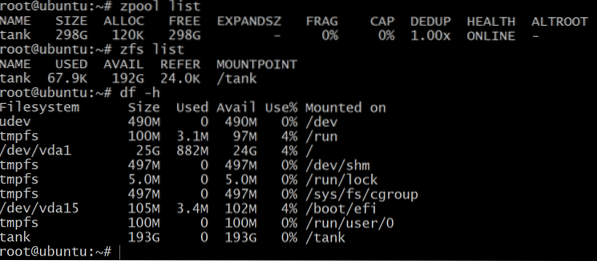
While zpool list shows the net capacity of the raw storage, zfs list and df -h commands show the actual available storage of the zpool. So, it is always a good idea to check the available storage using zfs list command.
We will be using this for creating datasets.
Datasets and recovery
Traditionally, we used to mount filesystems like /home, /usr and /temp into different partitions and when we ran out of space one had to add symlinks to extra storage devices added to the system.
With zpool add you can add disks to the same pool and it keeps on growing as per your need. You can then create datasets, which is the zfs term for a filesystem, like /usr/home and many others that then live on the zpool and share all the storage made available to them.
To create a zfs dataset on the pool tank use the command:
$zfs create tank/dataset1$zfs list
As mentioned before, a raidz1 pool can withstand failure of up to one disk. So let's test that.
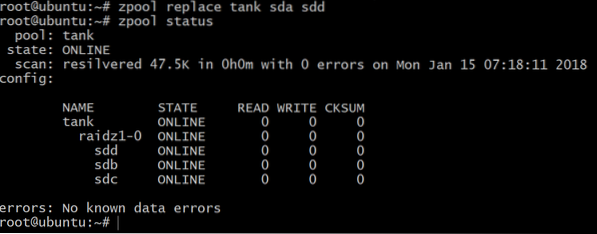
$ zpool offline tank sda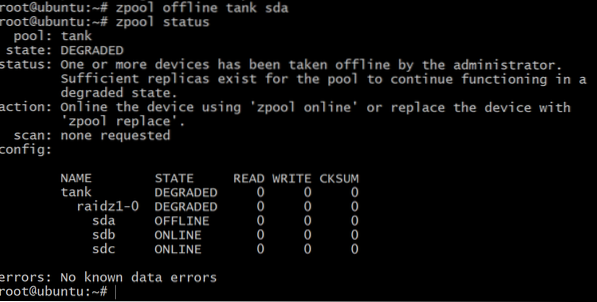
Now the pool is offline, but not all is lost. We can add another volume, sdd, using DigitalOcean and giving it a gpt label as before.
Further reading
We encourage you to try out ZFS and its various features as much as you want, in your free time. Make sure to delete all the volumes and droplets, once you are done, to avoid unexpected billings at the end of the month.
You can learn more about ZFS terminology here.


