In this article, we will explain how to do basic network configuration in the Ubuntu system. We will use the command-line Terminal for executing the commands. To open the command line Terminal in Ubuntu, use the Ctrl+Alt+T keyboard shortcut.
In this article, we will be covering how to:
- View current IP address
- Set static IP address
- Set the dynamic IP address
- View current hostname
- Change hostname
Note: We have run the commands and procedure mentioned in this article on the Ubuntu 20.04 system.
View Current IP Address
To view the current IP address of your machine, you can use either of the following commands:
$ ip aOr
$ ip addr
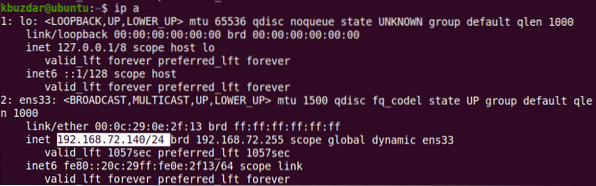
Running either of the above commands will display the IP address information. Note down the name of the interface from the output of the above command.
Set Static IP Address
In the following procedure, we will see how to set up the static IP in a Ubuntu system.
Ubuntu 20.04 uses netplan as a default network manager. The configuration file for the netplan is stored in the /etc/netplan directory. You can find this configuration file listed in the /etc/netplan directory the following command:
$ ls /etc/netplanThe above command will return the name of the configuration file with the .yaml extension, which in my case was 01-network-manager-all.yaml.
Before making any changes to this file, make sure to create a backup copy of it. Use the cp command to do so:
$ sudo cp /etc/netplan/01-network-manager-all.yaml 01-network-manager-all.yaml.bakNote: You might have a configuration file with the name other than the 01-network-manager-all.yaml. So make sure you use the right configuration file name in the commands.
You can edit the netplan configuration using any text editor. Here we are using the Nano text editor for this purpose.
$ sudo nano /etc/netplan/01-network-manager-all.yamlThen add the following lines by replacing the interface name, IP address, gateway, and DNS information that fit your networking needs.
network:version: 2
renderer: NetworkManager
ethernets:
ens33:
dhcp4: no
addresses:
- 192.168.72.140/24
gateway4: 192.168.72.2
nameservers:
addresses: [8.8.8.8, 8.8.4.4]
Once done, save and close the file.
Now test the new configuration using the following command:
$ sudo netplan tryIf it validates the configuration, you will receive the configuration accepted message; otherwise, it rolls back to the previous configuration.
Next, run the following command to apply the new configurations.
After this, confirm the IP address of your machine using the following command:
$ ip aIt should reflect the changes you have made.
Set the Dynamic IP Address
In the following procedure, we will see how to configure the interface to receive a dynamic IP address from DHCP. Edit the netplan configuration file using any text editor. Here we are using the Nano text editor for this purpose.
$ sudo nano /etc/netplan/01-network-manager-all.yamlThen add the following lines by replacing the interface name with your system's network interface.
network:version: 2
renderer: NetworkManager
ethernets:
ens33:
dhcp4: yes
addresses: []
Once done, save and close the file.
Now test the new configuration using the following command:
$ sudo netplan tryIf it validates the configuration, you will receive the configuration accepted message, otherwise, it rolls back to the previous configuration.
Next, run the following command to apply the new configurations.
$ sudo netplan apply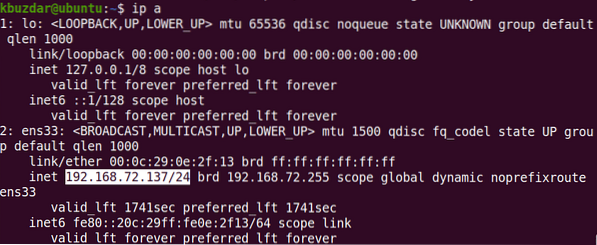
After this, check the IP address of your machine using the following command:
$ ip aView Current Hostname
To view the current hostname, you can use either of the following commands:
$ hostnamectlor
$ hostname
Change Hostname
There are two different ways to change the hostname of the system. To change the hostname of the system, you must be a root user or a standard user with sudo privileges.
Using the Hostnamectl Command
To change the hostname of the system to a new name, use the following command:
$ sudo hostnamectl set-hostname nameExample:
$ sudo hostnamectl set-hostname desktopThis command will change the hostname of the system to “desktop”.
After that, reboot the system and you will see the new hostname assigned to your system.
Using Hostname Command
Hostname command can also be used to change the hostname of the system. Use the following command to change the hostname of the system:
$ sudo hostname nameThis command changes the hostname of the system temporarily. To permanently change the hostname, you will need to edit the /etc/hostname and /etc/hosts file.
Use the following command to edit the /etc/hostname file:
$ sudo nano /etc/hostnameReplace the old hostname with the new name, then save and exit the file.
Next, use the following command to edit the /etc/hosts file:
Replace the old hostname with the new name, then save and exit the file.
$ sudo nano /etc/hostsAfter that, reboot the system and you will see the new hostname assigned to your system.
Once you are done with basic network configurations, use the ping command to verify the connectivity of your system with other systems on the network and the external network.
$ ping IP-address or domain nameThat is all the basics you need to know about network configuration in Ubuntu 20.04 system. Note that if you have multiple network interfaces, you will have to perform IP configurations for each interface. I hope you liked the article!


