Configuring Static IP on the Server:
You should configure a static IP address on the server where you want to configure Apt-Cacher-NG.
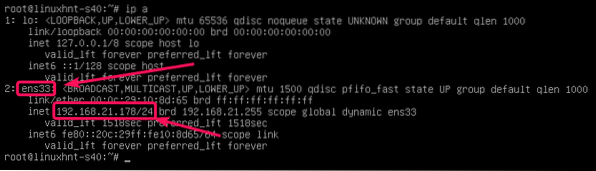
You can find the current IP address of your Debian 10 server with the following command:
$ ip aAs you can see, the IP address in my case is 192.168.21.178/24. I want to assign a static IP 192.168.21.5/24 to this server, which is on the same network as before. Notice the network interface device name is ens33 in my case. It will be different for you. So, replace it with yours from now on.
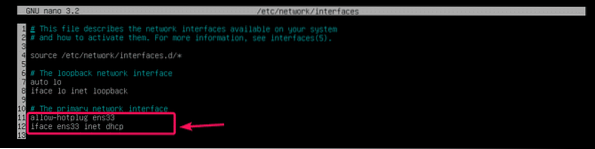
Now, open the /etc/network/interfaces file with nano text editor with the following command:
$ sudo nano /etc/network/interfaces
Now, remove the marked line if present in the /etc/network/interfaces file.
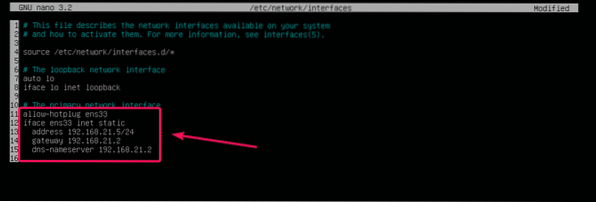
Once you removed the lines, add the following lines to the /etc/network/interfaces file.
allow-hotplug ens33iface ens33 inet static
address 192.168.21.5/24
gateway 192.168.21.2
dns-nameserver 192.168.21.2
NOTE: Change the device name, IP address, gateway and DNS name server address depending on your network and configuration requirement.
The final configuration file should look as follows. Now, save the file by pressing
Now, reboot the server with the following command:
$ sudo reboot
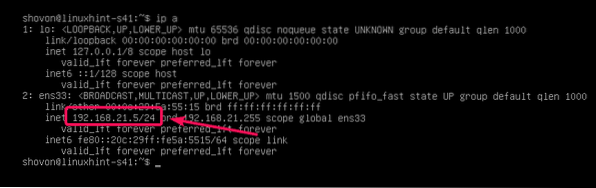
Once your server boots, run the following command to verify that the IP address has changed.
$ ip aAs you can see, the IP address 192.168.21.5/24 is set.
As you can see, internet connectivity also works. So, we are good.
$ ping -c 3 google.com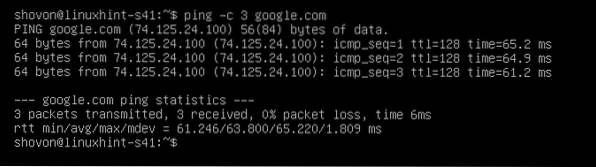
Installing Apt-Cacher-NG on the Server:
Apt-Cacher-NG is available in the official Debian 10 package repository. So, you can easily install it with the APT package manager.
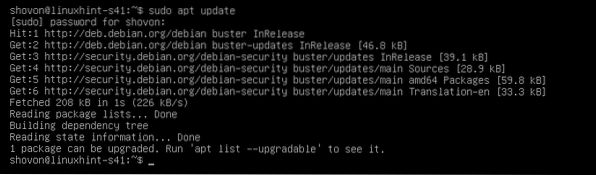
First, update the APT package repository cache with the following command:
$ sudo apt update
The APT package repository cache should be updated.
Now, run the following command to install Apt-Cacher-NG:
$ sudo apt install apt-cacher-ng
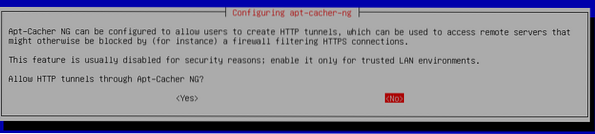
Once you see the following prompt, select
Apt-Cacher-NG should be installed.

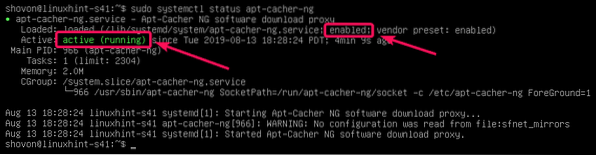
Now, check whether Apt-Cache-NG is running using the following command:
$ sudo systemctl status apt-cacher-ng
As you can see, apt-cacher-ng service is active/running. It is also enabled, which means it's added to the system startup by default. So, it will start automatically on system boot.
NOTE: If for any case, apt-cacher-ng service is not running or is disabled (not added in the system startup), then run the following commands to start apt-cacher-ng and add it to the system startup.
$ sudo systemctl start apt-cacher-ng$ sudo systemctl enable apt-cacher-ng
Configuring Debian 10 Machines with Proxy:
Now, to configure your Debian 10 servers and clients on the network, you have to tell APT to use the Apt-Cacher-NG HTTP Proxy. Once you do, all the packages the clients and servers that use the proxy downloads will be cached on the Apt-Cacher-NG server. Thus, download speed, bandwidth usage and delay will be reduced significantly.
To configure a Debian 10 machine to use the Apt-Cacher-NG proxy, create a new file 02proxy in the /etc/apt/apt.conf.d/ directory with the following command:
$ sudo nano /etc/apt/apt.conf.d/02proxy
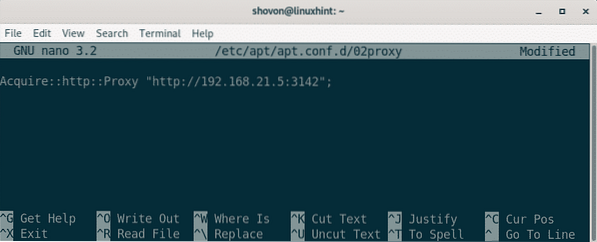
Now, type in the following line to the 02proxy file.
Acquire::http::Proxy "http://192.168.21.5:3142";NOTE: Don't forget to replace the IP address with the IP address of your own Apt-Cacher-NG server.
The final configuration file should look as follows. Now, save the file by pressing
Your Debian 10 machine should now use the Apt-Cacher-NG proxy to download packages and Apt-Cacher-NG server should cache all the packages.
Apt-Cacher-NG Statistics Report:
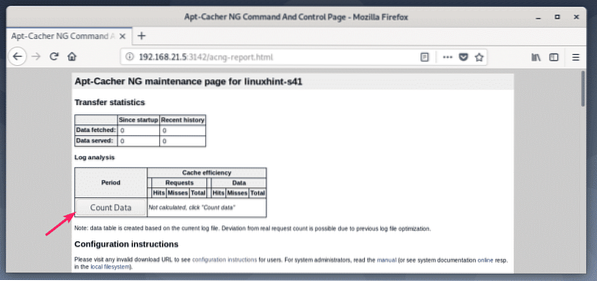
From any computer on the network, if you visit the page http://192.168.21.5:3142/acng-report.html, it will display statistics information about the Apt-Cacher-NG.
If you visit the acng-report.html page for the first time, it will be not show any statistic data. So, you have to click on Count Data button for the first time.
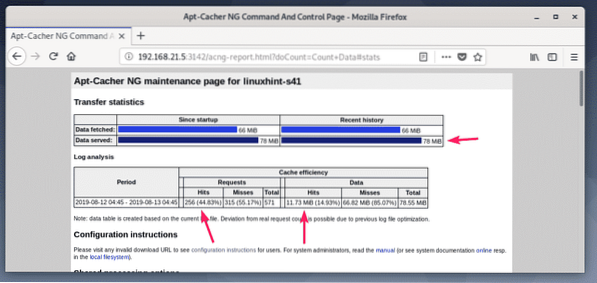
Once you do, it will show you how much data is downloaded from the internet, how much data is server from the cache. Also, the HTTP request hits (cached) and misses (not cached).
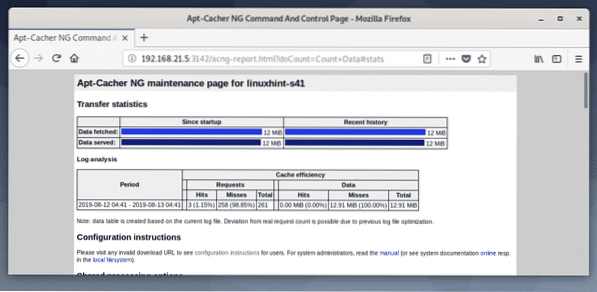
I configured the proxy and installed some packages on some of the Debian 10 machines on my network. As you can see, data downloaded is less than data served. Again, there are a lot of hits requests. So, cache is working correctly.
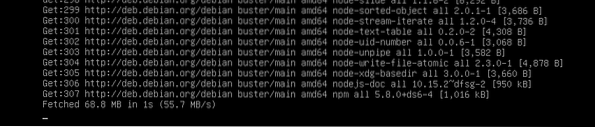
I downloaded nodejs and npm packages on 2 Debian 10 minimal servers. One with cache enabled and one without cache.
Without cache, it took about 1 min and 39 seconds = 99 seconds to complete the download of all the required packages.

With cache enabled, it took only 1s to download all the required packages as you can see in the screenshot below.
Configuring Apt-Cacher-NG:
The configuration directory of Apt-Cacher-NG is /etc/apt-cacher-ng/
The important configuration files are acng.conf, backends_debian in our case.
$ ls /etc/apt-cacher-ng/
You can open the backends_debian configuration file as follows:
$ sudo nano /etc/apt-cacher-ng/backends_debian
In this file, the Debian 10 HTTP repositories to be cached are placed. Right now, I am caching packages downloaded from http://deb.debian.org/debian/. If you're using some other Debian 10 repositories, then add them here.

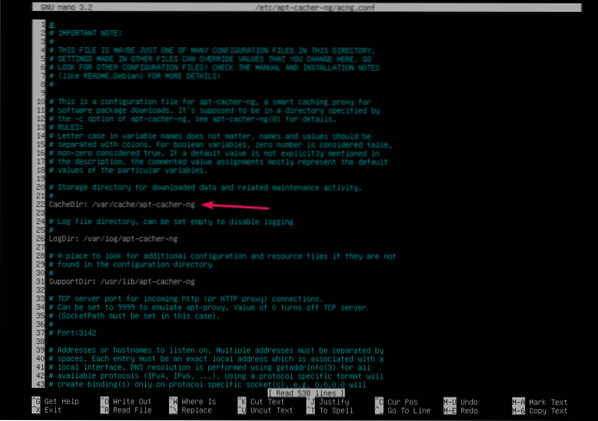
You can open the acng.conf file with the following command:
$ sudo nano /etc/apt-cacher-ng/acng.conf
This file is very long and has a lot of configuration options. But, the most important option is CacheDir. If you want to change the directory where cached packages are stored, change the CacheDir.
If you change the CacheDir to a new directory, then change the user and group of the new directory to apt-cacher-ng as follows:
$ sudo chown -Rfv apt-cacher-ng:apt-cacher-ng/new/cache/directory
If you change Apt-Cacher-NG configuration file, then don't forget to restart the apt-cacher-ng service with the following command:
$ sudo systemctl restart apt-cacher-ngSo, that's how you set up a Debian 10 package cache server with Apt-Cacher-NG. Thanks for reading this article.


