At the same time, markdown is very light-weight and flexible as well. The most popular use case for markdown is for License and README files in a GitHub repository, but it is also being integrated with more and more CMS for managing blog posts, and even writing research papers. You can render mathematical equations with plugins for LaTeX.
It is chiefly used by developers, however. It is really helpful in making tutorials and documentation thanks to syntax highlighting for multiple languages and support for images and even gifs.
Let's start with a setup that lets us preview the rendered document alongside a raw markdown text file.
Atom Text Editor and Markdown Preview
You can download and install Atom Text Editor or Visual Studio Code to follow along. Atom and VS Code both have pre-installed plugins for Markdown Preview. Here Atom will be used but syntax would remain roughly the same no matter what text editor you use.
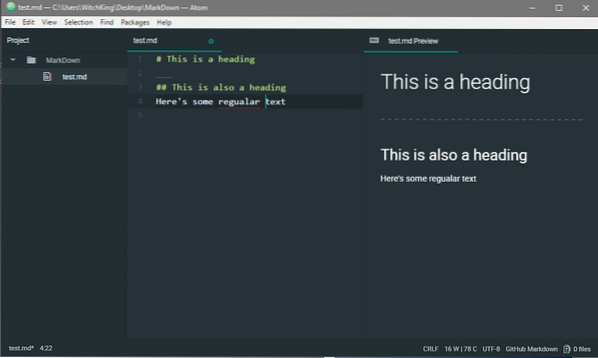
On Atom, make sure that the Markdown Preview package is enabled (it is, in fact, enabled by default). Create a folder for this markdown tutorial and, in there, open up a new file (CTRL + N) and enter the following text in there.
# This is a heading___
##This is also a heading
Here's some text
Save the file (CRTL + S) with a .md extension. For example, you can name your file as test.md and the .md part will tell Atom that this is a markdown file and the extension would work with it as intended. You can generate a preview by using the following keybinding (CTRL+SHIFT+M) which is shown in a new pane beside the raw text file.
You can close the preview pane by using the same key-binding or by using the GUI itself.
With everything set up we can have a closer look at the syntax and start creating amazing documents on the fly.
Markdown Syntax
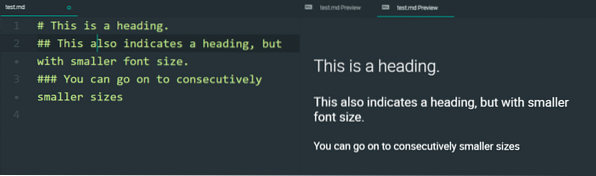
As mentioned earlier, the main motivation behind Markdown is readability. This means no obscure tags or nested tags or any other confusion inducing strings. Instead we can start of with '#' symbol to indicate that that particular line is a heading.
# Is a heading.## Also indicates heading, but with smaller font size.
### You can go on to consecutively smaller sizes
Line Breaks
Markdown continues to lump all the text into one giant paragraph even when the raw text is broken into several different lines. To mitigate this, you can use two spaces at the end of a line and then put a newline character (that is, hit
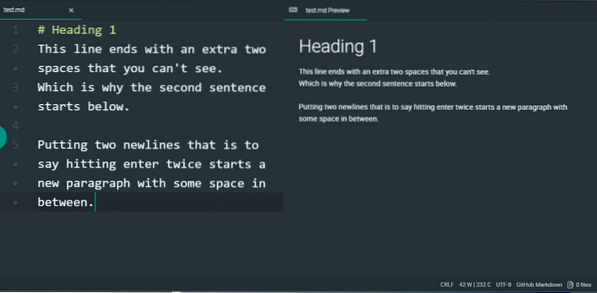
The sentence “Which is why… ” started in a new line but is not spaced apart from the previous line, whereas, using two newlines created a wider separation.
Horizontal Rule
Horizontal rule, as the name suggests, creates a horizontal line that lets you structure your document and make logical separations in it. There are two methods for creating a horizontal rule. First is to use three or more underscores to create a horizontal rule.
#Heading 1___
Paragraph and heading are separated by a horizontal rule.
___
Another separated section
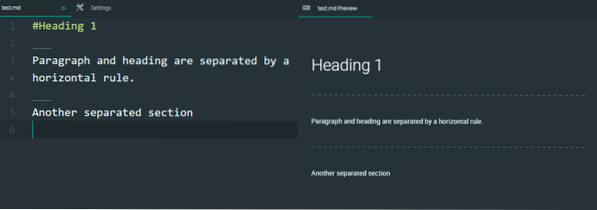
Another option (which I won't recommend) is to use three or more dashes '-' but they are also used to indicate that the sentence immediately above them is a heading. So if you don't have a newline between a sentence and the horizontal rule below it, that sentence will take the form of a heading.
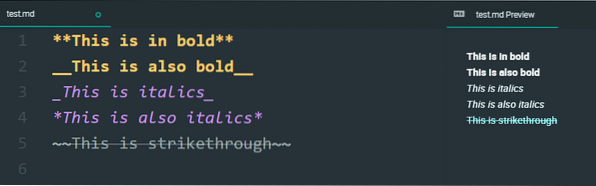
Italics, Bold and Strikethrough
The syntax for the three of these is rather simple and speaks for itself.
**This is in bold**__This is also bold__
_This is italics_
*This is also italics*
~~This is strikethrough~~
Escape character
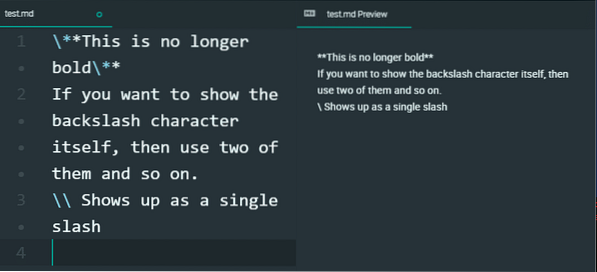
Now, one might ask, how would you literally write **Some text** into the final markdown file if it just changes that to bold every time. This is something that most programming languages also deal with and the solution is similar to those - Use a backslash character. This works for other syntax elements too, and is not specifically for bold styling.
\**This is no longer bold\**If you want to show the backslash character itself, then use two of them and so on.
\\ Shows up as a single slash
Blockquotes and code blocks
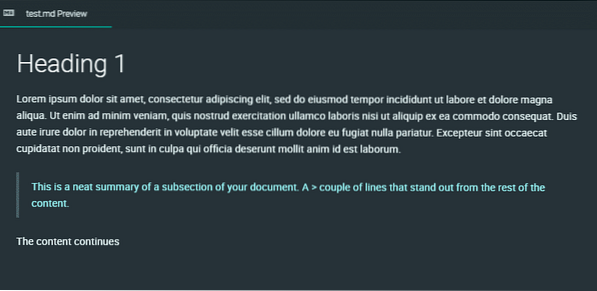
Blockquotes and code blocks are much easier. A blockquote can be used to highlight an important point towards which you want to draw the readers' attention. This can be achieved by using right angular bracket at the start as shown.
# Heading 1Lorem ipsum dolor sit amet, consectetur adipiscing elit, sed do eiusmod tempor incididunt ut
labore et dolore magna aliqua. Ut enim ad minim veniam, quis nostrud exercitation ullamco laboris
nisi ut aliquip ex ea commodo consequat. Duis aute irure dolor in reprehenderit in voluptate
velit esse cillum dolore eu fugiat nulla pariatur. Excepteur sint occaecat cupidatat non
proident, sunt in culpa qui officia deserunt mollit anim id est laborum.
> This is a neat summary of a subsection of your document. A > couple of lines that stand
out from the rest of the content.
The content continues.
Here's how it looks when it is rendered.
For code blocks, simply indent the lines the lines by 4 spaces or more. This is really
handy for developers and operators who want to document their work. We would later see how to make this even better.
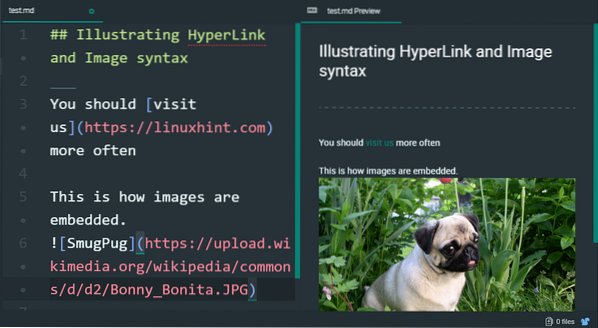
HyperLinks and Images
For hyperlinks, the syntax is pretty simple. The visible text is written in square brackets and the URL to which it points is written in round brackets right next to it.
For images, the syntax is similar, except that it starts with an exclamation mark. You are free to use a relative path in your project folder which point to the image or you can have a public URL.
## Illustrating HyperLink and Image syntax___
You should [visit us](https://linuxhint.com) more often
This is how images are embedded.

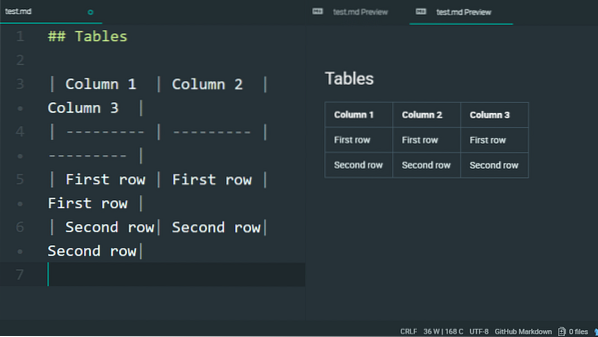
Tables
Creating tables in markdown includes literally drawing an ascii (Unicode to be precise) portrait of a table.
## Tables| Column 1 | Column 2 | Column 3 |
| --------- | --------- | --------- |
| First row | First row | First row |
| Second row| Second row| Second row|
The syntax need not be exactly aligned from one row to another, but the pipe character is used to switch over to the next column and next line indicates the next row has started, generally.
Extended Markdown
For those of you who have come so far, here's the real treat. If you are using Atom, you can actually replace the Markdown Preview plugin for Markdown Preview Plus. Which offers the following functionalities.
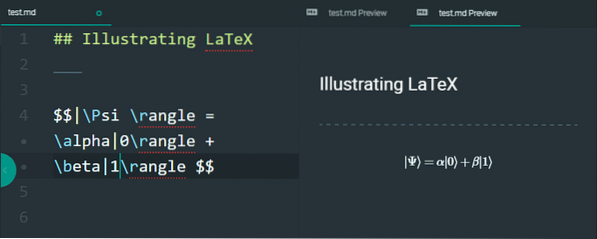
1. Mathematical equations using LaTeX:
You can actually insert LaTeX scripts between dollar signs and it will be rendered as LaTeX script and shown in the preview with CTRL+SHITFT+X keybinding. You don't even have to know all of the LaTeX, just a few snippets are enough.
## Illustrating LaTex___
$$|\Psi \rangle = \alpha|0\rangle + \beta| \rangle $$
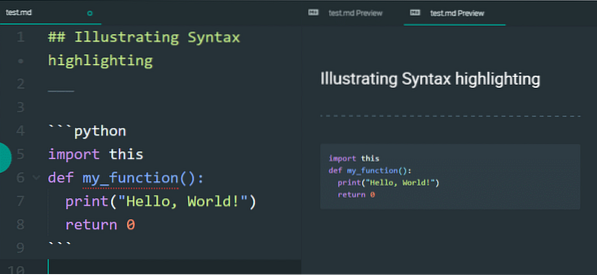
2. Syntax Highlighting
Instead of using indentation to indicate code blocks, you can actually use backticks followed by name of the languages that your script is supposedly written in. The languages whose syntax are supported are too numerous to list here, but here's an example in python.
## Illustrating Syntax highlighting___
"python
import this
def my_function():
print("Hello, World!")
return 0
"
There are many flavours or Markdown. GitHub has its own special brew and the syntax is very flexible. This is not supposed to intimidate the users, but to cater a wider variety of them. It is one of those languages that one just understands a subset that one needs and uses it, instead of getting bothered by the technicalities (unless you are interested in its technicalities!)


