Why is Lucene needed?
Search is one of the most common operations we perform multiple times a day. This search can be across multiple web-pages which exist on the Web or a Music application or a code repository or a combination of all of these. One might think that a simple relational database can also support searching. This is correct. Databases like MySQL support full-text search. But what about the Web or a Music application or a code repository or a combination of all of these? The database cannot store this data in its columns. Even if it did, it will take an unacceptable amount of time to run the search this big.
A full-text search engine is capable of running a search query on millions of files at once. The velocity at which data is being stored in an application today is huge. Running the full-text search on this kind of volume of data is a difficult task. This is because the information we need might exist in a single file out of billions of files kept on the web.
How Lucene works?
The obvious question which should come to your mind is, how is Lucene so fast in running full-text search queries? The answer to this, of course, is with the help of indices it creates. But instead of creating a classic index, Lucene makes use of Inverted Indices.
In a classic index, for every document, we collect the full list of words or terms the document contains. In an Inverted index, for every word in all the documents, we store what document and position this word/term can be found at. This is a high-standard algorithm which makes the search very easy. Consider the following example of creating a classic index:
Doc1 -> "This", "is", "simple", "Lucene", "sample", "classic", "inverted", "index"Doc2 -> "Running", "Elasticsearch", "Ubuntu", "Update"
Doc3 -> "RabbitMQ", "Lucene", "Kafka", "", "Spring", "Boot"
If we use inverted index, we will have indices like:
This -> (2, 71)Lucene -> (1, 9), (12,87)
Apache -> (12, 91)
Framework -> (32, 11)
Inverted indices are much more easy to maintain. Suppose if we want to find Apache in my terms, I will have straightaway answers with Inverted indices whereas with classic search will run on complete documents which might not have been possible to run in real-time scenarios.
Lucene workflow
Before Lucene can actually search the data, it needs to perform steps. Let's visualise these steps for a better understanding:
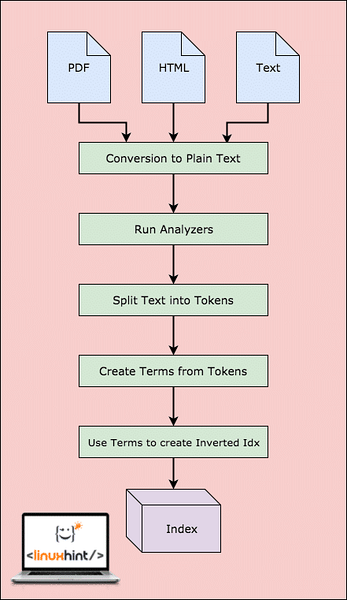
Lucene Workflow
As shown in the diagram, this is what happens in Lucene:
- Lucene is fed the documents and other sources of data
- For every document, Lucene first converts this data to plain text and then the Analyzers converts this source to plain text
- For every term in the plain text, the inverted indices are created
- The indices are ready to be searched
With this workflow, Lucene is a very strong full-text search engine. But this is the only part Lucene fulfils. We need to perform the work ourself. Let's look at the components of Indexing needed.
Lucene Components
In this section, we will describe the basic components and the basic Lucene classes used to create indices:
- Directories: A Lucene index stores data in normal file system directoies or in memory if you need more performance. It is completely the apps choice to store data wherever it wants, a Database, the RAM or the disk.
- Documents: The data we feed to the Lucene engine needs to be converted to plain-text. To do this, we make a Document object which represents that source of data. Later, when we run a search query, as a result, we will get a list of Document objects that satisfy the query we passed.
- Fields: Documents are populated with a collection of Fields. A Field is simply a pair of (name,value) items. So, while creating a new Document object we need to fill it with that kind of paired data. When a Field is invertely indexed, the value of the Field is Tokenized and is available for search. Now, while we use Fields, it is not important to store the actual pair but only the inverted indexed. This way, we can decide what data is searchable only and not important to be saved. Let's look at an example here:
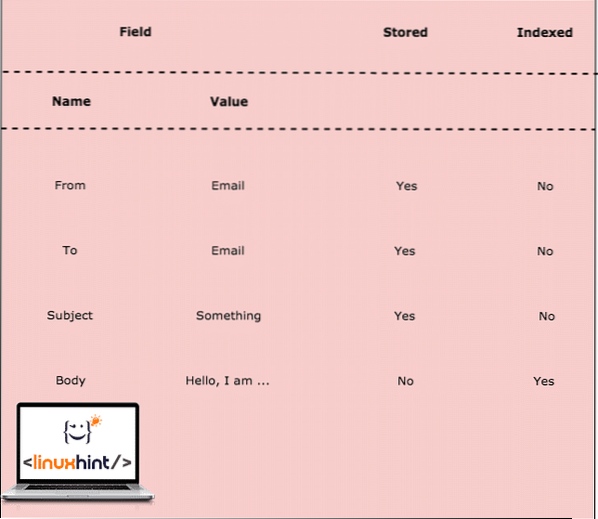
Field Indexing
In above table, we decided to store some fields and others aren't stored. The body field is not stored but indexed. This means that the email will be returned as a result when the query for one of the Terms for the body content is run.
- Terms: Terms represents a word from the text. Terms are extracted from the analysis and tokenization of Fields' values, thus Term is the smallest unit on which the search is run.
- Analyzers: An Analyzer is the most crucial part of indexing and searching process. It is the Analyzer which conevrts the plain-text into Tokens and Terms so that they can be searched. Well, that is not the only responsibility of an Analyzer. An Analyzer uses a Tokenizer to make Tokens. An Analyzer also does the following tasks:
- Stemming: An Analyzer converts the word into a Stem. This means that 'flowers' is converted to the stem word 'flower'. So, when a search for 'flower' is run, the document will be returned.
- Filtering: An Analyzer also filters the stop words like 'The', 'is' etc. as these words do not attracts any queries to be run and aren't productive.
- Normalization: This process removes accents and other character markings.
This is just the normal responsibility of StandardAnalyzer.
Example Application
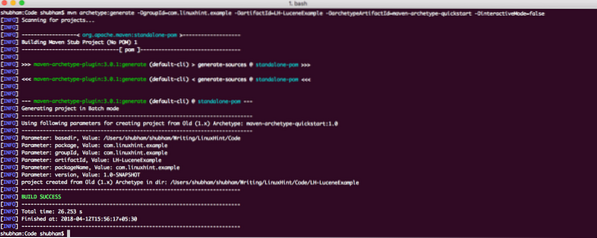
We will be using one of the many Maven archetypes to create a sample project for our example. To create the project execute the following command in a directory that you will use as workspace:
mvn archetype:generate -DgroupId=com.linuxhint.example -DartifactId=LH-LuceneExample -DarchetypeArtifactId=maven-archetype-quickstart -DinteractiveMode=falseIf you are running maven for the first time, it will take a few seconds to accomplish the generate command because maven has to download all the required plugins and artifacts in order to make the generation task. Here is how the project output looks:
Project Setup
Once you have created the project, feel free to open it in your favourite IDE. Next step is to add appropriate Maven Dependencies to the project. Here is the pom.xml file with the appropriate dependencies:
Finally, to understand all the JARs which are added to the project when we added this dependency, we can run a simple Maven command which allows us to see a complete Dependency Tree for a project when we add some dependencies to it. Here is a command which we can use:
mvn dependency:treeWhen we run this command, it will show us the following Dependency Tree: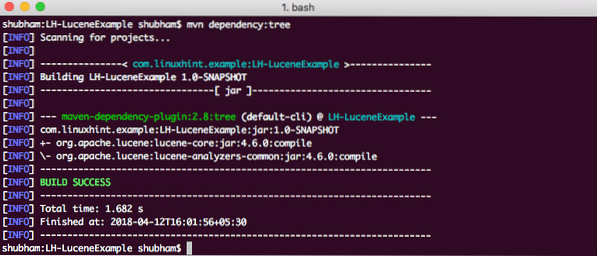
Finally, we create a SimpleIndexer class which runs
import java.io.File;
import java.io.FileReader;
import java.io.IOException;
import org.apache.lucene.analysis.Analyzer;
import org.apache.lucene.analysis.standard.StandardAnalyzer;
import org.apache.lucene.document.Document;
import org.apache.lucene.document.StoredField;
import org.apache.lucene.document.TextField;
import org.apache.lucene.index.IndexWriter;
import org.apache.lucene.index.IndexWriterConfig;
import org.apache.lucene.store.FSDirectory;
import org.apache.lucene.util.Version;
public class SimpleIndexer
private static final String indexDirectory = "/Users/shubham/somewhere/LH-LuceneExample/Index";
private static final String dirToBeIndexed = "/Users/shubham/somewhere/LH-LuceneExample/src/main/java/com/linuxhint/example";
public static void main(String[] args) throws Exception
File indexDir = new File(indexDirectory);
File dataDir = new File(dirToBeIndexed);
SimpleIndexer indexer = new SimpleIndexer();
int numIndexed = indexer.index(indexDir, dataDir);
System.out.println("Total files indexed " + numIndexed);
private int index(File indexDir, File dataDir) throws IOException
Analyzer analyzer = new StandardAnalyzer(Version.LUCENE_46);
IndexWriterConfig config = new IndexWriterConfig(Version.LUCENE_46,
analyzer);
IndexWriter indexWriter = new IndexWriter(FSDirectory.open(indexDir),
config);
File[] files = dataDir.listFiles();
for (File f : files)
System.out.println("Indexing file " + f.getCanonicalPath());
Document doc = new Document();
doc.add(new TextField("content", new FileReader(f)));
doc.add(new StoredField("fileName", f.getCanonicalPath()));
indexWriter.addDocument(doc);
int numIndexed = indexWriter.maxDoc();
indexWriter.close();
return numIndexed;
In this code, we just made a Document instance and added a new Field that represents the File content. Here is the output we get when we run this file:
Indexing file /Users/shubham/somewhere/LH-LuceneExample/src/main/java/com/linuxhint/example/SimpleIndexer.javaTotal files indexed 1
Also, a new directory is created inside the project with following content:
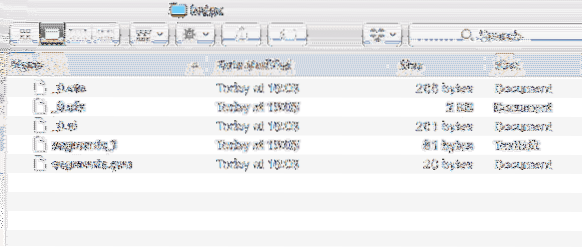
Index Data
We will analyse what all files are created in these Index in more lessons to come on Lucene.
Conclusion
In this lesson, we looked at how Apache Lucene works and we also made a simple example application which was based on Maven and java.


