In this tutorial we will be installing and demonstrating the use of Minio on Ubuntu 18.04 LTS server. This VPS has a static IP and I will be setting up DNS records and TLS connections to make this Object store as secure and production ready as possible.
Prerequisites
Here are the prerequisites you would need if you want to follow along:
- A VPS running Ubuntu or any other Linux distro with a static IP (IP_ADDRESS will be our placeholder, replace it with your VPS' actual IP address)
- A Fully Qualified Domain Name [FQDN]. example.com will be our placeholder.
Installation and Miscellaneous Setup
Let's login to our VPS and get things ready for Minio to run properly.
1. DNS Setup
Go to the nameserver where your domain's DNS records are maintained, most likely this is found at your domain registrar's website. Add an A record, pointing your chosen FQDN (for example minio.example.com ) to your VPS' IP_ADDRESS.
2. Minio User
Before we install Minio, let's create a new UNIX user account under whom minio will run. We don't want to run it as root or as the regular user who may have sudo access or other applications running under it. We create a minio system account, named minio-user:
$ sudo useradd --system minio-user --shell /sbin/nologin3. Minio Download
Next we download the minio binary (It is written in Go which compiles into a small lightweight binary).
Get the binary
$ curl -O https://dl.minio.io/server/minio/release/linux-amd64/minioMove the binary to a location where binaries are usually expected to reside:
$ sudo mv minio /usr/local/binMake the binary file executable and give minio-user user and group its ownership:
$ sudo chmod +x /usr/local/bin/minio$ sudo chown minio-user:minio-user /usr/local/bin/minio
4. /etc config files, startup scripts and storage device
We need Minio to start up with system reboot and be recognized as a running service by the OS. Not doing so would result in catastrophes such as when the OOM-killer sees this process and decides that it's not useful enough. We would also need a directory where the actual data of our object store is going to be saved:
$ sudo mkdir /usr/local/share/minio$ sudo mkdir /etc/minio
Make sure that minio has full control over these directories:
$ sudo chown minio-user:minio-user /usr/local/share/minio$ sudo chown minio-user:minio-user /etc/minio
Inside the /etc/default directory we need to create a minio file to specify environment variables like the port number we will be listening on and the directory where the data should be saved (the volume). We created the volume earlier that was the /usr/local/share/minio directory. So use your favourite text editor to create a file /etc/default/minio and add the following contents inside it:
MINIO_VOLUMES="/usr/local/share/minio/"MINIO_OPTS="-C /etc/minio --address minio.example.com:443"
Make sure that you write your VPS' actual designated FDQN instead of the literal string minio.example.com above. Port number 9000 is what they usually use in the Documentation but we are going to use proper TLS installation listening at port 443. Since it is a port number less than 1024, we need to expressly tell the OS that it is okay for minio to listen on these ports:
$ sudo setcap 'cap_net_bind_service=+ep' /usr/local/bin/minioLastly, we need to configure the minio service. Fortunately the script that does it is available at their GitHub repo and we will place it at its appropriate place:
$ curl -O https://raw.githubusercontent.com/minio/minio-service/master/linux-systemd/minio.service
$ sudo mv minio.service /etc/systemd/system
Reload all systemd units and enable minio to start on boot
$ sudo systemctl daemon-reload$ sudo systemctl enable minio
Lastly, make sure that your firewall allows communication at port 443.
LetsEncrypt TLS Certificates using Certbot
We need to negotiated TLS certificates between our Minio server and LetsEncrypt. Certbot is the client which does this for us and also automates the certificate renewals. Let's first install Certbot:
$ sudo apt update$ sudo apt-get install software-properties-common
$ sudo add-apt-repository ppa:certbot/certbot
$ sudo apt-get update
$ sudo apt-get install certbot
Then install the certs, as documented by Minio Docs:
$ sudo certbot certonly --standalone -d minio.example.com --staple-ocsp -m[email protected] --agree-tos
Here you enter your FQDN for the Minio server after the -d flag and your email address after -m flag. The email address is important as it allows LetsEncrypt to notify you about pending renewals.
Your emails will now be present at /etc/letsencrypt/live/minio.example.com. Of course, the last directory name would depend on your chosen FQDN. Now copy the certs to Minio's /etc/minio directory and give it permission to access them.
$ cp /etc/letsencrypt/live/minio.ranvirslog.com/fullchain.pem /etc/minio/certs/public.crt$ cp /etc/letsencrypt/live/minio.ranvirslog.com/privkey.pem /etc/minio/certs/private.key
$ chown minio-user:minio-user /etc/minio/certs/public.crt
$ chown minio-user:minio-user /etc/minio/certs/private.key
Now you are ready to use the service:
$ sudo service minio start$ sudo service minio status
Output:
- minio.service - Minio
Active: active (running) since Tue 2018-10-09 11:54:41 PDT; 5s ago
Docs: https://docs.minio.io
Process: 15874 ExecStartPre=/bin/bash -c [ -n "$MINIO_VOLUMES" ] && echo "Variable
MINIO_VOLUMES not set in /etc/default/minio" (code=exited, status=0/SUCCESS)
Main PID: 15877 (minio)
Tasks: 13 (limit: 4915)
CGroup: /system.slice/minio.service
└─15877 /usr/local/bin/minio server -C /etc/minio --address minio.example.com:443 /usr/
local/share/minio/
Oct 09 11:54:41 hostname minio[15877]: Browser Access:
Oct 09 11:54:41 hostname minio[15877]: https://minio.example.com
Oct 09 11:54:41 hostname minio[15877]: Command-line Access: https://docs.minio.io/docs/
minio-client-quickstart-guide
Oct 09 11:54:41 hostname minio[15877]: $ mc config host add myminio
https://minio.example.com
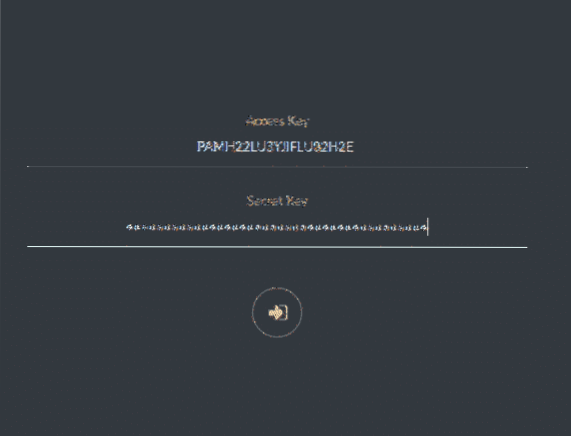
PAMH22LU3YJIFLU82H2E IKJ+qtc0Oqdn46R3dLfsjv5bCnm8UEeIBYpdG8qg
…
The output of this command will contain the access key (PAMH22LU3YJIFLU82H2E) and secret key (IKJ+qtc0Oqdn46R3dLfsjv5bCnm8UEeIBYpdG8qg) for minio as shown in bold letters above. Your keys would be different so don't copy the ones mentioned here.
Using Minio
Open up your browser and visit https://minio.example.com (make sure to use the FQDN you assigned) and use the access and secret key listed in your service minio status command to login in for the first time.
And you will be greeted by the Minio UI.
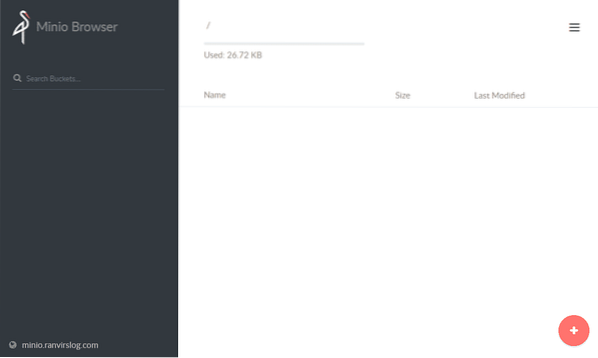
Here you can use the plus sign at the bottom left corner to upload files or create a new bucket. I created a new bucket called mybucket.

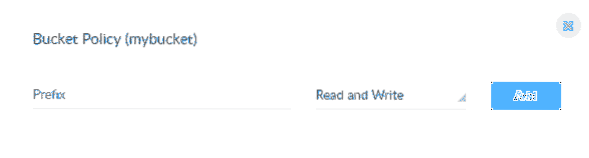
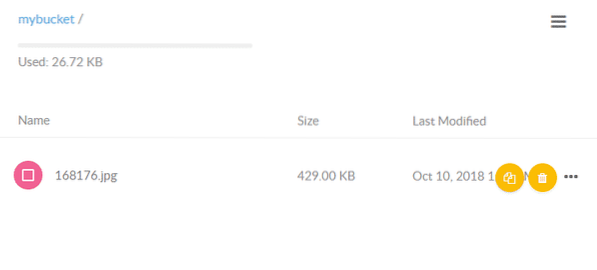
You can edit its policy to read and write and then upload a few files (say images) into this bucket. Minio will create a unique URL for each object in a bucket. You can set policies for read and write per bucket as well as the expiration date on individual object's URL.
Conclusion
That's the basics of how you get started with an object store. The objects themselves are ideally not meant to be modified just read from or added to the buckets. You can integrate this into your application by following the official documentation. It supports a wide range of programming languages ranging from Go, Python, JavaScript to .NET.


