Introduction to WordPress
WordPress is an open-source content management system (CMS). It allows you to create and manage blogs. One more important feature being, it allows the users to host their own dynamic website without actually coding from scratch. It provides a user-friendly interface to update blog posts and websites. A wide plethora of templates are available for the users to choose from. Complete customization of the website is an added advantage of WordPress. Even though it has built in templates, the software developers can customize it by using the basic WordPress framework and then adding their own PHP code, styling statements and scripts. It also allows the developers to fire SQL queries to make substantial changes in the database linked to these websites.
A user-friendly WordPress dashboard helps the user to navigate through different themes, plugins and different features and extensions available through WordPress.
Figure 1: A Sample WordPress Website
Some of the key features of WordPress are:
- Plugins are supported by WordPress; thus it gives flexibility to add new modules.
- All the websites created under WordPress are indexed properly on the search engine. Thus, the websites are search engine optimization (SEO) friendly.
- The multimedia texts like images, videos are maintained properly.
- WordPress is multilingual, thus allowing dynamic translation of the websites.
- Users can create creative and innovative websites without programming at all.
- A lot of popular widgets are available to choose from along with the customizable themes.
- A variety of the templates have the social sharing features indicating the number of social media networks it supports. In this case, the more the merrier.
Thus, everything from a personal blog to a large corporate website can be created using WordPress. It has evolved as the best self-hosting services as well as a popular content management system.
Introduction to DigitalOcean Virtual Private Server (VPS)
DigitalOcean is a cloud platform to deploy virtual servers, manage storage and balance loads. Cloud is basically a model where users have a convenient, on-demand access to a shared pool of resources, such as servers, storage and applications, over the internet. Thus, the method of accessing these shared resources which are virtual in nature and when required is called as cloud access.
Resources like CPU and memory options are allocated to the cloud servers for the users to access. The operating system and other complementary software are based on the developer's choice. Website hosting, distributed applications, sending and storing of information are some of the applications of cloud usage.
Two types of cloud hosting are possible:
- Shared hosting: It is the most common and simple way of getting a site up and running. In this type of hosting, the pool of resources is shared by millions of users. The location of the cloud and the allocation of resources depends on the cloud provider. Shared hosting can be divided into two types, para-virtualization and true-virtualization, which make uses of OpenVZ and KVM respectively.
- Dedicated hosting: Here, entire physical server is dedicated to a single client. The usage and allocation of resources is completely under the developer's control. It is more flexible in nature. The cloud resides within the organisation it serves.
DigitalOcean is a shared hosting based on KVM virtualization and made available to millions of users to reap the benefits of the services provided by them.
Virtualization:
Virtualization supports running of multiple virtual server machines on a single physical machine. This enables an efficient use of resources, meaning that services can still function independently just as it's on a different physical hardware. If a hardware failure occurs, the virtual servers are transferred to another healthy physical server. Virtualization also divides users without actually isolating them. Hypervisor basically manages these virtual servers. Individual VPSs have their own Operating System installed which the user can gain access to depending on the type of cloud.
The virtual servers created are called as droplets as in droplets in the ocean, in DigitalOcean terminology.

A fair share of CPU, memory, storage and load balancing resources are assigned to these droplets by default. If the resources fall short, dynamic allocation is possible in DigitalOcean.
The four type of cloud services usually available are:
- Public: This cloud is available for publicly for everyone to use with sharing of resources. Entire control lies with the cloud provider. DigitalOcean by default allows to create all the Droplets as public servers.
- Private: This cloud is limited to a particular organization. All the internal departments of the firm have access to the cloud, no one else does.
- Community: Type of a public cloud designed to meet specific needs of people with common concerns. Can be owned by one or multiple organizations falling under same community.
- Hybrid: This cloud is a mixture of public and private both, where only sensitive information is stored on the private cloud. Other information is available on the public cloud.
DigitalOcean provides Virtual Private Servers. The main difference between VPS and Private Cloud, that VPS is based on either a single physical server or a public cloud server, whereas, in private cloud only specific authorized users can access the resources which are deployed across various physical servers of the mainframe. Another difference being, users can gain more control over the resource allocation and utilisation of a VPC over the traditional VPS; hence VPC can be more expensive than VPS. Unfortunately, DigitalOcean only provides VPS, but it's more than enough to host a public WordPress website.
DigitalOcean provides resource pooling of various computing resources like network bandwidth, storage and processing memory. Based on the demand, these virtual resources can be assigned or re-assigned to specific Droplets. DigitalOcean also allows automatic control and optimal use by leveraging a metering capability to monitor and report the usage.
Steps to Install and Configure WordPress On a Droplet
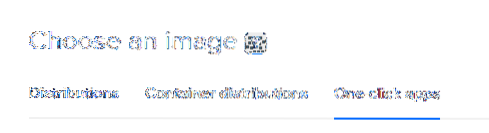
Step 1: Creating a droplet
-
- Select Create Droplet by navigating to this URL.
https://cloud.digitalocean.com/droplets
- The Droplet Hostname is the name provided to the droplet. Spaces should be avoided in the hostname if possible.
- Navigate to “one-click apps” section, and select “WordPress on 16.04” or whatever the latest version available at the moment.

- Under Select Size, select the $5/mo. plan is sufficient for starters. If you're upgrading from a shared hosting environment, go for the suitable plan. Make sure to keep in mind the future use of the website while selecting the server size. DigitalOcean also allows dynamic reallocation of the resources. So, even if thousands of users are visiting the website, the server space should be sufficient.
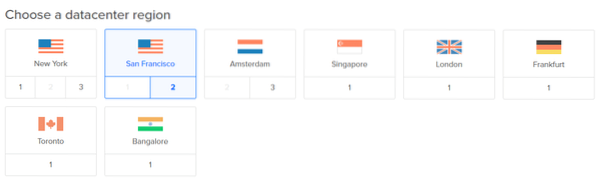
- The region determines the physical location of your VPS. This basically means that location should be selected based on the location of the audience. This will enhance SEO techniques and speedy retrieval of the information.
- Next, click on Enable Backups option, to keep a copy of the data just in case, the information is lost, it can be retrieved easily if a proper and updated backup is maintained. However, it costs 20% of the Droplet price.
- Scroll to the bottom of the page and click the Create Droplet button. Once that is done, the virtual droplet is created and installed.
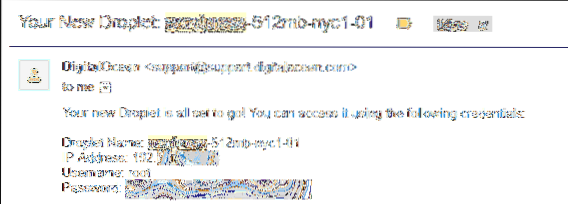
- After the droplet is created, copy the IP address.
An email is sent after the creation of the droplet containing public IP to the Droplet, username and password. The username is set as 'root' and a default password is a randomly generated one.
Step 2: Access WordPress in the Droplet
- Enter IP address to the Droplet in the browser. The WordPress site can be accessed from the given public IP address. Navigate to this address, find the admin account, change the default password to a safe one. http://
/wp-login.php - Type the given username, and the password to login to the admin area.
- Navigate to http://
/wp-admin/users.php
Use a secure password to the admin account to avoid any sort of leaking of the information in the future. Choose the password that can be easily memorised. Use this website to check how secure the password is. https://howsecureismypassword.net/
Step 3: SSH Login
SSH is to get secure access of remote server. This is useful to install themes, plugins via the FTP protocol.
- After changing the default password, use PuTTY configuration to establish connection with the server through SSH. PuTTY is an open-source software.
- In the PuTTY window, enter domain name or the IP as host name and select connection type as SSH. Click on establish connection.
Buying A Customized Domain Name
A domain name is basically a memorable address on the internet to a web server. It is through the domain name that the users will find your website. Thus, it becomes essential to have a recognizable and a memorable domain name. A domain name carries brand reputation. It should be selected in such a way that it can roll of the tongue easily and can be embedded in the users' memory immediately.
That is where, domain name registrars like namecheap and godaddy come into picture. Eclectic plans are available on these platforms for the user to choose from according to his/her preferences. All domain names are unique, so it becomes quintessential to register the name before someone else claims it.
Once, the term of validity is over, if renewal is not done, the domain becomes obsolete and can be assigned to different users if asked for it; hence make sure to renew it before the term expired.
Mapping the Domain Name to IP Using Namecheap
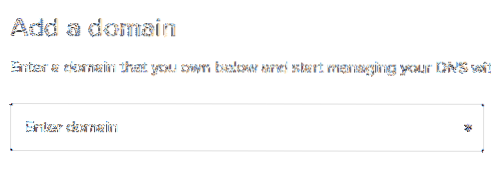
1. Register a domain by navigating to the following URL. This domain is going to be used to access the aforementioned WordPress website. Registering the domain creates a user profile too.
https://www.namecheap.com/domains/registration

2. Configure the domain name to use DigitalOcean's name servers :
- Login to the Registrar's Control Panel and go to Domain List https://ap.www.namecheap.com/Domains/DomainList

- Select the domain name that you want to configure and click “domain” tab
- After that, specify custom DNS servers as DigitalOcean name servers. Type ns1.digitalocean.com, ns2.digitalocean.com and ns3.digitalocean.com in the text boxes.
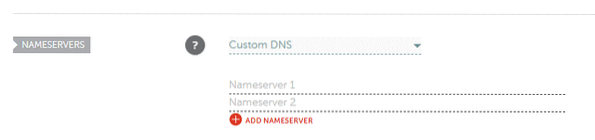
- Save. This completes the configuration of the name servers.
3. Create droplet if you do not already have one. For existing droplets, select the IP address of the droplet and then copy it in a new tab in your browser. This is done to check if the server is working or not.
Configuring Domain Name with The Droplet
- Now, to configure the domain name to the droplet, we need to login to the domain provider's control panel and create an A Record. However, since DigitalOcean is used as the web server, its inbuilt DNS server is used to add the records. It's much faster than using rest of the DNS servers.
- A-Record stands for address record and it is used to find the IP address of a computer connected to the network. In DigitalOcean's control pane, navigate to “Networking”

- Add the domain name registered in Namecheap.
- Type @ as the hostname, and select the newly created Droplet where WordPress is installed as “Will redirect to”
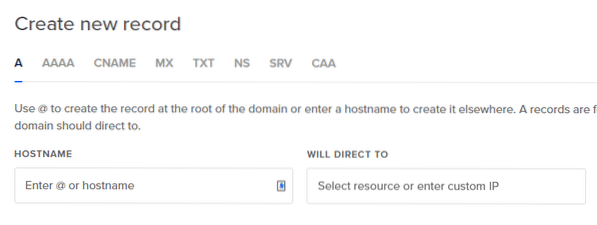
- Add rest of the records such as CNAME if a subdomain is used, MX records if a mail server is used in the same way as above records.
In order to check if things are in place, open the command prompt and type
ping domain.name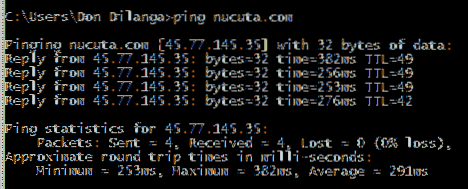
If this works without any error, it means you are all set and the domain name is correctly mapped to the IP address and thus, the domain name can be used directly to access it.
Thus, this gets us to the end of this article where we covered installation and configuration of WordPress on DigitalOcean and mapping of the domain name to an IP.
Good news! All the installation steps are successful and now you are ready to launch your own innovative and creative WordPress website on DigitalOcean Cloud Hosting. The WordPress site can further be customized using themes, plugins. Most of the themes can be downloaded for free of charge from here https://wordpress.org/themes/ , whereas the plugins can be downloaded from here https://wordpress.org/plugins/


