Its primary use is on GNU Gparted and PartitionMagic packages, although PartedMagic is a commercial Software. It's essential for data.
This tutorial will walk you through PartedMagic operations like creating bootable media, booting up, partitioning, data recovery, etc.
How to Use PartedMagic To Create a Bootable Media
- Let us start by getting a copy of the PartedMagic ISO by navigating to the official website: https://partedmagic.com/store/
- Next, we need to burn the PartedMagic ISO to a CD or USB. For this tutorial, we will illustrate using a USB drive. You can use tools such as PowerISO (on Windows) or K3B (For Linux).
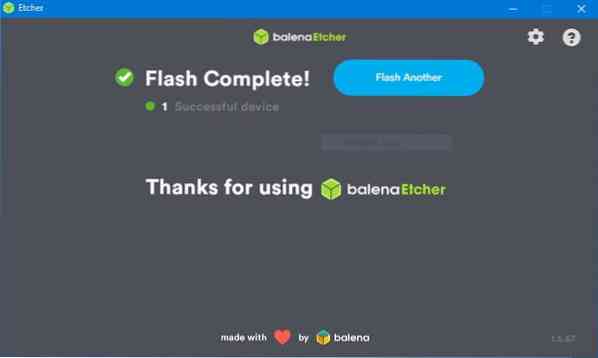
- Download a USB bootable media creation tool. Open the following resource link to download balenaEtcher: https://sourceforge.net/projects/etcher.mirror/
- Install the application-it works for Mac, Windows, and Linux systems, then launch it.
- Ensure you have your USB drive connected and is visible under the Devices* Tab in balenaEtcher.
- Select the PartedMagic iso to burn. If you have multiple USB drives connected, select the correct one and click Flash
- ALL THE DATA STORED IN THE DRIVE WILL BE ERASED! BACKUP IMPORTANT CONTENT!
- Wait until the Flash process completes, allowing you to boot into PartedMagic.
How to Boot Up PartedMagic
- To use PartedMagic, we need to boot into it like a Normal OS.
- Reboot your Machine and Press the Boot Key. Check this site for your boot-up key: https://www.disk-image.com/faq-bootmenu.htm
- This will take you to the PartedMagic Boot-up Menu. Here're you have various options and operations you can perform. However, we want to boot into PartedMagic Interface.
- Select the Live with Default Settings 64
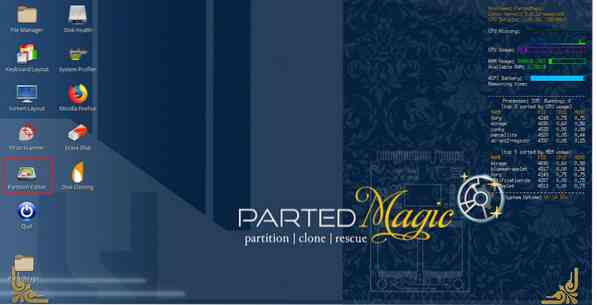
- Selecting this option will boot up the OS, and you will get to the PartedMagic Desktop Environment.
- Once in the desktop environment, you can perform tasks like partitioning disks, cloning, erasing, and surfing the web.
How to Use GParted
One of the tools available in the PartedMagic Toolset is GParted. It allows us to perform changes to disks and partitions. For example, we can use it to create a partition for a Linux system installation.
Let's discuss how to use GParted to partition a disk.
DISCLAIMER: DO NOT try this on a Drive with valuable data. You will lose the data. We take no responsibility for any data loss that may occur due to instructions given in this tutorial. BACK UP YOUR DATA!
We will partition an existing disk and create a new partition that we can use to install a Linux distribution. We will not be formatting the partition. Unless you are an advanced Linux user, stick to Resizing a Partition.
After performing disk changes with GParted, perform a disk check to fix any errors that may keep the installation from booting up.
1. Start by booting up PartedMagic. Once you're on the desktop, launch GParted by selecting Partition Editor on the desktop.
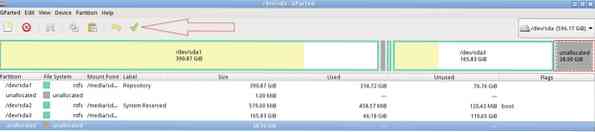
2. This will automatically launch GParted and list all the available disks. Select the target disk from the main menu. By default, GParted selects the first disk from the list of the connected devices. Choose the desired disk from the dropdown menu.
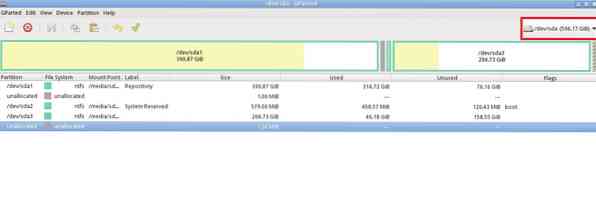
3. Once you have the desired disk selected, the system will reload the disk, displaying all the disk's information such as Partitions, File system, Partition Tables, etc.
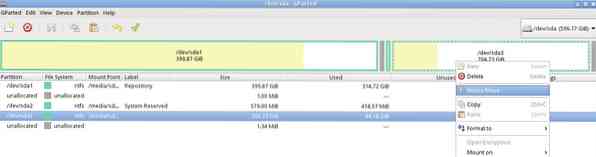
4. Now, select the partition you wish to resize and right-click. Select Resize/Move option. If you have multiple partitions, select the partition at the end, making it easy to reattach the partition if desired.
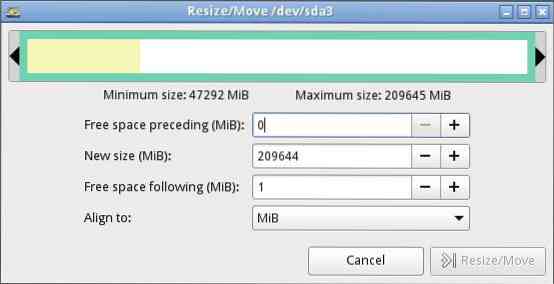
5. That will launch the Resize/Move /dev/sd_ dialog box.
6. At this point, you can specify the free space for the resized partition. For ease of use, use the colored indicator to resize the partition. Ensure to leave adequate free space on the existing partition.
7. Once you are satisfied with the size allocated to the partition, click on Resize, which will close the dialog box and navigate back to the GParted main window. Gparted will display changes performed to the disk but not applied.
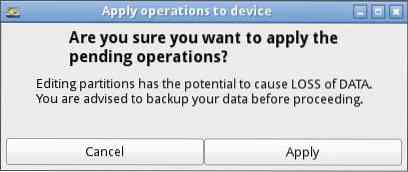
8. Complete the specified operation to the disks by selecting the Apply option on the main menu. If you're performing tasks on a disk with data, ensure you are comfortable with the changes before applying.
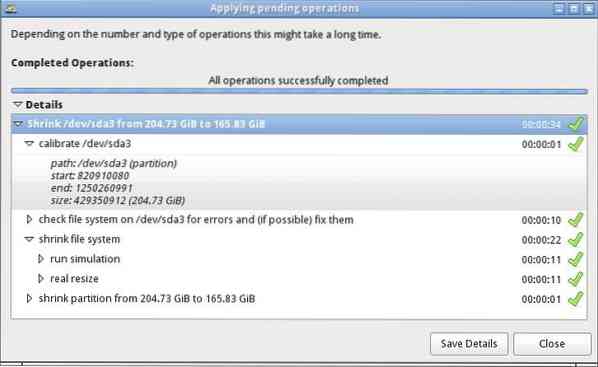
9. GParted will apply all the pending operations. It will display the progress as it occurs and shows the Applying Pending Operations complete dialog window.
10. To view the log of the recently performed operations, select View Details options.
11. Resizing partition creates an unallocated disk space you can to perform tasks install a new Linux OS. You can perform the partitioning while installing the OS or create them using GParted. For the sake of this tutorial, we will not create the Filesystem.
Formatting A Partition
1. Once we have created a partition, we can format it using GParted.
2. Right-click on the unallocated partition we created and selected NEW
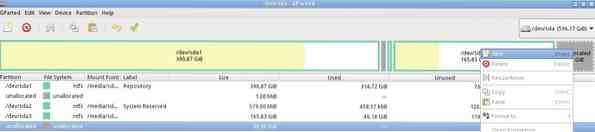
3. You can either create a Primary or Extended Partition. For those using MBR, you cannot have more than three primary partitions, and you will have to stick to the Extended partition

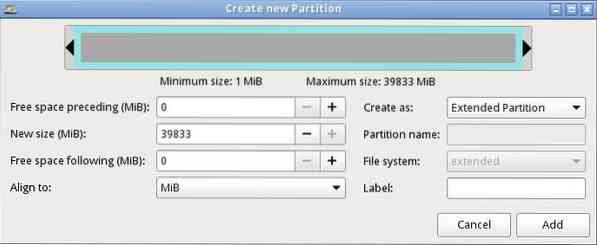
4. Select the Label the File system such as DOS, EXT4, ETX3, etc.
5. Finally, select ADD and apply all the changes.
Conclusion
You can perform other tasks with PartedMagic like copying files using the file manager, cloning a disk, erasing a disk, encryption, erase traces, etc.
TO AVOID LOSING, BE CAREFUL WHILE WORKING WITH PARTED MAGIC DATA!

