Note: We will be explaining the commands and procedure on Debian 10 (Buster) system. You should
Installing SOGo Groupware on Debian 10
Step 1: Install Apache
Firstly, update the system repository index as follows:
$ sudo apt updateEnter the sudo password.
Now install Apache using the below command in Terminal:
$ sudo apt install apache2Step 2: Install and Configure MariaDB
We will need to install MariaDB as a database backend for SOGo. Execute the below command to install the MariaDB server on your system:
$ sudo apt install mariadb-serverNow you might be prompted with the Y/n choice to carry on the installation of MariaDB. Press Y to proceed.
Now execute the below command in Terminal to improve the security of your MariaDB installation:
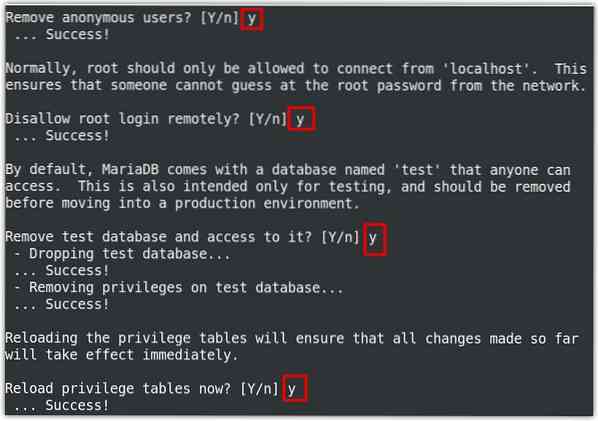
$ sudo mysql_secure_installationWhen asked to enter the current password for root, just press Enter. After that, you will be asked to set a new root password so that no one can login as a MariaDB root user without authentication. Press y if you want to set a new password for MariaDB root. Then enter the password twice.

Now press y for all subsequent questions also shown highlighted in the following screenshot.
Step 3: Install SOGo
Sogo can be installed easily via an apt command-line utility. However, we will first need to add its repository to our system's local repositories. Follow the below steps to do so:
To install SOGo in your Debian system, first, add the SOGo repository to the sources.list file. In the Terminal, execute the below command to edit the sources.list file:
$ sudo nano /etc/apt/sources.listNow to add the SOGo repository, add the below line at the end of the file:
deb http://packages.inverse.ca/SOGo/nightly/2/debian/ buster busterNow save and close the sources.list file.
Add key for SOGo repository using the following command:
After adding a new repository, you will need to update the local repository index. Use the below command to do so:
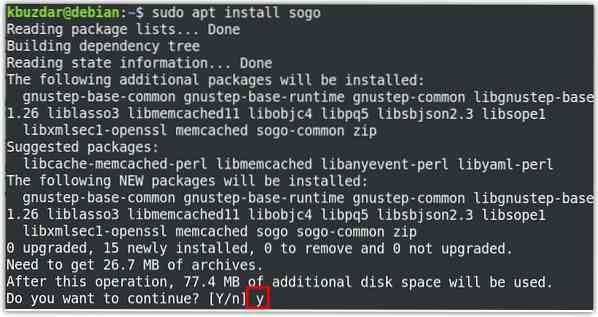
$ sudo apt updateOnce the update is completed, you can install SOGo as follows:
$ sudo apt install sogoNow you might be prompted with Y/n (yes/no) option for proceeding with the installation. Press Y to proceed.
Once SOGo is installed, start its service using the below command:
$ sudo systemctl start sogoTo automatically start the SOGo service at boot, execute the below command in Terminal:
$ sudo systemctl enable sogoNow start MySQL using the below command in Terminal:
$ sudo mysqlNow we will create a database and a user. Issue the following to create a database “sogo”:
$ CREATE DATABASE sogo;Now create a user named “sogo” with the password “password”.
$ GRANT ALL ON sogo.* TO 'sogo'@'localhost' IDENTIFIED BY 'password';First, connect to the database to run subsequent commands:
$ USE sogo;Then create a database table to hold user information.
$ CREATE TABLE sogo_users (c_uid VARCHAR(10) PRIMARY KEY, c_name VARCHAR(10), c_password VARCHAR(32), c_cn VARCHAR(128), mail VARCHAR(128));Now add an entry in the table for a user:
$ INSERT INTO sogo_users VALUES ('sim', 'sim', MD5('sim123'), 'Sim Sam', sim@ domain.com');$ flush privileges;
$ exit;
Now we will have to enable some of the Apache modules. Execute the below command in Terminal to do so:
$ sudo a2enmod proxy proxy_http headers rewriteAfter the modules are enabled, restart apache as follows:
$ sudo systemctl restart apacheStep 4: SOGo Configuration
Now we will configure SOGo to make it use the MySQL database that we have created in previous steps. We will do configurations under the user “sogo”. For this purpose, issue the following command to change the user:
$ su sogoThen execute the below commands for SOGo configurations. Make sure to replace the Country/Region with your timezone, and domain.com with your actual domain. Also, replace password with the password you have set during database creation.
$ defaults write sogod SOGoTimeZone "Country/Region"$ defaults write sogod SOGoMailDomain "domain.com"
$ defaults write sogod SOGoLanguage "English"
$ defaults write sogod SOGoUserSources '(canAuthenticate = YES; displayName = "SOGo Users"; id = users; isAddressBook = YES; type = sql; userPasswordAlgorithm = md5; viewURL ="mysql://sogo:password@127.0.0.1:3306/sogo/sogo_users";)'
$ defaults write sogod SOGoProfileURL 'mysql://sogo:[email protected]:3306/sogo/sogo_user_profile'
$ defaults write sogod OCSFolderInfoURL 'mysql://sogo: password @127.0.0.1:3306/sogo/sogo_folder_info'
$ defaults write sogod OCSSessionsFolderURL 'mysql://sogo: password @127.0.0.1:3306/sogo/sogo_sessions_folder'
$ defaults write sogod SOGoLoginModule Calendar
$ defaults write sogod SOGoSieveScriptsEnabled YES
$ defaults write sogod SOGoAppointmentSendEMailNotifications YES
# The default port for SOGoSieveServer was 2000 but now it is 4190
$ defaults write sogod SOGoSieveServer sieve://localhost:4190
$ defaults write sogod SOGoVacationEnabled YES
$ defaults write sogod SOGoMailMessageCheck every_5_minutes
$ defaults write sogod SOGoFirstDayOfWeek 1
# following is the configuration for mailbox
$ defaults write sogod SOGoSentFolderName "INBOX.Sent"
$ defaults write sogod SOGoTrashFolderName "INBOX.Trash"
$ defaults write sogod SOGoDraftsFolderName "INBOX.Drafts"
$ defaults write sogod NGImap4ConnectionStringSeparator "."
$ exit
Now restart SOGo service using the below command:
$ sudo systemctl restart sogoNow modify the SOGo configuration file for apache to use localhost with no SSL. You can find the SOGo configuration file for Apache at /etc/apache2/conf.d/SOGo.conf.
Edit the file using the below command:
$ sudo nano /etc/apache2/conf.d/SOGo.confNow find the following lines and replace 443 with 80 and yourhostname with localhost.
RequestHeader set "x-webobjects-server-port" "443"RequestHeader set "x-webobjects-server-name" "yourhostname"
RequestHeader set "x-webobjects-server-url" https://yourhostname
It should now look like this:
RequestHeader set "x-webobjects-server-port" "80"RequestHeader set "x-webobjects-server-name" "localhost"
RequestHeader set "x-webobjects-server-url" "http://localhost"
Then to check for any configuration errors, execute the below command in Terminal:
$ sudo apachectl configtestIf you receive the following output, it means configurations are fine.
Syntax OKNow restart the Apache server as follows to apply the configuration changes:
$ sudo systemctl restart apache2Now access the following address in any web browser from the same system on which SOGO is installed:
http://localhost/SOGoYou should now see the SOGo login page where you can log in using your admin username and password, which are 'sim' and 'sim123'.
Uninstalling SOGo
In case you no longer need SOGo Groupwarw, you can easily remove it from your system. Execute the below command in Terminal to uninstall SOGo from your Debian system:
$ sudo apt remove sogoWhen you install SOGo, some dependencies are also installed with it. To remove those dependencies too, execute the below command in Terminal:
$ sudo apt remove --auto-removeAlternatively, if you want to uninstall SOGo along with all configuration files, execute the below command in Terminal:
$ sudo apt purge sogoThen to remove the dependencies too, execute the below command in Terminal:
$ sudo apt purge --auto-removeThat is all there is to it! In this post, you have learned how to install and configure SOGo groupware on Debian OS. For advanced configurations, visit SOGo official documentation.


