Install Nginx
By default, Ubuntu isn't shipped with Nginx. Therefore, it has to be installed manually with the following commands.
sudo apt-get updatesudo apt-get install Nginx
The first command updates the local repository information, whereas the second command installs the Nginx in the system.
Configure the Firewall
Configuring the firewall depends on the firewall software installed in the system. Since several firewalls are available in the market, it isn't easy to teach them how to configure them. Thus, this guide only demonstrates how to configure the default, inbuilt firewall- UFW, aka uncomplicated firewall. Other firewalls should have a similar configuration to this one.
sudo ufw app listsudo ufw allow 'Nginx HTTPS'
sudo ufw enable
The first command lists out available profiles to be used in the firewall. The second command uses the Nginx HTTPS profile in the allow (aka Whitelist) list of the firewall, and the third command enables the firewall. This guide later demonstrates how to use HTTPS. HTTPS is necessary nowadays as it secures the data connection between the client and the server. Browsers like Chrome will automatically default to HTTPS version of any site in the future; hence it's required to have SSL enabled for any web site, especially when the web site owner plans to improve its SEO score and the security.
Configure File System
Even though Nginx supports to serve content through multiple domain names, it's configured by default to serve content through a single domain. The default path is Nginx is /var/www/html. Multiple domains require to have multiple directories. The following instructions demonstrate how to create multiple directories to serve content through multiple domains.
- Create a directory for each domain with the following commands. The p flag is necessary to create parent directories, meaning when the www or any other directory in the address doesn't exist, it creates the whole line of directories with p flag. sudo mkdir -p /var/www/nucuta.com/html
- Assign ownership to the directories. This ensures the user has total control over the directories. However, here the user is taken from the currently logged in user, and therefore it's important to log in to the user account that is going to be assigned to the directory. The first segment of $USER is for the user, and the second segment is for the group to which the user belongs. sudo chown -R $USER:$USER /var/www/nucuta.com/html
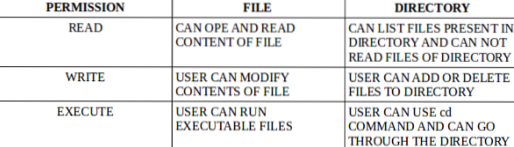
- Change the permission of the directories with following commands. There are 3 entities, and 3 permissions in Linux file systems. In the following example, the first digit is for a user, the second digit is for the group, and the last digit is for all (aka public). The read permission has the value of 4, write permission has the value of 2, and the execute permission has the value of 1. These numbers can be added together to alter the permission of an entity, for instance, 755 means, USER has the permission to READ, WRITE, and EXECUTE (4+2+1 = 7), GROUP has the permission to READ, and EXECUTE (4+1 = 5), ALL has the permission to do the same. The permission is applied to files and directories both with different rules. The rules are listed in the following chart.
- Once the permission was assigned, create a default page for each domain in the web browser when the naked domain is called. Naked domain means the domain without any sub-domains, example nucuta.com. nano /var/www/nucuta.com/html/index.html.
- Add the following boilerplate code in each index file, and save as index.html in respective directory (as seen above).
sudo mkdir -p /var/www/nucuta.net/html.
sudo chown -R $USER:$USER /var/www/nucuta.net/html
sudo chmod -R 755 /var/www/nucuta.net/html
nano /var/www/nucuta.net/html/index.html.
Success!
Configure Nginx
Configuring the Nginx is not that difficult as Nginx by default supports multiple domains. Even though it's possible to use configuration information of multiple domains in the same file, it's advisable to use multiple files for each domain's configuration information. The default configuration file is named “default”, and is located in /etc/nginx/sites-available/default
- Navigate to /etc/nginx/sites-available/default, and delete all the configuration information. Use a text editor like nano or notepad++ nano /etc/nginx/sites-available/default
- Copy and paste the following configuration, and save it. server
- Copy the configuration information in default file to a domain-specific configuration file with the following command. sudo cp /etc/nginx/sites-available/default /etc/nginx/sites-available/nucuta.com
- Repeat the aforesaid step to the other domain as well with the following command. sudo cp /etc/nginx/sites-available/default /etc/nginx/sites-available/nucuta.net
- Open both files with a text editor like nano (nano ), and change the server_name directive's value as follows. In /etc/nginx/sites-available/nucuta.com file
- Once both files were configured, copy them to the following directories to activate the configuration files. It creates a symbolic link between the actual file and the directory; hence in the future, only the files in a site-available directory have to be altered to make changes in both site-available, and site-enabled directories. sudo ln -s /etc/nginx/sites-available/nucuta.com /etc/nginx/sites-enabled/
- Go through the configuration files, make any more changes, and use the following commands to make the changes effective. The first command ensures the configuration files are free from invalid configuration information, and the second command ensures the server is properly reloaded or restarted to make the changes effective. Use either reload or restart commands. Reload is preferred, but restart can be used if reload didn't work out. systemctl config nginx
listen 80 default_server;
listen [::]:80 default_server;
root /var/www/html;
index index.html index.htm index.nginx-debian.html;
server_name _;
location /
try_files $uri $uri/ =404;
server_name nucuta.com
In /etc/nginx/sites-available/nucuta.net file
server_name nucuta.net
sudo ln -s /etc/nginx/sites-available/nucuta.net /etc/nginx/sites-enabled/
systemctl reload nginx or systemctl restart nginx.
Configure the DNS Records
Configuring the DNS settings depend on the DNS provider. However, all the DNS providers have a similar interface. By default, the domain registrar provides access to the DNS records. This phase requires the IP address of the server where the nginx web server is hosted. Getting the IP address entirely depends on the platform. Platforms like Linode, DigitalOcean, Vultr display the IP in the dashboard. If it's difficult to find contact the support of the respective service provider.
- In the DNS settings, add an “A” record, and use the server's IP as value, domain name as the host. Make sure the domain name uses here is same as the domain name used in the Nginx configuration file. After configuring one domain, repeat it for the other domain as well.
- Let the DNS records to be updated. It usually takes up to 24 hours, but usually, it's done in a few minutes.
Enable HTTPS
Enabling HTTPS is quite simple, and can be done for free of charge with letsencrypt. Letsencrypt is an open-source certificate authority that releases free SSL certificates to webmasters to encrypt the traffic to their website.
- Install snap-in the operating system with the following command. Note that this segment will use a snap daemon to install all the required packages instead of apt or apt-get. Snap is alternative package management, and a deployment tool that can be used to install packages in Ubuntu, and many other Linux operating systems. This is not required to install when having Ubuntu 16.04 LTS or any other higher version. However, still, run the last command to ensure the snap is up to date. sudo apt update
- Install the certbot that configures, and renews the SSL certificates for both the domains. Without certbot SSL certificates have to be installed manually. On top of that, renewing has to be done manually as well. This can be a problem as letsencrypt certificates expire after 3 months later. Therefore, the SSL certificate must be renewed once per 3 months to ensure the site can function properly as expected. Use the following command to install the certbot with ease. sudo snap install --classic certbot
- Certbot is installed in /snap/bin/certbot directory. To run the certbot executable file through the command line without specifying its full path, run the following command. It creates a symbolic link between the snap/bin/certbot and the /usr/bin/certbot directory, thereby allowing the certbot executable to run on the command line interface without specifying its full path. sudo ln -s /snap/bin/certbot /usr/bin/certbot
- Configure the Nginx instance in the system with the following command. There is another command that directly targets the specific domain when configuring the SSL. The 2nd command specified below installs and configures the SSL certificate for the specified domain name. sudo certbot -nginx
- Run the following command to simulate the renewing process. The actual command without -dry-run flag is executed automatically as certbot configures a cronjob to run the command automatically after some times later. A dry run testing is required to ensure the certbot can renew the certificates without any obstacle. sudo certbot renew --dry-run
sudo apt install snapd
sudo snap install core; sudo snap refresh core
certbot --nginx -d nucuta.com
Conclusion
Configuring multiple domain names in a Nginx web server is quite easy as it provides a plethora of options to make the process easy. Certbot makes it possible to install SSL certificates for multiple domains for a Nginx web server. As the SSL certificate, this guide uses letsencrypt that provides SSL certificates for free of charge for any number of domains. The only downside of letsencrypt is its short lifetime, but certbot ensures it won't be a problem to the webmaster with its automatic renewing process.

