Hyper-V is Microsoft's hardware virtualization product. It lets you create and run a software version of a computer, called a virtual machine. Each virtual machine acts like a complete computer, running an operating system and programs. In this post, we will show you the three ways to disable Hyper-V on Windows 10.
Hyper-V runs each virtual machine in its own isolated space, which means you can run more than one virtual machine on the same hardware at the same time. You might want to do this to avoid problems such as a crash affecting the other workloads, or to give different people, groups or services access to different systems.
Hyper-V can help you:
- Establish or expand a private cloud environment. Provide more flexible, on-demand IT services by moving to or expanding your use of shared resources and adjust utilization as demand changes.
- Use your hardware more effectively. Consolidate servers and workloads onto fewer, more powerful physical computers to use less power and physical space.
- Improve business continuity. Minimize the impact of both scheduled and unscheduled downtime of your workloads.
- Establish or expand a virtual desktop infrastructure (VDI). Use a centralized desktop strategy with VDI can help you increase business agility and data security, as well as simplify regulatory compliance and manage desktop operating systems and applications. Deploy Hyper-V and Remote Desktop Virtualization Host (RD Virtualization Host) on the same server to make personal virtual desktops or virtual desktop pools available to your users.
- Make development and test more efficient. Reproduce different computing environments without having to buy or maintain all the hardware you'd need if you only used physical systems.
Disable Hyper-V on Windows 10
You can disable Hyper-V in Windows 10 in 3 quick and easy ways. We'll explore this topic under the methods outlined below in this section:
- Via Control Panel
- Via PowerShell
- Via Registry Editor
Let's take a look at the description of the step-by-step process in relation to each of the method.
1] Disable Hyper-V via Control Panel
To disable Hyper-V via Control Panel, do the following:
- Press Windows key + R to invoke the Run dialog.
- In the Run dialog box, type
appwiz.cpland hit Enter to open the Programs and Features applet. - In the window, on the left side, click the Turn Windows features on or off link.
- Wait for the applet to populate.
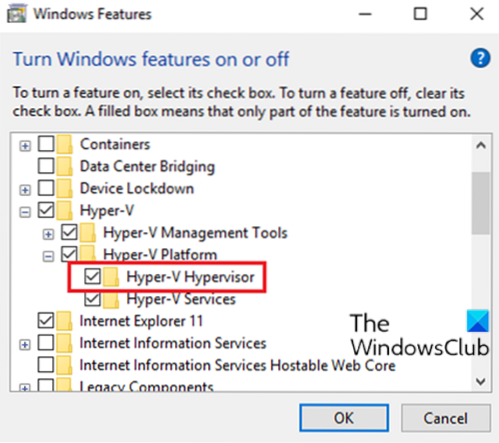
- Next, expand Hyper-V, expand Hyper-V Platform,
- Clear the Hyper-V Hypervisor check box or you can just uncheck the parent Hyper-V folder.
You can now exit Control Panel.
2] Disable Hyper-V via PowerShell
To disable Hyper-V via PowerShell, do the following:
- Press Windows key + X to open Power User Menu.
- Tap A on the keyboard to launch PowerShell in admin/elevated mode.
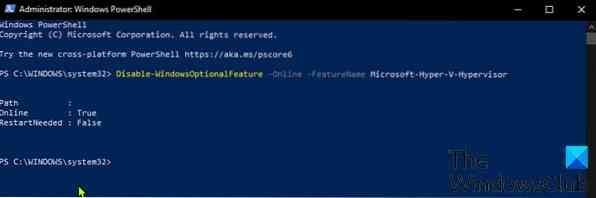
- In the PowerShell console, type in or copy and paste the command below and hit Enter:
Disable-WindowsOptionalFeature -Online -FeatureName Microsoft-Hyper-V-Hypervisor
Tip: Provided you have hardware virtualization support enabled in BIOS/UEFI, you can run the same command to quickly enable Hyper-V; just replace Disable with Enable in the command.
- The process might take a while. Once the command executes, you can exit PowerShell.
3] Disable Hyper-V via Registry Editor
Since this is a registry operation, it is recommended that you back up the registry or create a system restore point as necessary precautionary measures.
To disable Hyper-V via Registry Editor in Windows 10, do the following:
- Press Windows key + R to invoke the Run dialog.
- In the Run dialog box, type
notepadand hit Enter to open Notepad. - Copy and paste the code below into the text editor.
Windows Registry Editor Version 5.00 [HKEY_LOCAL_MACHINE\SYSTEM\CurrentControlSet\Control\DeviceGuard] "RequireMicrosoftSignedBootChain"=dword:00000000 [HKEY_LOCAL_MACHINE\SYSTEM\CurrentControlSet\Control\DeviceGuard\Scenarios] [HKEY_LOCAL_MACHINE\SYSTEM\CurrentControlSet\Control\DeviceGuard\Scenarios\HypervisorEnforcedCodeIntegrity] "WasEnabledBy"=dword:00000000 "Enabled"=dword:00000000
- Now, click the File option from the menu and select Save As button.
- Choose a location (preferably desktop) where you want to save the file.
- Enter a name with .reg extension (eg; Disable_HyperV.reg).
- Choose All Files from the Save as type drop-down list.
- Double-click the saved .reg file to merge it.
- If prompted, click on Run > Yes (UAC) > Yes > OK to approve the merge.
- You can now delete the .reg file if you like.
That's it on the three ways to disable Hyper-V on Windows 10!


