
To understand this article's objective, we should first discuss four key terms related to it: media, media files, Ubuntu, and Chromecast. Media is a communication outlet responsible for the storage and retrieval of data. The data storage and retrieval process align with data encoding and decoding. This data exists in four main forms: audios, videos, pictures, and documents. The mentioned media data types are synonymous with media files.
Encoding and decoding help maintain the integrity of these media files during their manipulation or access. Ubuntu is a Linux-based open-source operating system that can host an infinite number of media files installed on a machine with enormous storage. However, Ubuntu does not actually host the media files. It mirrors their state and storage location on a machine or computer display monitor. An authenticated user can easily gain access and manipulate the state of these files if possible.
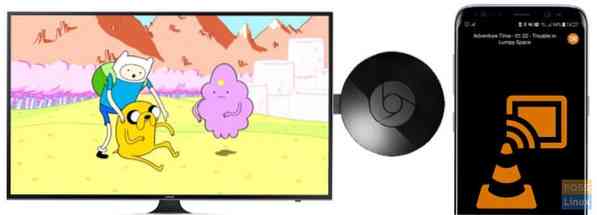
Chromecast is an electronic gadget that permits the seamless casting of media files from your smartphone or computer onto a target display with HDMI hardware and functionality. It is a bridge that permits media cast between a smartphone or computer and another display unit.
A Simple Chromecast Logic
Since Chromecast is a media bridge, it needs to connect to the targeted display unit. This display unit can be a smart TV or another computer. Chromecast is plugged into the display unit's HDMI port through an HDMI connector cable attached to it. This initial configuration setting is all you need to start casting media. This setup assigns your phone or computer the functionality of a remote control device. Your phone or computer will be responsible for initiating the media cast that will go through Chromecast and finally mirror the target content on your display unit.
For Chromecast to communicate with your smartphone or computer hardware, they both need to be under the same network. Since our main focus is using Ubuntu to cast media through Chromecast onto a display unit, by default, Chromecast is usually ready for network pairing. However, our Ubuntu machine might be hearing about Chromecast for the first time. In this case, we will need to introduce it to Chromecast through this network.
Power up both the Ubuntu machine and Chromecast and connect your Ubuntu machine to the network broadcast from Chromecast. This network paring is as easy as connecting your phone or laptop to a Bluetooth player when you want to listen to music.
Once the network connection between Ubuntu and Chromecast is successful, we can start configuring our way to media casting. However, the fulfillment of this network connection and pairing success further reveals several alternate means through which Ubuntu can cast media to Chromecast. These media casting modes are at Ubuntu's disposal, and we will have a look at each of them.
Casting Media From Ubuntu to Chromecast Using the Terminal
The use of Ubuntu CLI (Command Line Interface) or terminal is one cool way of casting your online or offline videos to Chromecast. The online videos can be from sights like YouTube or Netflix, while your offline videos are the ones stored in your computer's movies or music directory and external storage devices.
Moreover, you can additionally cast audio files or even photo files and enjoy their slideshow with a relaxed poise. However, since we are on the terminal or CLI, the success of our media casting attempt won't be direct, and at the same time, it won't be complicated. We will need some assistance from a program with renowned success in media casting on Ubuntu. This program is mkchromecast. It is a reputable media casting tool, especially for audio and video files. The first step is to have it installed on our Ubuntu OS system.
Launch your terminal and make sure you are a Sudoer user or you have Sudo privileges because your Ubuntu system will require some authentication before it allows you to install anything. Before we forget, updating your Ubuntu system should precede the installation of any software or application.
It is a good way to keep our Ubuntu household in order and ensure that the already installed software applications and features are in a stable state and functioning as required.
tuts@FOSSlinux:~$ sudo apt update
We can now install mkchromecast
tuts@FOSSlinux:~$ sudo apt install mkchromecast
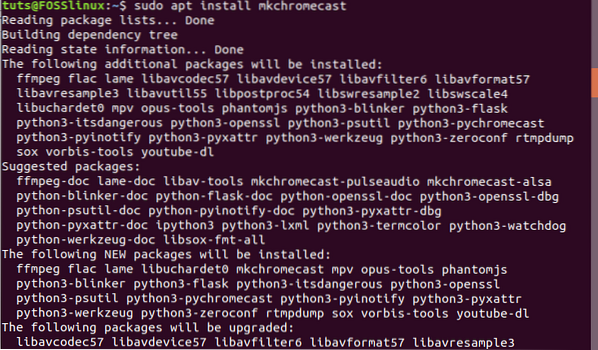
This installation process should take less than a minute.
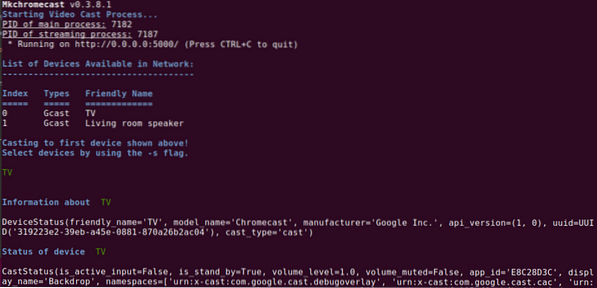
Since your Ubuntu machine and Chromecast gadgets are already connected and paired on the same network at this stage, the mkchromecast program we installed will now help us reveal the media devices active on our paired network. The following command should list them on our terminal.
tuts@FOSSlinux:~$ mkchromecast -t
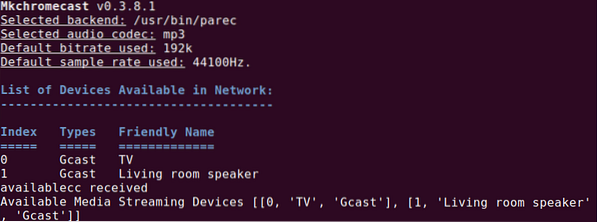
A successful connection and pairing of your Ubuntu machine to the Chromecast network should display a Chromecast icon on the top-right corner of your Ubuntu desktop environment. It is the same desktop environment area where you are likely to come across your machine's Wi-Fi and Power icons. Clicking on the Chromecast icon will display its broad menu options. Select the first option. It will initiate a search for available media streaming devices. You should be able to see a list of the devices connected to your network.
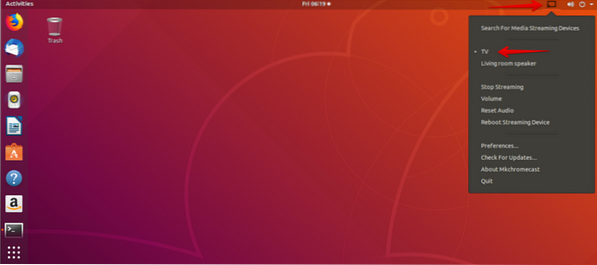
In our case, we have a TV and Living room speaker as the listed devices on the Chromecast network. We are now comfortable enough to choose either of these two devices, depending on the type of media we want to cast. We will go with the TV device for video media, and for audios media, we will go with the Living room speaker.
Casting Local Video From Ubuntu to Chromecast Using the Terminal
Your Ubuntu system can also cast local videos to Chromecast. To achieve this objective, we will still need to use our Ubuntu terminal and also borrow the expertise of the mkchromecast application we installed earlier. Go back to your terminal and type in the following command while adhering to the displayed syntax rules.
tuts@FOSSlinux:~$ mkchromecast --video -i [path/to/your/local/video]
An example path on our Ubuntu system can be something like the following:
/home/ tuts/Downloads\linux.mp4
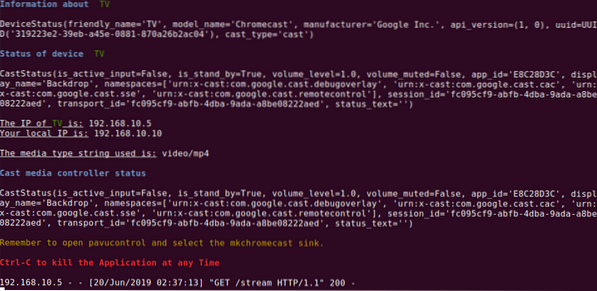
The screenshot below regarding some of the mkchromecast command's output is relaying some fascinating information. You should be able to pick up on the following important information fragments extracted from the terminal's output.
-
- The TV's IP address (our display streaming media device)
-
- Ubuntu's local IP address since we are not on an internet-based network
-
- The media type is an MP4 video. A correct match to the media type of the video path we added earlier.
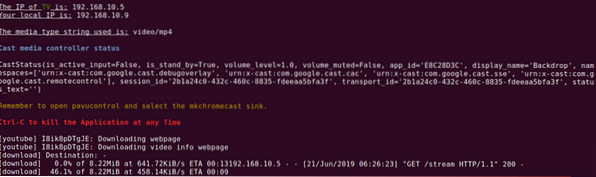
Since we can now enjoy our cast local videos stream from a smart TV display, you should also learn the necessary tweaks that will enable you to cast online streamed videos like the ones on YouTube. This step is easy when you know the exact URL of the video you want to cast. The command syntax to achieve this media cast through the mkchromecast program is as follows:
tuts@FOSSlinux:~$ mkchromecast -y [authentic online video url] --video
A mkchromecast command to an actual YouTube video should like the following:
tuts@FOSSlinux:~$ mkchromecast -y https://www.youtube.com/watch?v=yGVgKJTJkQo --video

However, you should note that this approach to video casting, especially when dealing with YouTube videos, is a two-way street. The first instance of the command downloads the intended videocast and stores it on your Downloads directory. The second and final instance that follows is casting the downloaded video file to Chromecast.
The last command tweak about using mkchromecast to cast media from your terminal is how to stop the media cast from running. Here, you don't need to key in any command and as the screenshot above depicts, using the keyboard shortcut Ctrl+Cshould suffice. You have now mastered media casting from the Ubuntu terminal.
Casting Media From Ubuntu to Chromecast Using VLC Player
If you are not an advanced Linux user yet or do not have much interest in the Ubuntu command line's geeky maneuvers, there is a simple and straight forward approach to cast your media. Everyone is familiar with the stability and performance metrics of the famed VLC media player. Moreover, there are no complex configuration routines involved for you to start casting your media to Chromecast. VLC's complexity is in its functional design, but not its user interface layout. For that reason, this media player is packaged with built-in support for Chromecast.
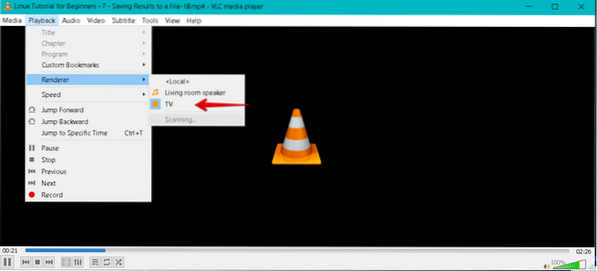
The following simple four steps are the only ones you need to take to successfully use your Ubuntu's VLC to cast media to Chromecast.
-
- The first step is to launch the VLC media player. You can launch it by using it to play a video file you intend to cast to Chromecast.
-
- On the VLC menu bar, please navigate to the Playback tab and click on it.
-
- The Playback tab should reveal a drop-down menu list. Hover to the Renderer option, which will also open a side-menu. The content of this side-menu is the list of active Chromecast devices connected to your network.
-
- The final step is to select your preferred casting device depending on the media file you have opened on VLC. Finally, the selected media streaming device will play or showcase cast media.
If you are done casting, you can end the cast connection simply by closing your VLC media player.
Casting Media From Ubuntu to Chromecast Using Google Chrome
Our last candidate on the casting media tutorial is the Google Chrome browser. Its media casting potential strictly relates to online videos and not the ones stored on your Downloads folder. The steps to follow to achieve a successful media cast from Ubuntu's Google Chrome to Chromecast are as follows.
-
- The first step is obvious; you need to have your Google Chrome up and running on your Ubuntu OS. You should then find a video link that you prefer and open it from the Chrome browser.
-
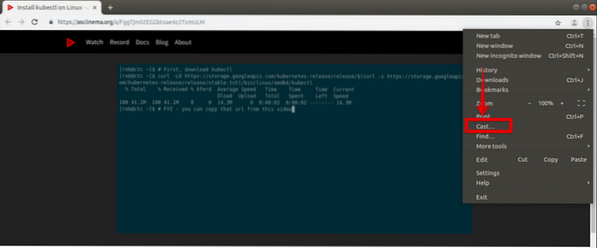
- On your browser's top-right corner, you will note three vertical dots representing the browser's menu. Click on the menu item and look through the available menu list.
-
- You should be able to identify the cast menu item on that menu list. Click on it, and your anticipated media cast event will begin.
-
- On the same top-right corner of your browser, besides the three vertical dots representing your browser's main menu, another icon should appear. It is the Chromecast icon (1). You should proceed and click on it with your computer's mouse or available pointing device. A pop-up menu will reveal itself with other menu items.
-
- The Chromecast menu you opened has two main options; casting device and casting source. On our end, we selected the Casting device (2), which is a TV. It will be the display device of our cast video link from the chrome browser. The casting source (3) is the cast tab selected from the sources drop-down menu. It is because we are casting the video media from google chrome's browser tab.
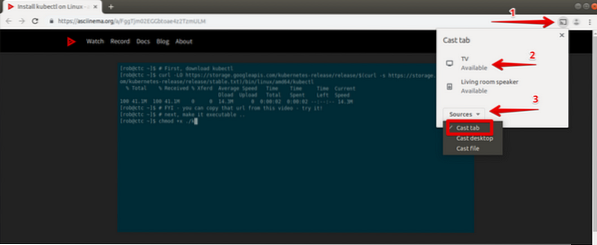
The active video link will cast or mirror its media content on the Chromecast device (TV) we chose to use. However, as for the casting source from the sources drop-down menu, the Chromecast device will, by default, go with the cast tab option if you do not make a selection.
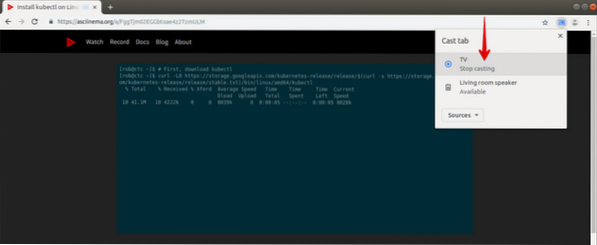
Finally, after you are done with the media casting experiment from your chrome browser, you might need to pull the plug. You can either close the tab with the active video link, or you can navigate to the Chromecast icon on the top-right window of your browser. You will find the stop casting option linked with the currently active casting device (TV) within its menu items.
Your media casting experiment from your beloved Ubuntu system to any Chromecast device is now complete. Successfully mastering these media casting techniques no longer makes it an experiment but an experience. You are now a jack of three trades involving the Ubuntu terminal, VLC media player, and Google Chrome browser media-casting prowess. You can now comfortably cast online and offline media regardless of whether they are on the internet or an external storage device.
Final Note
Several requirements have to be met for you to continue having a priceless Chromecast experience. If you want to try casting media with your mobile devices at one point, then Android 6.0 or later is the OS requirement for Android phones and tablets.
However, we primarily need to consider the hardware and broadcast requirements since they are tied to this article's main objective. HDCP is first on this list. It denotes High-bandwidth Digital Content Protection. The built-in HDCP for your TV needs to be version 1.3 or higher. If you want to cast media with 4K content, then the HDCP version needs to be at least 2.2. Moreover, other than the mentioned HDCP specs, your casting device (TV) should be 4K-capable. It would be best if you also considered working with at least a 20Mbps high-speed internet connection. If you are comfortable with an alternative to 4K content, an HDR-capable TV should meet your HDR (High Dynamic Range) content needs.


