First, let's install OpenCV:
pip3 install opencv-pythonRead and Show Images
The first thing we need to learn is to read and write images. Reading an image file, inputting the full path to the file or the file name (if the file is in the python folder), and adding a flag is done using cv2.imread(). The flag can take the value of 1 (for a color image), 0 (for grayscale), or -1 (for color image with channels). One can use the cv2.imshow() function to show the image; here, two arguments are passed - a name for the image and the image to show. Next, we use the cv2.waitKey() function to wait for a keyboard input; a 0 for the cv2.waitKey(0) function implies a permanent wait time. On the other hand, the cv2.destroyAllWindows() function will close the windows.
This will read and open an image, and keep the image open until you close it:
import cv2image = cv2.imread('LinuxLogo.jpg', 1)
cv2.imshow('image', image)
cv2.waitKey(0)
cv2.destroyAllWindows()
Write Images
We use the cv2.imwrite() function to save an image. This function takes two parameters - a name to save the image and the image you wish to save.
import cv2image = cv2.imread('identify.jpg', -1)
cv2.imwrite('save_image.png', image)
Capture Video from Webcam
To capture videos, we begin by initializing the cv2.VideoCapture() function. We then use a “while” loop to continue capturing the video. While the user doesn't press the exit key, we can read the frames and show them using the read() and cv2.imshow() function. We then put in a “break” key to exit the loop; in this case, the number 27 is the ESC key. If the user presses the ESC key, they break out from the loop. Once out of the loop, it is necessary to release the capture.
import numpy as npimport cv2
capture = cv2.VideoCapture(0)
while(True):
ret, frame = capture.read()
cv2.imshow('frame', frame)
if cv2.waitKey(1) & 0xFF == 27:
break
capture.release()
cv2.destroyAllWindows()
Playing a Video File
Playing a video file is like capturing a video from a webcam. To do this, the cv2.VideoCapture() function is used; the name of the video file you wish to play is then added to the function. The “while” loop is used again, and the exit key, in this case, is the “s” key on the keyboard. This will open and play the video file and closes it when the user presses the “s” key.
import numpy as npimport cv2
capture = cv2.VideoCapture("Megamind.avi")
while(True):
ret, frame = capture.read()
cv2.imshow('frame', frame)
if cv2.waitKey(1) & 0xFF == ord("s"):
break
capture.release()
cv2.destroyAllWindows()
Saving a Video File
Saving a video file requires a bit more work. The cv2.VideoWriter() function takes 4 parameters in total - the output file name, the FourCC code, the number of frames per second, and the frame size. Furthermore, one must specify the FourCC code, which is the video codec using the cv2.VideoWriter_fourcc() function. Using the capture.isOpened(), we read the frame and write the output frame. We can also show the frames using the cv2.imshow() function. Then, we use cv2.waitKey(1) & 0xFF == ord('s') to set an exit key. In this case, if the user presses the “s” key, they will exit the loop and then release the capture and the output and closes the windows.
import numpy as npimport cv2
capture = cv2.VideoCapture(0)
fourcc = cv2.VideoWriter_fourcc(*'XVID')
output = cv2.VideoWriter('output.avi',fourcc, 30.0, (640,480))
while(capture.isOpened()):
ret, frame = capture.read()
output.write(frame)
cv2.imshow('frame',frame)
if cv2.waitKey(1) & 0xFF == ord('s'):
break
capture.release()
output.release()
cv2.destroyAllWindows()
Drawing Lines, Circles, Rectangles, and Texts
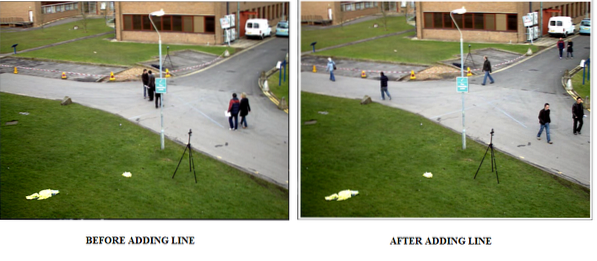
The first thing we will learn to draw is a line. To draw a line, we simply use the cv2.line() function. The function takes 5 arguments - the source video, the starting point, the ending point, the color, and the line's thickness. In the following case, we have decided to draw a rectangular border (made up of 4 lines):
import cv2capture = cv2.VideoCapture('vtest.avi')
while True:
ret, frame = capture.read()
width = int(capture.get(3))
height = int(capture.get(4))
line1 = cv2.line(frame, (0,0), (0,height), (255, 255, 255),10)
line2 = cv2.line(line1, (0, 0), (width,0),(255, 255, 255), 10)
line3 = cv2.line(line2, (0,height), (width, height), (255, 255, 255), 10)
line4 = cv2.line(line3, (width, 0), (width, height), (255, 255, 255), 10)
cv2.imshow('frame', line4)
if cv2.waitKey(40) == ord('q'):
break
capture.release()
cv2.destroyAllWindows()
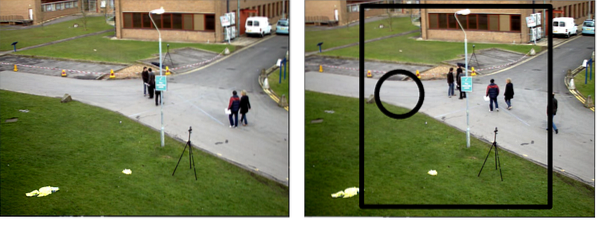
Next, we'll draw both a circle and a rectangle on the video. To draw a rectangle, we use the cv2.rectangle() function, which takes 5 arguments much like the line. To draw a circle, we use the function cv2.circle(), which also takes 5 arguments - the source video, the center point, the radius, the color, and the thickness.
import cv2capture = cv2.VideoCapture('vtest.avi')
while True:
ret, frame = capture.read()
width = int(capture.get(3))
height = int(capture.get(4))
rectangle = cv2.rectangle(frame, (150, 15), (650, 550), (0,0,0), 11)
cv2.circle(rectangle, (250, 250), 60, (0,0,0), 11)
cv2.imshow('frame', frame)
if cv2.waitKey(40) == ord('q'):
break
capture.release()
cv2.destroyAllWindows()
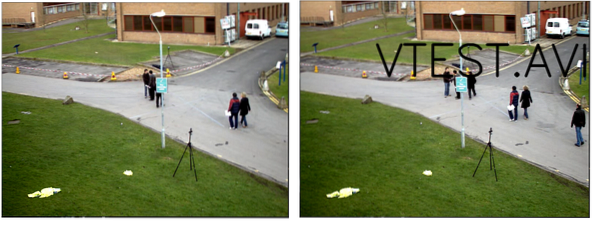
Now, let's add some text to the video we have. To do this, we need to specify a font; here, we chose cv2.FONT_HERSHEY_SIMPLEX. Once the font is selected, we can use the function cv2.putText() to do the rest. Cv2.putText() takes 8 arguments - the source video, the text you wish to write, the position where you want it, the font, the magnification, the color, the thickness, and cv2.LINE_AA (which makes everything looks better).
import cv2capture = cv2.VideoCapture('vtest.avi')
while True:
ret, frame = capture.read()
width = int(capture.get(3))
height = int(capture.get(4))
font = cv2.FONT_HERSHEY_SIMPLEX
image = cv2.putText(frame, "VTEST.AVI", (200, 200), font, 4, (0,0,0), 5, cv2.LINE_AA)
cv2.imshow('frame', image)
if cv2.waitKey(40) == ord('q'):
break
capture.release()
cv2.destroyAllWindows()
OpenCV is capable of many great things where one must begin somewhere. It could be learning to create and save images and videos. In this tutorial, we learned to do the very basics of computer vision.
Happy Coding!


